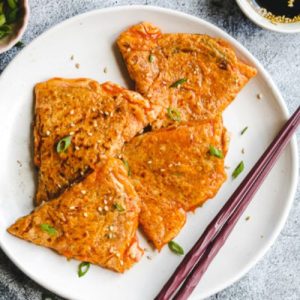
Vegan Kimchi Pancakes
Delightfully crispy and savory, these Vegan Kimchi Pancakes are a simple, plant-based Korean dish perfect for quick meals. Loaded with kimchi, scallions, and a light batter, they’re high in fiber, low in saturated fat, and can be paired with a tangy dipping sauce for maximum flavor. Ideal for weeknight dinners, light lunches, or meal prep.
Equipment
- 1 large mixing bowl
- 1 medium skillet or non-stick pan
- 1 spatula
- 1 small bowl (for dipping sauce)
- Measuring Cups and Spoons
Ingredients
For the Pancake:
- ½ cup all-purpose flour or gluten-free flour
- ¼ cup potato starch or rice flour
- ¼ tsp salt
- 1 cup kimchi chopped
- 2 scallions cut into 1-inch pieces
- 3 tbsp kimchi juice
- ⅓ –½ cup cold water
For the Dipping Sauce:
- 3 tbsp soy sauce
- 1 tbsp rice vinegar
- 1 tsp sesame oil
- 1 tsp sugar
- ½ –1 tsp chili oil
Instructions
- Prepare the Kimchi and Scallions: Begin by gathering your kimchi and scallions. Chop the kimchi into bite-sized pieces, making sure the pieces are uniform so they cook evenly. Slice the scallions into approximately 1-inch lengths, keeping both the white and green parts intact for flavor and color. Set them aside. Collect any leftover kimchi juice, as this will enhance the pancake’s tangy, savory depth.
- Mix the Dry Ingredients: In a large mixing bowl, combine ½ cup of all-purpose flour (or gluten-free flour if desired) with ¼ cup potato starch or rice flour. Sprinkle in ¼ teaspoon of salt to bring out the flavors of the kimchi and other ingredients. Use a whisk or fork to stir the dry ingredients thoroughly until they are evenly distributed and free of lumps.
- Combine Wet Ingredients with Dry: Add the chopped kimchi, scallions, and 3 tablespoons of reserved kimchi juice to the dry mixture. Slowly pour in ⅓ cup of cold water while gently stirring. Continue mixing until the batter becomes thick and cohesive, but still slightly fluid. If needed, gradually add up to ½ cup water to achieve a spreadable consistency that isn’t too runny or too stiff. Aim for a smooth batter that holds the ingredients evenly.
- Preheat the Pan: Place a medium or large non-stick skillet over medium-high heat. Allow it to preheat for 1–2 minutes until warm but not smoking. For a traditional crispy finish, lightly brush the pan with 1 teaspoon of oil. For an oil-free version, simply skip this step. A properly heated pan ensures the pancake develops a golden-brown crust without sticking.
- Cook the First Side of the Pancake: Pour all of the batter into the center of the pan, using a spatula to gently spread it into an even layer, roughly ½–¾ inch thick. Let it cook undisturbed for 3–4 minutes, or until the bottom is golden brown and the edges start to set. Avoid flipping too early to prevent the pancake from breaking.
- Flip the Pancake: Once the edges are firm and the underside is crispy, carefully slide a spatula under the pancake. Gently flip it over to cook the other side. Press lightly with the spatula if needed to ensure even contact with the pan. Cook for another 3–4 minutes until the second side is golden brown and the pancake is cooked through. The finished pancake should be crispy on the outside but chewy and tender inside.
- Prepare the Dipping Sauce: While the pancake is cooking, prepare the dipping sauce. In a small bowl, combine 3 tablespoons soy sauce, 1 tablespoon rice vinegar, 1 teaspoon sesame oil, 1 teaspoon sugar, and ½–1 teaspoon chili oil, depending on your spice preference. Stir until the sugar is dissolved and the ingredients are fully blended. Set aside until ready to serve.
- Serve the Pancake: Once the pancake is fully cooked, transfer it to a cutting board. Using a sharp knife, slice the pancake into 6–8 even pieces. Arrange on a serving plate and accompany with the prepared dipping sauce. For extra garnish, consider sprinkling with sesame seeds or additional chopped scallions. Serve immediately while hot and crispy for the best texture and flavor.
- Storage and Reheating Tips: If you have leftover pancakes, store them in an airtight container in the refrigerator for up to 2 days. To reheat, place them in a lightly oiled skillet over medium heat, cooking each side for 2–3 minutes until crispy again. The batter itself can also be prepared ahead of time and kept in the fridge for up to 2 days, ready to fry whenever convenient.
Notes
- For best results, use well-fermented kimchi with some of its juice; it adds tangy depth and enhances the pancake’s flavor.
- Adjust water carefully—too much makes the batter runny, too little results in a dense pancake. Aim for a thick, pourable consistency.
- Non-stick or cast-iron pans work best for crispy edges. Lightly oil the pan for a golden crust or skip oil for an oil-free version.
- Leftover pancakes reheat beautifully in a skillet rather than a microwave to maintain crispiness.
- Experiment with add-ins like finely chopped mushrooms or shredded carrots to increase fiber and nutrients while keeping the flavor balanced.