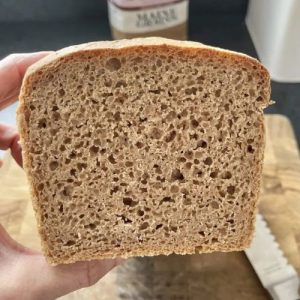
Spelt Bread
A soft, golden loaf with a subtly nutty flavor, this spelt bread is high in fiber and plant-based protein. Perfect for breakfast, sandwiches, or meal prep, it’s an easy, satisfying, and heart-healthy homemade bread option.
Equipment
- Large mixing bowl (1)
- Measuring cups (1 set)
- Measuring spoons (1 set)
- Spoon or spatula – 1
- 9×5 inch loaf pan – 1
- Clean dishcloth – 2
- Wire cooling rack – 1
- Oven (1)
Ingredients
- 3 ½ tsp instant yeast
- 1 ¾ cups warm water
- ½ tsp maple syrup
- 1 tsp salt
- 1 ¼ cups whole grain flour
- 2 ¼ cups spelt flour
Instructions
- Activate the Yeast: Begin by placing 3 ½ teaspoons of instant yeast into a large mixing bowl. Pour 1 ¾ cups of warm water over the yeast, ensuring the water is comfortably warm—not hot—to protect the yeast’s activity. Stir gently until the yeast fully dissolves, creating a foamy, slightly frothy mixture. This step is crucial to activate the yeast, ensuring your bread rises properly and develops a light, airy texture.
- Sweeten and Season the Base: Add ½ teaspoon of maple syrup to the yeast mixture. The natural sugar will give the yeast an extra boost, promoting better fermentation and a slightly sweet undertone in the bread. Follow this by adding 1 teaspoon of salt to the bowl. Stir gently to incorporate both ingredients evenly, which will balance the flavors and enhance the overall taste of your loaf.
- Combine Whole Grain Flour: Gradually add 1 ¼ cups of whole grain flour to the liquid mixture. Stir continuously with a spoon or spatula until the flour is fully absorbed, forming a smooth, wet batter. At this stage, the batter will still be quite loose and sticky, which is normal and necessary for a tender crumb. Ensuring the whole grain flour is evenly mixed lays the foundation for consistent texture throughout the loaf.
- Incorporate Spelt Flour: Next, add 2 ¼ cups of spelt flour to the bowl. Mix thoroughly until the dough begins to come together. The dough will still be slightly sticky, which is typical for spelt-based bread due to its lower gluten content. Use a light touch when stirring to avoid overworking the dough, which could make the bread dense instead of soft and fluffy.
- First Rise – Fermentation: Cover the mixing bowl with a clean dishcloth and place it in a warm, draft-free spot. Allow the dough to rest and rise for 45 minutes. During this time, the yeast will ferment, creating air pockets that give the bread its light and airy structure. The dough should increase in volume and feel slightly puffy when touched.
- Prepare the Loaf Pan: While the dough is rising, grease a 9×5-inch loaf pan with a small amount of oil or line it with parchment paper. This prevents sticking and ensures the bread releases easily after baking. Properly preparing your pan is a simple but important step that guarantees a perfect loaf shape.
- Shape and Second Rest: Once the dough has completed its first rise, gently transfer it into the prepared loaf pan. Avoid pressing too hard; simply shape it lightly to fit the pan. Cover the pan with a clean dishcloth and let it rest for another 20 minutes. This second rise, known as “proofing,” allows the dough to expand slightly, creating a soft and even crumb in the finished bread.
- Preheat the Oven: During the second rise, preheat your oven to 475°F (245°C). Heating the oven in advance ensures that the bread begins baking immediately at the right temperature, contributing to a crisp golden crust while keeping the interior soft.
- Initial High-Heat Bake: Place the loaf pan on the lower rack of the preheated oven. Bake at 475°F for 10 minutes. This high initial temperature helps the bread form a beautiful, golden-brown crust and gives it a slight oven spring, which means the loaf rises even more during the early minutes of baking.
- Reduce Temperature and Continue Baking: After 10 minutes, lower the oven temperature to 400°F (200°C). Continue baking for an additional 20 minutes. Check for a deep golden color on the crust, which indicates that the bread is fully baked. The loaf should sound hollow when tapped on the bottom, another sign that it’s perfectly cooked.
- Cooling the Bread: Remove the bread from the oven and carefully set the loaf pan on a wire cooling rack. Gently lift the bread out of the pan and allow it to cool completely on the rack. Cooling ensures the interior crumb sets properly, making it easier to slice and enhancing the overall flavor and texture.
- Serving and Enjoying: Once cooled, slice your homemade spelt bread and enjoy it as a wholesome breakfast, sandwich base, or snack. Its nutty flavor, soft crumb, and nutritious profile make it perfect for everyday meals or meal prep, giving you a healthy, fiber-rich option for any time of day.
Notes
- Using warm water (not hot) ensures the yeast activates without being damaged.
- Spelt flour has less gluten than regular wheat flour, so expect slightly stickier dough and a softer, tender crumb.
- Letting the dough rise twice—first in the bowl and then in the loaf pan—creates a light, airy texture.
- Avoid overmixing after adding spelt flour to prevent a dense loaf.
- Maple syrup is optional but adds a subtle sweetness that balances the nutty flavor of spelt.
- Cooling the bread completely before slicing prevents it from becoming gummy or squashed.