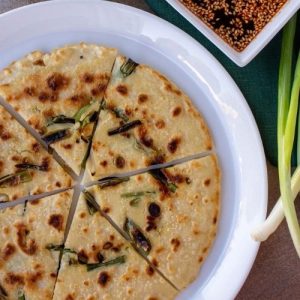
Quick Korean Scallion Pancakes
Crispy, golden, and full of fresh scallion flavor, this Korean Pajeon recipe is an easy, satisfying appetizer, snack, or side dish. Ready in just 40 minutes, these pancakes are packed with fiber, protein, and healthy fats, making them a delicious and wholesome addition to any meal. Serve with a tangy dipping sauce for the perfect bite.
Equipment
- 1 Small Mixing Bowl
- (1) Whisk
- 1 10-inch non-stick skillet
- 1 spatula
- 1 measuring cup
- 1 knife
- 1 cutting board
- Paper towels for draining
Ingredients
Dipping Sauce:
- 3 tablespoons soy sauce
- 1 tablespoon water
- 1 tablespoon unseasoned rice vinegar
- 1 teaspoon gochujang Korean chili paste
- 1 teaspoon toasted sesame seeds
- ½ teaspoon toasted sesame oil
Pajeon (Korean Scallion Pancakes):
- 1 ¾ cups 228 g all-purpose flour
- ¼ cup 25 g cornstarch
- 2 large eggs beaten
- 2 cups ice-cold water
- 1 teaspoon kosher salt
- 2 tablespoons vegetable oil for pan-frying
- 2 bunches scallions approx. 12, white and light green parts thinly sliced, dark green parts cut into 1-inch pieces
Instructions
- Prepare the Dipping Sauce: In a small mixing bowl, combine 3 tablespoons of soy sauce, 1 tablespoon of water, 1 tablespoon of unseasoned rice vinegar, 1 teaspoon of gochujang, 1 teaspoon of toasted sesame seeds, and ½ teaspoon of toasted sesame oil. Whisk all ingredients together until the mixture is smooth and well blended. Taste and adjust seasoning if desired—add a touch more gochujang for heat or a splash of vinegar for tang. Set aside at room temperature while preparing the pancakes. This sauce can also be made ahead and stored in the fridge for up to one week; bring it back to room temperature before serving for best flavor.
- Mix the Pancake Batter: In a large mixing bowl, combine 1 ¾ cups of all-purpose flour and ¼ cup of cornstarch. Add the two beaten eggs and gradually pour in 2 cups of ice-cold water. Sprinkle in 1 teaspoon of kosher salt. Using a whisk, gently stir the mixture until smooth. Be careful not to overmix; over-whisking can develop the gluten too much, resulting in a dense and chewy pancake. The batter should be slightly thinner than typical American pancake batter, pourable but still able to coat the scallions evenly.
- Chill the Batter: Cover the bowl with plastic wrap or a kitchen towel and place it in the refrigerator for 10 to 15 minutes. Chilling allows the flour to fully hydrate and helps create crispier pancakes. Cold batter also prevents the scallions from wilting during cooking, keeping them fresh and vibrant in color. After chilling, give the batter a quick stir to ensure it’s evenly mixed and smooth.
- Prepare the Scallions: While the batter rests, wash the scallions thoroughly under cold running water to remove any grit. Pat dry with a clean kitchen towel. Trim the root ends and remove any wilted or damaged parts. Slice the white and light green sections very thinly, almost like ribbons, and cut the dark green parts into 1-inch pieces. This ensures that every pancake has a perfect balance of tender, flavorful white sections and crisp green tops for visual appeal and taste.
- Heat the Pan: Place a 10-inch non-stick skillet over medium to medium-high heat. Add approximately ½ tablespoon of vegetable oil and allow it to heat until shimmering but not smoking. A properly heated pan is crucial for achieving a golden, crispy exterior while keeping the inside tender. Test the heat by flicking a drop of batter into the pan; it should sizzle immediately.
- Assemble the Pancake: Arrange a quarter of the prepared scallions evenly in the hot skillet. Pour about ¾ cup of batter over the scallions, spreading it gently with a spatula to create an even layer. The pancake should measure around 8 inches in diameter. Ensure the batter covers all scallions, creating a consistent thickness for uniform cooking.
- Cook the First Side: Allow the pancake to cook undisturbed for 4 to 6 minutes. Check occasionally, but avoid flipping too early. You’re looking for the bottom to turn a rich golden brown and the top to almost dry out. Adjust the heat if necessary: lower it slightly if the pancake is browning too fast or increase it if it’s cooking too slowly. This careful control prevents soggy or burnt pancakes.
- Flip the Pancake: Using a wide spatula, carefully slide under the pancake and flip it over. Cook the second side for 2 to 3 minutes, until it is golden and slightly blistered. Add a little more oil to the pan if needed. The second side cooks faster, so keep a close eye on it to avoid overcooking.
- Drain Excess Oil: Once cooked on both sides, transfer the pancake to a tray lined with paper towels. This step helps remove excess oil and ensures the pancake remains crisp and not greasy. Repeat the process with the remaining batter and scallions, adding oil to the pan as necessary for each batch.
- Cut and Serve: Allow the pancakes to rest for 1–2 minutes after cooking, then cut each pancake into 6 wedges or 9 squares. Arrange on a serving plate and serve immediately with the prepared dipping sauce. For an extra touch, sprinkle additional toasted sesame seeds on top for garnish. These pancakes are best enjoyed warm while crispy, though they can also be reheated in a dry skillet to regain their crunch.
- Reheating Leftovers (Optional): If you have leftovers, allow them to cool to room temperature, then layer them between parchment paper and store in an airtight container or Ziploc bag. Refrigerate for up to 3 days or freeze for up to 3 months. To reheat, place in a dry non-stick pan over medium heat, flipping halfway through, until both sides are crisp and hot. Avoid microwaving, as it will make the pancakes soggy.
Notes
- Use cold water for the batter: Ice-cold water helps the pancakes crisp up perfectly and prevents the scallions from wilting during cooking.
- Don’t overmix the batter: Over-whisking can make the pancakes tough. Mix until just combined; a few small lumps are fine.
- Adjust oil and heat carefully: Too little oil results in a soggy pancake, while too much heat burns it before the inside cooks. Medium heat is ideal.
- Rest the batter: Letting the batter chill for 10–15 minutes improves texture and creates crispier pancakes.
- Reheating works best in a skillet: Avoid microwaving leftovers to maintain crispness; a dry pan on medium heat brings back their original texture.