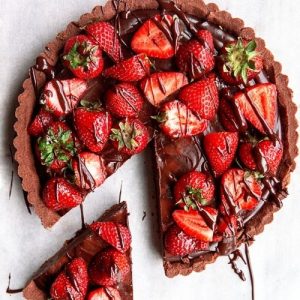
Healthy Chocolate Strawberry Tart
A crisp cocoa-infused crust holds a silky dark chocolate ganache, topped with fresh strawberries and optional chocolate glaze for a stunning finish. This tart combines indulgence with antioxidant-rich ingredients, making it both delicious and satisfying.
Equipment
- (1) Mixing bowl (medium)
- (1) Mixing bowl (large)
- 1 Electric hand mixer or stand mixer
- (1) Whisk
- 1 9-inch tart pan with removable bottom
- Plastic wrap (for chilling dough)
- 1 Knife (for chopping chocolate)
- 1 Saucepan (for double boiler base)
- 1 Heatproof bowl (for double boiler top)
- Measuring Cups and Spoons
- Spatula
Ingredients
For the Crust
- 1 ⅔ cups all-purpose flour
- ⅓ cup cocoa powder
- ¼ teaspoon salt
- 1 cup unsalted butter softened
- ½ cup powdered sugar
- 1 teaspoon vanilla extract
For the Filling
- 12 ounces dark chocolate finely chopped
- 1 cup heavy whipping cream
- 4 tablespoons unsalted butter room temperature
- ½ pound fresh strawberries about 225 g, rinsed and hulled
For the Glaze (optional)
- 2 tablespoons heavy whipping cream
- 1.75 ounces dark chocolate finely chopped
- 1 teaspoon corn syrup
- 1 tablespoon warm water
Instructions
- Prepare the Dry Ingredients for the Crust: Begin by whisking together the all-purpose flour, cocoa powder, and salt in a medium mixing bowl. This step ensures that the cocoa is evenly distributed throughout the flour and prevents clumps in your dough. Whisking also aerates the mixture slightly, which helps create a crust with a tender, crumbly texture. Set this dry mixture aside for now.
- Cream Butter and Sugar for the Base: In a large mixing bowl, use an electric hand mixer or stand mixer to beat the softened butter with powdered sugar until the mixture becomes light and fluffy. This process incorporates air into the butter, creating a smooth and creamy base that will give the crust a melt-in-your-mouth quality. The sugar should no longer feel grainy, and the mixture should appear pale in color.
- Add Vanilla and Blend Flavors: Once the butter and sugar are well combined, mix in the vanilla extract. This step may seem small, but vanilla adds a warm, aromatic note that enhances both the chocolate in the crust and the filling. Blend just until incorporated to avoid overworking the mixture.
- Incorporate the Dry Ingredients into the Dough: With your mixer on the lowest speed, gradually add the prepared flour-cocoa mixture to the creamed butter mixture. Mix just until the dough starts to come together, being careful not to overmix, as this can lead to a dense crust. The dough should be soft but not sticky, holding together easily when pressed between your fingers.
- Shape and Chill the Dough: Using clean hands, gather the dough into a smooth ball. Wrap it tightly in plastic wrap to prevent it from drying out and place it in the refrigerator for at least 30 minutes. Chilling is essential because it allows the butter to firm up, making the dough easier to press into the tart pan and helping the crust hold its shape during baking.
- Prepare the Tart Pan and Oven: While the dough is chilling, preheat your oven to 350°F (175°C). Lightly grease a 9-inch tart pan with a removable bottom, ensuring that both the base and sides are coated to prevent sticking. Greasing also helps release the tart easily once baked.
- Press the Dough into the Tart Pan: After chilling, unwrap the dough and place it directly into the prepared tart pan. Using your fingertips, gently press the dough evenly across the bottom and up the sides of the pan. Aim for an even thickness to ensure uniform baking. Use a knife or the flat edge of a spatula to trim and smooth the top edges, creating a neat and professional-looking finish.
- Bake and Cool the Crust: Place the pan in the preheated oven and bake the crust for 15 minutes. During baking, the dough may puff up slightly, which is normal. If this happens, use the back of a spoon to gently press the crust back into place while it’s still warm. Remove from the oven and allow the crust to cool completely in the pan. Cooling prevents the warm crust from melting the ganache filling when added later.
- Prepare the Chocolate Ganache Filling: Set up a double boiler by bringing a small saucepan of water to a gentle simmer and placing a heatproof bowl on top, ensuring the bottom does not touch the water. Add the finely chopped dark chocolate and heavy cream into the bowl. Stir constantly with a whisk or spatula until the chocolate melts completely and the mixture is smooth and glossy. This gentle heating method prevents the chocolate from scorching.
- Enrich the Ganache with Butter: Once the chocolate and cream are smooth, remove the bowl from heat and immediately whisk in the room-temperature butter. The butter adds silkiness and richness to the ganache, giving it a luxurious mouthfeel. Whisk until the butter is fully melted and the ganache has a shiny finish.
- Fill and Chill the Tart: Pour the prepared ganache into the cooled tart crust, using a spatula to spread it evenly across the base. Place the tart in the refrigerator and allow it to chill for 1 to 2 hours, or until the ganache is fully set. This chilling time ensures that the filling is firm enough to slice cleanly but still creamy and smooth when served.
- Top with Fresh Strawberries: Once the ganache has set, arrange fresh strawberries on top of the tart. You can place them whole for a dramatic effect, slice them for a more delicate look, or even create decorative patterns. The natural sweetness and juiciness of the strawberries balance the richness of the chocolate filling beautifully.
- Prepare the Optional Chocolate Glaze: If you’d like to add an elegant glossy finish, make the glaze. Heat the heavy cream in a small saucepan until it just begins to simmer, then pour it over the finely chopped dark chocolate in a heatproof bowl. Stir until smooth and shiny, then whisk in the corn syrup and warm water. The corn syrup adds sheen, while the water thins the glaze slightly for easy drizzling.
- Garnish and Serve: Drizzle the prepared glaze over the strawberries and ganache, allowing it to cascade naturally for a beautiful presentation. Slice the tart with a sharp knife, wiping the blade between cuts for clean slices. Serve chilled or at room temperature.
Notes
- Use high-quality chocolate for both the ganache and optional glaze. The richness and smoothness of your chocolate directly affect the final taste and texture of the tart. Opt for chocolate with at least 70% cacao for depth and complexity.
- Chill the dough properly before baking. This ensures the crust holds its shape and bakes evenly without shrinking.
- For best results, finely chop the chocolate before melting. Larger chunks take longer to melt and can overheat, causing a grainy texture.
- Fresh strawberries work best for topping, but if using frozen, ensure they are drained and patted dry to prevent excess moisture from softening the ganache.
- The optional chocolate glaze is purely for presentation, but it adds a professional shine that impresses guests without adding much effort.