Indulge in the creamy, melt-in-your-mouth goodness of white chocolate fudge that’s unbelievably simple to make!
With just three main ingredients, this sweet treat is quick, fuss-free, and perfect for satisfying your dessert cravings.
Rich in protein from condensed milk and offering a small boost of calcium, it’s an easy, everyday indulgence that delights both kids and adults alike.
White Chocolate Fudge
Equipment
- 1 × 8×8-inch baking dish
- 1 × nonstick saucepan
- 1 × spatula or wooden spoon
- Parchment paper to line the pan
- 1 × sharp knife
Ingredients
- 3 cups white chocolate chips
- 14 oz sweetened condensed milk
- ⅛ teaspoon sea salt
- Sprinkles optional, for garnish
Instructions
- Prepare the Pan: Line an 8×8-inch baking dish with parchment paper, ensuring the paper slightly overhangs the edges. This will make it easy to lift the fudge out once it has set. Set the prepared pan aside while you work on melting the chocolate.
- Melt the Chocolate: Place the white chocolate chips in a large, nonstick saucepan over low heat. Stir continuously to ensure the chocolate melts evenly and does not scorch. Once the chocolate is smooth and glossy, sprinkle in the sea salt and stir well to incorporate.
- Combine with Condensed Milk: Remove the saucepan from the heat immediately and pour in the sweetened condensed milk. Gently fold the mixture together until fully combined, taking care not to overmix. The mixture should be thick but pourable at this stage.
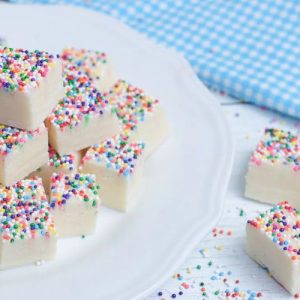
- Pour into Pan: Transfer the fudge mixture into the prepared pan, using a spatula to smooth it into an even layer. If desired, press sprinkles gently onto the top for a decorative touch. Work quickly, as the fudge will begin to firm up as it cools.
- Chill to Set: Cover the pan and refrigerate for at least 1 hour, or until the fudge is completely firm to the touch. This step ensures clean, precise squares when cutting.
- Cut and Serve: Lift the fudge from the pan using the parchment overhang. Using a sharp knife, slice it into 1-inch squares. Serve immediately, or store in an airtight container at room temperature for easy snacking.
Notes
- Use high-quality white chocolate for the smoothest, creamiest fudge.
- Stir constantly while melting to avoid scorching or clumping.
- Sea salt balances the sweetness—don’t skip it!
- Optional sprinkles add a fun color contrast but aren’t necessary.
- Chill completely before slicing to ensure clean, uniform squares.
- Store in an airtight container to keep fudge soft and fresh.
- For a richer flavor, try adding a splash of vanilla extract.
- A nonstick saucepan makes stirring easier and reduces sticking.
Chef’s Secrets for Perfect Fudge
The key to creamy white chocolate fudge lies in gentle heat and timing.
Melt the chocolate slowly over low heat, stirring constantly to prevent burning.
Adding the sweetened condensed milk off the heat ensures a silky texture without seizing.
Using a spatula to spread the mixture evenly helps achieve a smooth surface.
For extra flair, press sprinkles lightly onto the top before chilling—the fudge sets around them, creating a professional, polished look.
Small touches like high-quality ingredients or a pinch of salt can transform simple fudge into an indulgent treat.
Serving Suggestions for White Fudge
This fudge is versatile and pairs beautifully with a variety of treats.
Serve it as a sweet finish after dinner alongside fresh berries or a dollop of whipped cream.
It also works perfectly in dessert platters, gift boxes, or snack trays for parties.
You can cut it into smaller bite-sized pieces for afternoon snacks or wrap squares individually for lunchbox treats.
The subtle sweetness makes it a crowd-pleaser without overpowering other desserts.
Storage Tips to Keep Fudge Fresh
Proper storage is essential to maintain the creamy texture of your fudge.
Keep it in an airtight container at room temperature for up to one week.
For longer storage, refrigerate the fudge—it will last up to two weeks and maintain firmness.
Avoid storing in direct sunlight or warm areas, as heat can soften the fudge too much.
When stacking layers, place parchment paper between layers to prevent sticking.
Fudge can also be frozen for up to three months; thaw at room temperature before slicing for best results.
Frequently Asked Questions
1. Can I use a different type of chocolate?
Yes! While white chocolate is classic for this recipe, you can substitute milk or semi-sweet chocolate.
Keep in mind that darker chocolate will change the sweetness level and may slightly alter the texture.
2. Do I have to use sweetened condensed milk?
Sweetened condensed milk is essential for this recipe’s creamy, smooth texture.
Using alternatives like evaporated milk or cream may require additional sugar or adjustments to achieve the same consistency.
3. How can I prevent fudge from sticking to the knife?
Warm the knife slightly under hot water and wipe it dry before slicing.
This helps make clean cuts and prevents the fudge from sticking or tearing.
4. Can I add flavors or mix-ins?
Absolutely! Consider vanilla extract, citrus zest, chopped nuts, or mini chocolate chips.
Mix-ins should be folded in gently after combining the chocolate and condensed milk to preserve the smooth texture.
5. Can I make fudge ahead of time?
Yes, this fudge is perfect for prepping in advance.
Store it in an airtight container, chilled or at room temperature, and slice just before serving for a fresh, homemade treat anytime.
