All products are selected by our editorial team for quality. If you buy through our links, we may earn a small commission at no extra cost to you.
When the sun is shining and the temperatures rise, nothing beats the indulgence of a bowl of homemade ice cream.
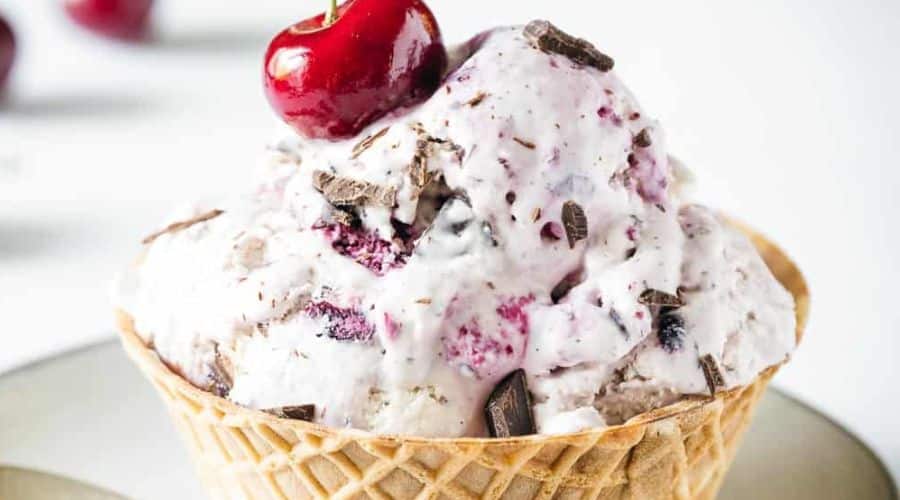
This Vanilla Cherry Ice Cream recipe combines two beloved flavors: the rich, creamy smoothness of vanilla and the sweet-tart burst of fresh cherries.
The pairing is simply irresistible, offering a delightful balance that’s perfect for cooling off during the hot summer months or satisfying your dessert cravings all year long.
Making your own ice cream at home is surprisingly easy and rewarding.
With just a handful of ingredients and a little time, you can create a refreshing treat that’s far superior to anything you’ll find in the store.
The natural sweetness of the cherries swirled into the creamy vanilla base makes every bite an experience.
Whether served in a cone or as a decadent sundae, this homemade vanilla cherry ice cream is sure to become a favorite in your dessert repertoire.

Ingredients for Vanilla Cherry Ice Cream
For a creamy, flavorful homemade ice cream, it’s essential to start with high-quality ingredients.
Here’s a breakdown of everything you’ll need to make Vanilla Cherry Ice Cream at home:
Vanilla Ice Cream Base
The heart of this recipe is the smooth and creamy vanilla base, which forms the perfect canvas for the vibrant cherry swirl. The main ingredients are:
- Heavy Cream – This adds richness and creaminess to the ice cream, making it thick and indulgent.
- Whole Milk – Whole milk balances the richness of the cream, providing a smooth texture without being too heavy.
- Granulated Sugar – A touch of sugar is essential to bring out the flavors of both the vanilla and cherries, while also ensuring the ice cream has the proper texture.
- Vanilla Extract – A good-quality vanilla extract gives the ice cream its aromatic, comforting flavor.
You can also add a pinch of salt to enhance the flavors and balance the sweetness, as well as a dash of lemon juice for a subtle tang.
Fresh or Frozen Cherries
The cherries provide the fruity punch in this ice cream, and choosing the right cherries is crucial. You can opt for fresh, pitted cherries if they’re in season or use frozen cherries for year-round availability. Here’s how to handle each type:
- Fresh Cherries: If you’re using fresh cherries, make sure to pit them and chop them into smaller pieces for an even distribution throughout the ice cream.
- Frozen Cherries: These are convenient and work perfectly in this recipe. Just let them thaw slightly before chopping, as they tend to be a little firmer than fresh ones.
Optional Ingredients for Extra Flavor
While the base of the ice cream and cherries is already flavorful, you can enhance the taste and texture with a few additions:
- Vanilla Bean: For a more intense vanilla flavor, consider using a vanilla bean instead of, or alongside, vanilla extract. Scrape out the seeds and add them to the cream mixture for a richer taste.
- Lemon Juice: A splash of lemon juice can elevate the sweetness of the cherries and provide a refreshing citrus note that complements the creaminess of the vanilla.
With these ingredients in hand, you’re ready to create a smooth, creamy, and fruity ice cream that will make everyone ask for seconds!
Tools You’ll Need for Making Vanilla Cherry Ice Cream
To make your Vanilla Cherry Ice Cream at home, you’ll need a few essential tools that will help ensure everything comes together smoothly.
Here’s a list of what you’ll need:
Ice Cream Maker
An ice cream maker is the most important tool for this recipe.
It churns the ice cream base as it freezes, which helps incorporate air and ensures a creamy, smooth texture. There are a few different types of ice cream makers:
- Electric Ice Cream Makers: These are ideal if you’re looking for a hassle-free method. Simply pour in the chilled mixture, turn it on, and let the machine do all the work.
- Manual Ice Cream Makers: These require a little more effort, but they can still yield excellent results. With a manual machine, you’ll need to crank it by hand, which can be a fun process if you’re making ice cream with family or friends.
If you don’t own an ice cream maker, you can still make this recipe using the no-churn method. We’ll discuss this alternative in a later section.
Mixing Bowls
You’ll need a couple of mixing bowls: one for preparing the vanilla ice cream base and another for preparing the cherries.
Opt for large bowls so you can comfortably mix the ingredients.
Whisk and Spatula
A whisk will be useful for blending the cream, milk, sugar, and vanilla together into a smooth base.
A spatula will come in handy when you’re scraping down the sides of the bowl or folding in the cherry mixture.
Measuring Cups and Spoons
Accurate measurements are key for ensuring the perfect consistency of your ice cream.
Have your measuring cups and spoons on hand for the milk, cream, sugar, and vanilla extract.
Storage Container
Once your ice cream is churned and ready, you’ll need a storage container to freeze it.
Choose a shallow, airtight container that allows the ice cream to freeze evenly.
For the best results, use a container made of metal or glass, as these retain the cold better than plastic.
Step-by-Step Instructions for Vanilla Cherry Ice Cream

Making homemade Vanilla Cherry Ice Cream is a fun and rewarding process.
Follow these step-by-step instructions for a creamy, flavorful treat:
Step 1: Prepare the Vanilla Ice Cream Base
Start by making the vanilla base, which will form the foundation of your ice cream.
In a large mixing bowl, combine the following:
- Heavy Cream (2 cups)
- Whole Milk (1 cup)
- Granulated Sugar (3/4 cup)
- Vanilla Extract (1 tablespoon)
Whisk the ingredients together until the sugar is completely dissolved, creating a smooth and well-blended mixture.
If you’re using a vanilla bean, scrape the seeds from the pod and stir them into the cream mixture for a more intense vanilla flavor.
Once the base is mixed, cover the bowl and place it in the refrigerator for at least 1–2 hours, or until it is thoroughly chilled.
This step ensures that the ice cream churns to the perfect consistency.
Step 2: Prepare the Cherries
While your ice cream base is chilling, it’s time to prepare the cherries.
You can use either fresh cherries or frozen cherries, depending on what you have available.
- Fresh Cherries: Pit and chop the cherries into bite-sized pieces. You can leave them slightly chunky for a more rustic texture, or chop them finely if you prefer a smoother consistency in the ice cream.
- Frozen Cherries: Let the frozen cherries thaw for a few minutes until they’re soft enough to chop. If you’re using frozen cherries, you might want to chop them smaller, as they’re often firmer than fresh ones.
Once chopped, transfer the cherries to a bowl and sprinkle them with about 1-2 tablespoons of sugar.
This will help draw out their juices and enhance their sweetness.
Let them sit for about 10–15 minutes, allowing the sugar to work its magic and create a bit of a cherry syrup.
Step 3: Combine Vanilla Base with Cherries
After the vanilla base has chilled, it’s time to add the cherry goodness.
Stir the macerated cherries (along with any juice that has formed) into the chilled vanilla ice cream base.
Ensure that the cherries are evenly distributed, but be careful not to over-mix so you don’t lose that marbled effect.
Step 4: Churn the Ice Cream
Now, it’s time to churn the ice cream. Pour the cherry-vanilla mixture into your ice cream maker.
Follow the manufacturer’s instructions, but typically, it will take about 20–30 minutes of churning for the ice cream to reach a soft-serve consistency.
If you’re using a manual ice cream maker, you will need to crank the handle regularly until the ice cream thickens to the desired texture.
The more you churn, the creamier your ice cream will be!
Step 5: Freeze the Ice Cream
Once the ice cream has reached a soft-serve consistency, transfer it to your storage container.
Smooth the top with a spatula, and place the container in the freezer.
Let the ice cream freeze for at least 4–6 hours, or overnight, for the best texture. The freezing time helps the ice cream firm up into a scoopable consistency.
If you want to add extra cherries or a swirl of cherry sauce, you can gently fold these into the ice cream at this stage before freezing.
This will create an extra burst of flavor in every bite.
Tips for the Perfect Vanilla Cherry Ice Cream
Creating the perfect batch of Vanilla Cherry Ice Cream is all about balancing flavors, textures, and ingredients.
Here are some helpful tips to elevate your ice cream-making process:
1. Balance the Sweetness
Cherries can range from sweet to tart depending on the variety and ripeness.
When preparing your cherries, taste them first to determine how much sugar to add.
If they’re very sweet, you may want to reduce the sugar you use in both the cherries and the base.
On the other hand, if they’re tart, you can add a little more sugar to bring out the natural sweetness.
2. Macerate the Cherries
Macerating the cherries with sugar before adding them to the ice cream base is crucial for enhancing the flavor. Let the cherries sit with the sugar for at least 15 minutes.
This draws out their juices, giving the ice cream a beautiful swirl of cherry syrup that makes each bite extra flavorful.
3. Don’t Overmix
While combining the vanilla base with the cherries, be sure not to overmix.
You want to maintain that marbled look where the vanilla and cherry swirl together, rather than completely blending them into one uniform color.
This adds a delightful visual appeal and a fun texture to the ice cream.
4. Chill the Base Properly
To achieve a creamy texture, it’s important that the vanilla base is well-chilled before churning.
The colder the base, the smoother the ice cream will churn.
Aim to refrigerate the mixture for at least 1–2 hours (or even overnight) to give it the best chance of freezing evenly and forming a rich consistency.
5. Serve Immediately or Let It Firm Up
For a softer, creamier consistency, serve your vanilla cherry ice cream immediately after churning.
If you prefer it firmer, allow it to freeze for an additional 4–6 hours.
This is a personal preference, so feel free to adjust the freezing time based on how you like your ice cream!
Variations of Vanilla Cherry Ice Cream
Once you’ve mastered the classic Vanilla Cherry Ice Cream, there are several ways you can modify the recipe to suit your tastes or dietary preferences.
Here are a few variations:
1. Chocolate Chip Vanilla Cherry Ice Cream
If you love a bit of chocolate with your cherries, try adding some dark chocolate chips or chopped chocolate to the ice cream during the final mixing stage.
The rich, slightly bitter chocolate pairs beautifully with the sweetness of the cherries and the creamy vanilla base.
2. Vegan Vanilla Cherry Ice Cream
For a dairy-free version, you can easily swap out the cream and milk for coconut milk or almond milk, and the heavy cream for coconut cream.
You can also use a plant-based sweetener like maple syrup or agave nectar.
This creates a rich, coconutty version of vanilla cherry ice cream that’s just as delicious as the traditional one.
3. No-Churn Vanilla Cherry Ice Cream
If you don’t have an ice cream maker, this no-churn recipe is for you.
Simply whip the heavy cream and sweetened condensed milk together until stiff peaks form, then fold in the vanilla and cherries.
Freeze for 4-6 hours, and you’ve got a simple and tasty version of homemade ice cream.
4. Almond and Cherry Swirl Ice Cream
Add some toasted almonds to the mixture, either chopped or slivered, for a delightful crunch.
The nutty flavor pairs wonderfully with both the vanilla and cherry, giving the ice cream a slightly different texture and an added layer of flavor.
5. Cherry Cheesecake Ice Cream
For a richer, tangier twist, incorporate some cream cheese into the vanilla base, blending it in to create a cheesecake-like flavor.
Swirl the cherry mixture through the ice cream for a delicious cherry cheesecake effect.
Conclusion: Savor Every Bite of Homemade Vanilla Cherry Ice Cream
There’s nothing quite like homemade ice cream, and Vanilla Cherry Ice Cream offers a delightful balance of creamy vanilla and sweet-tart cherries in every bite.
Whether you make it on a sunny afternoon or as a special treat for your family, this simple yet indulgent recipe is sure to impress.
The best part? You can customize it to your liking, adding a personal touch that makes it even more special.
Enjoy the process of making this creamy dessert, and don’t forget to share your homemade creations with friends and family.
This ice cream is the perfect way to celebrate any occasion, big or small, and will leave everyone asking for seconds!
Frequently Asked Questions (FAQs)
1. Can I use frozen cherries instead of fresh ones?
Yes, you can definitely use frozen cherries in this recipe.
Just allow them to thaw slightly before chopping, as they tend to be firmer than fresh cherries.
Macerate them with sugar as you would with fresh cherries to draw out their juices.
2. How long does homemade ice cream last in the freezer?
Homemade ice cream can last up to 2–3 weeks in the freezer.
However, it’s best enjoyed within the first week for optimal texture and flavor.
If the ice cream becomes too hard in the freezer, let it sit at room temperature for a few minutes before scooping.
3. Can I make this recipe without an ice cream maker?
Yes, you can make a no-churn version of this ice cream.
Simply whip the heavy cream until stiff peaks form, then fold in the condensed milk, vanilla, and cherries.
Freeze for several hours until firm.
4. How can I prevent ice crystals from forming in my homemade ice cream?
To avoid ice crystals, make sure the ice cream base is well-chilled before churning.
Also, try not to leave the ice cream out for too long when serving.
The faster the ice cream freezes and the less exposure it has to air, the creamier the texture will be.
5. Can I add other fruits to this ice cream?
Absolutely! Feel free to experiment with other fruits, such as strawberries, raspberries, or blueberries.
Just be sure to adjust the sweetness according to the fruit you’re using, and always macerate the fruit before adding it to the base to enhance its flavor.

Vanilla Cherry Ice Cream
Equipment
- 1 Ice Cream Maker (electric or manual)
- (1) Whisk
- (1) Mixing bowl (large)
- 1 Measuring Cup (for liquids)
- 1 Measuring spoons
- 1 spatula
- 1 – Storage Container (Airtight for freezing)
Ingredients
- 2 cups – Heavy Cream
- 1 cup – Whole Milk
- 3/4 cup – Granulated Sugar
- 1 tablespoon – Vanilla Extract
- 1 cup – Fresh or Frozen Cherries pitted and chopped
- 1 –2 tablespoons – Sugar for macerating cherries
Optional:
- 1 Vanilla Bean if using instead of extract
- 1 tablespoon – Lemon Juice optional for added flavor balance
Instructions
Prepare the Vanilla Ice Cream Base:
- In a large mixing bowl, whisk together the heavy cream, whole milk, granulated sugar, and vanilla extract (or vanilla bean seeds if using). Stir until the sugar is completely dissolved. If using a vanilla bean, scrape the seeds from the pod and add them to the mixture.
Chill the Base:
- Cover the bowl with plastic wrap and place it in the refrigerator for 1–2 hours or until the mixture is thoroughly chilled.
Prepare the Cherries:
- Pit and chop the cherries into bite-sized pieces. Sprinkle with 1–2 tablespoons of sugar and let sit for about 15 minutes to macerate. This helps release the juices and enhances the cherry flavor.
Combine the Cherry Mixture with the Vanilla Base:
- Once the vanilla base is chilled, fold in the macerated cherries (and any juice they’ve released) into the base. Mix gently to create a beautiful swirl of cherry throughout the vanilla.
Churn the Ice Cream:
- Pour the mixture into your ice cream maker and churn according to the manufacturer’s instructions.This typically takes about 20–30 minutes, or until the ice cream reaches a soft-serve consistency.
Freeze the Ice Cream:
- Transfer the churned ice cream into a shallow, airtight storage container. Smooth the top with a spatula and freeze for at least 4–6 hours, or overnight, to firm up.
Serve and Enjoy:
- Once the ice cream has frozen and reached the desired consistency, scoop into bowls or cones and enjoy! Garnish with extra cherries if desired.
Notes
- Using Frozen Cherries: Frozen cherries work just as well as fresh ones. Allow them to thaw slightly before chopping and macerating them with sugar.
- Customizing Sweetness: Taste the cherries before adding sugar to adjust for sweetness. If using very sweet cherries, you can reduce the amount of sugar in both the cherry mixture and the base.
- Churning Tip: The more you churn, the creamier your ice cream will be. Make sure to follow the ice cream maker’s instructions for the best results.
- No Ice Cream Maker: For a no-churn option, whip the cream to stiff peaks, fold in the sweetened condensed milk, vanilla, and cherries, then freeze. The texture will be slightly different but still delicious.


