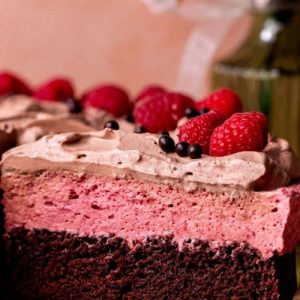
Indulge in this luscious Chocolate Raspberry Mousse Cake, a perfect balance of rich chocolate and tangy raspberry flavors.
With a moist cocoa cake base, light vanilla-infused raspberry mousse, and a topping of chocolate whipped cream, this dessert satisfies cravings without overwhelming.
High in protein from dairy and packed with antioxidants from raspberries, it’s an approachable, elegant treat for everyday baking.
Raspberry Chocolate Mousse Cake
Equipment
- 9-inch springform pan ×1
- Parchment paper ×2 sheets
- Mixing bowls ×2
- Electric mixer with whisk attachment ×1
- Rubber spatula ×1
- Serrated knife ×1
- Offset spatula ×1
Ingredients
Chocolate Cake:
- 1 cup all-purpose flour
- 2 tbsp cornstarch
- 1/2 cup unsweetened cocoa powder Dutch-processed preferred
- 1 tsp baking powder
- 1/2 tsp baking soda
- 1/2 tsp salt
- 1/2 cup vegetable or canola oil
- 1/2 cup granulated sugar
- 1/3 cup packed brown sugar light or dark
- 2 large eggs room temperature
- 1 tsp pure vanilla extract
- 1 tsp white vinegar
- 1/2 cup buttermilk room temperature
- 1/3 cup sour cream or Greek yogurt room temperature
- 1/2 cup hot water steaming
Raspberry Mousse:
- 3.4 oz vanilla pudding mix
- 1 cup cold milk
- 1/3 cup freeze-dried raspberries ground
- 2 cups heavy cream
- 1 tsp pure vanilla extract
Chocolate Whipped Cream:
- 1 cup heavy cream
- 1/4 cup powdered sugar
- 2 tbsp unsweetened cocoa powder
- 1 tsp pure vanilla extract
Instructions
- Prepare the Baking Pan: Begin by preparing your 9-inch springform pan. Spray the bottom and sides lightly with baking spray to prevent sticking. Cut a circle of parchment paper to fit the bottom of the pan and place it inside, then spray the parchment lightly. This ensures your cake will release perfectly after baking without any damage to the edges.
- Mix Dry Ingredients for the Cake: In a medium mixing bowl, sift together 1 cup all-purpose flour, 2 tablespoons cornstarch, 1/2 cup unsweetened cocoa powder, 1 teaspoon baking powder, 1/2 teaspoon baking soda, and 1/2 teaspoon salt. Sifting removes lumps and aerates the flour, which helps create a tender, fluffy cake.Stir gently with a whisk to combine evenly, then set aside.
- Combine Wet Ingredients for the Cake: In a separate large mixing bowl, pour 1/2 cup vegetable or canola oil, 1/2 cup granulated sugar, and 1/3 cup packed brown sugar. Add 2 large room-temperature eggs, 1 teaspoon pure vanilla extract, 1 teaspoon white vinegar, 1/2 cup room-temperature buttermilk, and 1/3 cup sour cream or Greek yogurt. Whisk thoroughly until the mixture is smooth and uniform. This step ensures your cake is moist and well-flavored.
- Incorporate Hot Water and Dry Ingredients: Slowly pour 1/2 cup steaming hot water into the wet ingredients while whisking constantly. The hot water helps bloom the cocoa powder and gives the cake a richer chocolate flavor. Gradually fold in the dry ingredient mixture using a spatula or whisk, mixing until just combined. The batter should be smooth, pourable, and silky.
- Bake the Chocolate Cake: Pour the prepared batter into the springform pan and spread it evenly with a spatula. Place the pan in a preheated oven at 350°F (175°C) and bake for 30–37 minutes. Test doneness by inserting a toothpick in the center; it should come out clean or with just a few moist crumbs. Let the cake rest in the hot pan for 10 minutes to set, then transfer to a cooling rack. Allow it to cool completely before adding the mousse layer.
- Prepare the Springform Pan for Mousse: While the cake cools, prepare the pan for the raspberry mousse layer. Clean the springform pan and spray lightly again. Cut a 9×16-inch sheet of parchment paper in half. Place the two halves vertically inside the pan to create a collar around the inner edge. Trim the top slightly if it sticks out above the pan. This collar will contain the mousse as it sets.
- Whip the Cream for Mousse: In a metal mixing bowl, combine 2 cups heavy cream and 1 teaspoon pure vanilla extract. Using a whisk attachment on high speed, beat until stiff peaks form. Be careful not to over-whip; the cream should be light, fluffy, and hold its shape when lifted. Set aside for folding into the raspberry pudding mixture.
- Prepare the Raspberry Pudding: In a separate bowl, whisk together 3.4 ounces vanilla pudding mix and 1 cup cold milk on high speed for 1 minute until smooth. Stir in 1/3 cup ground freeze-dried raspberries until fully combined. The mixture will thicken considerably, forming a rich raspberry base.
- Fold Whipped Cream into Raspberry Pudding: Gently fold the whipped cream into the raspberry pudding using a rubber spatula. Do this slowly and in sections, lifting from the bottom and turning over, to maintain the light and airy texture. It may take a few minutes, but patience ensures the mousse is smooth, creamy, and well incorporated.
- Assemble Cake and Mousse: Trim the dome from the top of the cooled chocolate cake with a serrated knife to create a flat surface. Place the cake in the prepared springform pan with the parchment collar. Spoon the raspberry mousse evenly over the cake, smoothing the top with an offset spatula. Cover and chill for at least 6 hours or overnight to allow the mousse to set completely.
- Prepare Chocolate Whipped Cream Topping: In a clean metal bowl, combine 1 cup heavy cream, 1/4 cup powdered sugar, 2 tablespoons unsweetened cocoa powder, and 1 teaspoon vanilla extract.Whip on high speed until medium peaks form. This whipped cream adds a light chocolate finish that is not overly sweet and complements the tart raspberry mousse perfectly.
- Decorate and Serve: Remove the chilled cake from the springform pan and carefully peel away all parchment paper. Spread the chocolate whipped cream over the top using an offset spatula. Garnish with fresh raspberries and chocolate pearls for an elegant finishing touch. Slice into 16 generous portions and serve immediately, enjoying the perfect harmony of chocolate and raspberry flavors.
Notes
- Measure ingredients accurately to ensure the cake rises and bakes evenly.
- Spoon and level flour instead of scooping to avoid a dense texture.
- Use room-temperature eggs, buttermilk, and sour cream for a smooth, uniform batter.
- Sift cocoa powder to prevent lumps and create a silky chocolate flavor.
- Gently fold whipped cream into raspberry pudding to keep the mousse light and airy.
- Chill the assembled cake for at least six hours (or overnight) for perfect mousse setting and clean slices.
Chef’s Secrets: Expert Baking Insights
The secret to an exceptional chocolate raspberry mousse cake lies in balancing textures and flavors.
Using a mix of granulated and brown sugar adds subtle depth to the cake, while hot water blooms the cocoa, intensifying its richness.
Freeze-dried raspberries provide concentrated tartness without excess moisture, helping the mousse remain firm.
When folding the whipped cream into the raspberry mixture, always use gentle motions to avoid deflating the mousse.
For a glossy finish, lightly brush the cake surface with simple syrup before adding the mousse to lock in moisture.
Serving Suggestions: Perfect Pairings And Presentation
This cake shines as a centerpiece for celebrations or a refined everyday dessert.
Serve chilled slices on a dessert plate with a fresh raspberry or a drizzle of chocolate ganache for added elegance.
For extra indulgence, pair with a scoop of vanilla bean ice cream or a dollop of mascarpone cream.
A light dusting of powdered sugar or cocoa around the plate elevates presentation for guests.
It’s also a delightful choice for afternoon tea or a casual coffee gathering, offering both visual appeal and satisfying flavor in every bite.
Storage Tips: Keep Cake Fresh Longer
To preserve the texture and flavor of your mousse cake, store it in the refrigerator in an airtight container or cover with plastic wrap.
The cake will remain fresh for up to three days. Avoid freezing if possible, as the mousse can separate slightly upon thawing; if necessary, wrap tightly and freeze for up to two weeks.
Bring the cake to room temperature for 10–15 minutes before slicing to make cutting easier and maintain the creamy consistency of the mousse and whipped cream.
Frequently Asked Questions
1. Can I make this cake ahead of time?
Absolutely. You can bake the chocolate cake and prepare the raspberry mousse a day in advance.
Assemble the cake and chill overnight for the mousse to set perfectly, making it convenient for parties or gatherings.
2. Can I use fresh raspberries instead of freeze-dried?
Fresh raspberries contain more moisture, which may affect mousse consistency.
If using fresh, lightly puree them and strain excess liquid, or reduce other liquids in the recipe to maintain firmness.
3. How can I make the cake vegan or dairy-free?
Substitute plant-based milk for buttermilk and regular milk, vegan butter or coconut oil for oil, and use a dairy-free pudding mix.
For the whipped cream, coconut cream or aquafaba works well to replicate the mousse texture.
4. How do I prevent the cake from sinking?
Avoid overmixing the batter, and ensure the oven temperature is accurate.
Use room-temperature ingredients and do not open the oven door during baking. Properly leveled and greased pans also help maintain structure.
5. Can I add extra chocolate or decorations?
Yes! You can layer melted chocolate ganache over the whipped cream or sprinkle chocolate shavings on top for added decadence.
Fresh berries, edible flowers, or chocolate pearls make the cake look visually stunning without altering the flavors.
