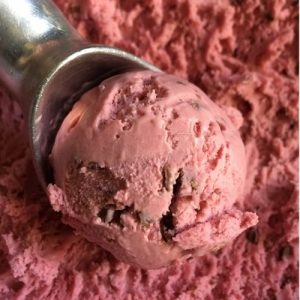
Indulge in the rich harmony of sweet raspberries and creamy chocolate in this homemade ice cream, a treat that feels decadent yet wholesome.
Bursting with antioxidants from fresh berries and enriched with protein and healthy fats from eggs and cream, it’s a naturally satisfying dessert.
Quick to prepare and freezer-friendly, it’s perfect for everyday enjoyment or special gatherings.
Refreshing Raspberry Chocolate Chip Ice Cream
Equipment
- 1 Small saucepan
- 1 medium saucepan
- 1 Medium Mixing Bowl
- Whisk
- Fine mesh strainer or colander with cheesecloth
- Ice cream maker
- Microwave-safe bowl or double boiler
Ingredients
- 8 ounces fresh raspberries
- ¼ cup granulated sugar for berries
- 4 large egg yolks
- 1 cup heavy cream
- ¾ cup granulated sugar for custard
- Pinch of salt
- 1 ¼ cup whipping cream
- 1 tablespoon vanilla extract
- 2 ounces milk chocolate
Instructions
- Preparing the Raspberries: Begin by placing the fresh raspberries into a small saucepan. Sprinkle ¼ cup of granulated sugar over the berries. Using a wooden spoon or silicone spatula, gently stir the fruit to combine. Place the pan over low heat and allow the berries to slowly release their natural juices. Stir occasionally to prevent sticking or scorching. After about 5–7 minutes, the mixture should become syrupy, with vibrant red juices infused with natural sweetness. Set aside to cool slightly.
- Whisking the Egg Yolks: Separate the eggs, placing the yolks in a medium-sized mixing bowl. Using a whisk or an electric mixer, beat the yolks briskly until they lighten in color and thicken slightly. This process helps to build a creamy texture in your ice cream custard. Reserve the egg whites for another use, such as meringues or an omelet, to avoid waste.
- Crafting the Custard Base: In a medium saucepan, combine 1 cup of heavy cream, ¾ cup of granulated sugar, a pinch of salt, and the prepared egg yolks. Place the pan over low heat, stirring constantly with a silicone spatula or whisk. This gentle cooking prevents the eggs from scrambling and allows the sugar to dissolve fully. As the mixture warms, continue whisking frequently. After 10–12 minutes, the custard should thicken enough to coat the back of a spoon, achieving a silky, pudding-like consistency.
- Straining for Smoothness: Remove the custard from the heat. Place a fine mesh strainer or colander lined with cheesecloth over a large bowl. Pour the warm custard through the strainer, allowing it to flow slowly into the bowl below. This step removes any cooked egg bits or undissolved sugar grains, ensuring a perfectly smooth base. Next, transfer the slightly cooled raspberry mixture through the strainer as well, pressing gently with a spatula to extract all the vibrant juices.
- Combining Cream and Flavor: Add 1 ¼ cups of whipping cream and 1 tablespoon of vanilla extract to the bowl with the strained custard and raspberry juice. Gently whisk the ingredients together until fully incorporated, forming a uniform, creamy mixture. The whipping cream adds richness and ensures a smooth, scoopable texture once frozen.
- Chilling the Ice Cream Base: For the best results, chill the ice cream base thoroughly before churning. Transfer the bowl to the refrigerator and allow it to cool completely—ideally for several hours or overnight. If you need to speed up the process, place the bowl inside a larger bowl filled with ice water. Chilling is essential to prevent a grainy texture in your finished ice cream.
- Melting the Chocolate: While the custard chills, melt the milk chocolate for the mix-ins. Place the chocolate in a microwave-safe bowl and heat in 30-second intervals, stirring between each, until fully melted. Alternatively, use a double boiler for more controlled melting. Let the melted chocolate cool to room temperature, ensuring it won’t melt the ice cream when added.
- Churning the Ice Cream: Once the ice cream base is thoroughly chilled, pour it into your ice cream maker following the manufacturer’s instructions. Begin the churning process. As the mixture thickens and reaches a soft-serve consistency, you can prepare to add the chocolate.
- Adding Chocolate Chips: When the ice cream is nearly set but still slightly soft, slowly drizzle the melted chocolate into the churner while it is running. The motion of the ice cream machine will naturally break the chocolate into small, bite-sized pieces that freeze quickly, creating delightful chocolate chips throughout the creamy raspberry base.
- Freezing to Firmness: Transfer the freshly churned ice cream into a freezer-safe container. Smooth the top with a spatula and cover it with a lid or plastic wrap. Freeze for at least 2–4 hours to achieve a firm, scoopable texture. Once fully frozen, serve and enjoy your luscious, homemade Raspberry Chocolate Chip Ice Cream.
- Serving Suggestions: Scoop the ice cream into bowls or waffle cones and garnish with fresh raspberries or a drizzle of melted chocolate. This dessert is perfect on its own or paired with warm baked goods like brownies, chocolate cake, or shortbread cookies for an indulgent experience.
Notes
- Use fresh, ripe raspberries for the brightest flavor and natural sweetness. Frozen berries can be substituted, but thaw and drain excess liquid first.
- Whisk egg yolks gently—overbeating or adding them to hot cream too quickly may cause scrambling.
- Chill the custard thoroughly before churning to ensure a smooth, creamy texture.
- Melt chocolate carefully—avoid overheating to prevent grainy or burnt chocolate.
- For an extra creamy texture, consider using a mix of heavy cream and half-and-half.
- Customize sweetness by adjusting sugar slightly to taste, depending on berry tartness.
- Always strain the custard and berry mixture for a silky, professional finish.
Chef’s Secrets for Perfect Ice Cream
The key to a luxurious, smooth ice cream lies in attention to temperature and timing.
Slowly heating the custard over low heat ensures the egg yolks thicken without scrambling, creating a rich, creamy base.
Straining the custard and berry mixture guarantees a silky texture without lumps or seeds. For those who like mix-ins beyond chocolate, try toasted nuts or dark chocolate for a richer flavor profile.
Additionally, chilling the base overnight not only improves texture but also allows the flavors to meld beautifully.
Using a combination of heavy cream and whipping cream helps balance creaminess without making the ice cream overly dense.
Serving Suggestions and Presentation Tips
Serve this ice cream in a classic bowl, waffle cone, or a dessert glass for an elegant presentation.
A few fresh raspberries or a light drizzle of melted chocolate on top adds visual appeal and intensifies the flavor.
Pairing it with shortbread cookies, a warm brownie, or a slice of pound cake transforms it into a gourmet dessert.
For entertaining, consider serving mini scoops in small glasses with a mint leaf garnish—perfect for parties or afternoon treats.
Storage Tips for Long-Lasting Freshness
Store your ice cream in a freezer-safe, airtight container to prevent freezer burn and preserve flavor.
Press a piece of parchment or plastic wrap directly on the ice cream surface before sealing the lid.
Ideally, consume within 2–3 weeks for peak flavor and texture. To soften frozen ice cream for easier scooping, let it sit at room temperature for 5–10 minutes.
Avoid repeated thawing and refreezing, which can alter the creamy texture and cause ice crystals to form.
Frequently Asked Questions
1. Can I use frozen raspberries instead of fresh?
Yes! Thaw frozen raspberries and drain any excess liquid before cooking to avoid a watery ice cream base.
Frozen berries may produce a slightly deeper flavor but won’t change the outcome significantly.
2. Can I substitute the milk chocolate for dark or white chocolate?
Absolutely! Dark chocolate adds richness and balances the tartness of raspberries, while white chocolate creates a sweeter, creamier contrast. Adjust melting carefully to prevent scorching.
3. How can I make this recipe egg-free?
You can substitute eggs with a custard alternative like cornstarch-thickened cream or a store-bought egg-free ice cream base.
The texture will remain creamy but slightly less rich than traditional custard.
4. Can this ice cream be made without an ice cream maker?
Yes, you can use a no-churn method by folding whipped cream into a sweetened, cooled raspberry custard base, then layering melted chocolate in stages before freezing.
The texture will be slightly softer but still indulgent.
5. How long can I store leftover ice cream?
For best quality, consume within 2–3 weeks. Always store in an airtight container and avoid frequent temperature changes to prevent ice crystals from forming and maintain a creamy texture.
