These Vegan Pumpkin Pie Pecan Bars are a simple yet indulgent way to enjoy pumpkin season without the fuss of traditional pie.
Packed with fiber from pecans and pumpkin, and healthy plant-based fats, they provide a satisfying, nutrient-rich treat.
Naturally sweetened and dairy-free, these bars are perfect for quick snacks, meal prep, or a wholesome dessert that everyone will love.
Pumpkin Pie Pecan Bars
Equipment
- Food processor – 1
- 8×8-inch baking pan (1)
- Mixing bowls (2)
- Whisk (1)
Ingredients
Pecan Crust:
- 2 ½ cups raw pecans
- 5 tablespoons brown sugar
- 1 teaspoon ground cinnamon
- ½ teaspoon salt
- 5 tablespoons non-dairy butter cubed (e.g., Earth Balance)
Pumpkin Pie Filling:
- 2 tablespoons cornstarch or arrowroot starch
- ¼ cup pure maple syrup
- 1 15 oz. can pumpkin puree (not pie filling)
- ⅓ cup sugar
- ¼ cup coconut cream or full-fat coconut milk
- 2 teaspoons vanilla extract
- 1 ½ teaspoons ground cinnamon
- ¼ teaspoon ground ginger
- ¼ teaspoon ground nutmeg
Optional Topping:
- Whipped coconut cream
- Extra pecans for garnish
Instructions
- Preheat Oven and Prepare Pan: Begin by preheating your oven to 350°F (175°C). While the oven warms, prepare your baking pan. Use an 8×8-inch pan, and either grease it generously with non-dairy butter or line it with parchment paper. Lining with parchment ensures easy removal of the bars later and keeps the crust intact. Set the pan aside while you prepare the pecan crust.
- Make the Pecan Crust: In a food processor, combine 2 ½ cups raw pecans, 5 tablespoons brown sugar, 1 teaspoon cinnamon, and ½ teaspoon salt. Pulse the mixture until the pecans are coarsely chopped and the ingredients are well blended. The goal is to create a texture that is sandy but still slightly chunky, giving the crust a pleasant crunch.
- Incorporate Butter into Crust: Add 5 tablespoons of cubed non-dairy butter to the food processor with the chopped pecan mixture. Pulse until the mixture resembles wet sand. It should hold together slightly when pressed between your fingers. This buttery mixture will form the base of your bars, providing both flavor and structure.
- Press and Bake Crust: Transfer the pecan mixture into your prepared baking pan. Using the back of a spoon or your fingers, press it evenly across the bottom of the pan, forming a compact, even layer. Bake the crust in the preheated oven for 8–10 minutes, until it becomes lightly golden and fragrant. Watch carefully to avoid burning. Once done, remove from oven and allow to cool slightly while you prepare the pumpkin filling.
- Prepare Cornstarch Mixture: In a small mixing bowl, whisk together 2 tablespoons cornstarch (or arrowroot starch) with ¼ cup pure maple syrup until fully combined. This mixture will help thicken the pumpkin filling, ensuring the bars set properly in the fridge. Set aside for the next step.
- Make Pumpkin Filling: Without cleaning the food processor from the crust (it’s perfectly fine to reuse), add the following ingredients: 1 (15 oz.) can pumpkin puree, ⅓ cup sugar, ¼ cup coconut cream (or full-fat coconut milk), 2 teaspoons vanilla extract, 1 ½ teaspoons cinnamon, ¼ teaspoon ground ginger, ¼ teaspoon ground nutmeg, Cornstarch and maple syrup mixture. Blend all ingredients until smooth and creamy, scraping down the sides of the processor as needed. The filling should be thick, velvety, and evenly spiced.
- Assemble Bars: Pour the pumpkin filling evenly over the baked pecan crust. Use a spatula to spread it gently and tap the pan on the counter a few times to even out the layer and remove air bubbles. This ensures each bar has a smooth, uniform filling.
- Bake Pumpkin Bars: Place the assembled pan back into the oven and bake for 40 minutes. The filling should be set but slightly soft in the center. You can check by gently shaking the pan—there may be a slight jiggle, but it should not be liquid. Remove from the oven and let the bars cool to room temperature on a wire rack or countertop.
- Chill for Best Results: Once cooled, cover the pan loosely with plastic wrap or foil and place it in the refrigerator for at least 2 hours. Chilling helps the pumpkin filling fully firm up, making it easier to cut clean squares without the layers separating.
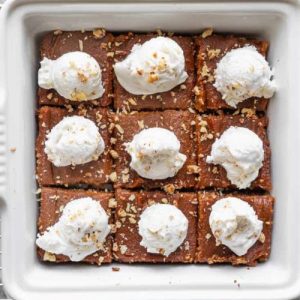
- Slice and Serve: After chilling, remove the bars from the pan using the parchment overhang (if lined) or carefully loosen edges with a knife. Slice into 12 squares using a sharp knife, wiping the blade between cuts for clean edges.
- Optional Toppings: Before serving, you can add a dollop of whipped coconut cream on top of each bar and sprinkle with extra pecans for added texture and visual appeal. This step enhances both flavor and presentation, making the bars look festive and indulgent.
- Storage Tips: Store the bars in an airtight container in the refrigerator for up to 5 days. They also freeze beautifully—wrap each square individually and freeze for up to 2 months. Thaw in the fridge or at room temperature before serving.
Notes
- Use raw pecans for the crust to ensure a rich, natural flavor and satisfying crunch.
- Full-fat coconut cream is essential for a creamy filling; avoid watery coconut milk, which prevents the bars from setting properly.
- These bars are naturally sweetened with maple syrup and sugar, but you can adjust the sweetness to taste.
- Press the crust firmly into the pan—this prevents crumbling when slicing.
- Chilling the bars before slicing is critical for clean edges and a firm texture.
Chef’s Secrets: Insider Baking Techniques
For a perfectly smooth pumpkin filling, blend all ingredients in a food processor or high-speed blender.
Scraping down the sides frequently ensures even texture. Toasting the pecan crust lightly before adding the filling enhances its flavor and prevents sogginess.
If you prefer a deeper, caramelized pecan flavor, lightly toast the pecans in a dry pan for 3–5 minutes before blending.
Always allow the bars to cool completely before refrigerating—this helps the spices meld and the texture firm up beautifully.
Serving Suggestions: Ways To Enjoy Bars
These pumpkin bars shine on their own as a snack or dessert, but you can elevate them further.
Top each square with a swirl of whipped coconut cream or a sprinkle of chopped pecans for extra texture.
They pair wonderfully with a warm cup of spiced chai, coffee, or a creamy plant-based latte.
For festive gatherings, drizzle lightly with dairy-free chocolate or a touch of maple glaze for a visually appealing presentation.
Storage Tips: Keep Bars Fresh Longer
Store these bars in an airtight container in the refrigerator for up to 5 days—this keeps the crust crisp and the filling firm.
For longer storage, wrap individual squares in parchment paper and freeze for up to 2 months.
Thaw in the refrigerator for 30–60 minutes before serving.
Avoid storing at room temperature for extended periods, as the filling is best kept chilled to maintain its creamy consistency.
Frequently Asked Questions
1. Can I make these bars nut-free?
Yes! Substitute pecans with sunflower seeds or pumpkin seeds for a nut-free crust, keeping the same measurements.
The texture will differ slightly but still be delicious.
2. Can I use pumpkin pie filling instead of puree?
It’s best to use pure pumpkin puree, not pumpkin pie filling.
Pre-spiced pie filling is sweeter and can affect the balance of flavors and texture in the bars.
3. How can I make these sweeter or less sweet?
Adjust the sugar or maple syrup in the filling to your preference.
Start by reducing or increasing by 1–2 tablespoons, tasting the blended mixture before baking.
4. Can I prepare these bars ahead of time?
Absolutely! They hold up well in the fridge for several days, and chilling actually improves the texture.
You can also freeze them for long-term storage and thaw as needed.
5. How do I get a perfectly creamy filling?
Use thick coconut cream and blend thoroughly until smooth.
Avoid watery coconut milk, and scrape down the sides of the blender or processor several times to ensure there are no lumps.
