This chickpea salad is a wholesome, plant-based twist on the classic chicken salad, offering all the creamy, tangy, and crunchy flavors you love—without the meat.
Packed with protein-rich chickpeas, fiber-filled veggies, and nutrient-dense herbs, it’s a heart-healthy option that’s naturally low in saturated fat.
Quick to make, highly versatile, and meal-prep friendly, this refreshing salad is perfect for busy weekdays, light lunches, or healthy on-the-go meals.
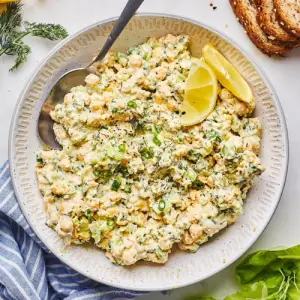
10- Minute Easy Chickpea Salad
Equipment
- 1 large mixing bowl
- 1 Medium Bowl (for dressing)
- 1 fork or potato masher
- (1) Whisk
- 1 cutting board
- (1) Chef’s knife
Ingredients
- 2 cans 15 oz each chickpeas, drained and rinsed
- ¾ cup celery finely diced
- ½ cup dill pickles finely diced
- ½ cup green onions thinly sliced
- ½ cup plain Greek yogurt
- 1 tablespoon lemon juice freshly squeezed
- 1 –2 tablespoons Dijon mustard to taste
- 2 teaspoons red wine vinegar
- 2 tablespoons fresh dill chopped
- 2 tablespoons fresh parsley chopped
- ¼ teaspoon garlic powder
- Kosher salt to taste
- Black pepper to taste
Instructions
- Prepare the Chickpeas: Start by opening the cans of chickpeas and pouring them into a colander. Rinse thoroughly under cold running water to wash away excess starch and sodium. Allow the chickpeas to drain fully before transferring them to a clean kitchen towel or paper towels. Gently pat them dry to remove any excess moisture. This drying step helps the chickpeas mash more easily and prevents the salad from becoming watery.
- Remove the Skins (Optional for Creaminess): Lay the chickpeas between two clean towels and roll them gently with your hands for about 20–30 seconds. This motion will loosen many of the skins. Peel away and discard the skins that come off easily. While this step is optional, removing most of the skins creates a creamier, smoother texture in the final salad. If you’re short on time, you can skip this step—your salad will still taste delicious.
- Mash the Chickpeas: Place the dried chickpeas into a large mixing bowl. Using a fork or a potato masher, press down firmly to smash the chickpeas. Continue mashing until most of them are broken down but still slightly chunky—aim for a balance between smoothness and texture. The chickpeas should resemble the consistency of shredded chicken or tuna, which gives the salad its hearty and satisfying bite.
- Add the Crunchy Vegetables: Once the chickpeas are mashed, fold in the diced celery, chopped dill pickles, and sliced green onions. Mix well so the vegetables are evenly distributed throughout. These crunchy ingredients add freshness, texture, and a burst of tangy flavor that makes the salad lively and enjoyable with every bite.
- Make the Creamy Dressing: In a separate medium bowl, whisk together the plain Greek yogurt, lemon juice, Dijon mustard, and red wine vinegar until smooth and creamy. Stir in the freshly chopped dill and parsley, along with the garlic powder. Season generously with kosher salt and freshly ground black pepper. Taste the dressing and adjust the flavors as needed—adding more mustard for tanginess, lemon juice for brightness, or herbs for extra freshness.
- Combine Chickpeas with Dressing: Pour the prepared dressing over the chickpea and vegetable mixture. Use a large spoon or spatula to gently fold everything together until the chickpeas are evenly coated. Take your time mixing to ensure that every bite gets a balance of creaminess, crunch, and herb flavor. If needed, taste again and adjust the seasoning with a pinch more salt, pepper, or a squeeze of lemon juice.
- Chill or Serve Immediately: You can enjoy the salad right away, or for even better flavor, cover the bowl and refrigerate for at least 30 minutes. This short resting time allows the flavors to meld together, making the salad more vibrant and refreshing.
- Serving Ideas: Serve your chickpea salad in a variety of ways depending on your mood. Spoon it between two slices of whole-grain bread for a hearty sandwich, tuck it into pita pockets, wrap it in fresh lettuce leaves for a lighter option, or pile it high on crackers for a quick snack. You can also spread it on a rice cake or serve it over a bed of leafy greens for a protein-packed salad bowl.
Notes
- This chickpea salad is an incredibly flexible recipe that you can adjust to suit your taste and pantry.
- Don’t worry about being exact—if you love pickles, add a little more; if you prefer extra creaminess, increase the yogurt or Dijon mustard.
- Removing the chickpea skins makes the salad smoother, but it’s not mandatory if you’re in a hurry.
- It’s a no-cook recipe, which makes it perfect for hot days or quick weekday meals, and it stores beautifully for several days, making it a meal-prep favorite.
Chef’s Secrets for Perfect Texture
The secret to an irresistible chickpea salad lies in balancing creaminess and crunch.
Mashing most of the chickpeas creates a hearty base, but leaving some chunks intact prevents the salad from turning pasty.
For maximum creaminess, take a few extra minutes to remove the skins—it may feel tedious, but the difference in texture is noticeable.
Using fresh herbs like dill and parsley brightens the flavor and makes the salad taste fresher than dried herbs.
Finally, always taste and adjust your dressing before mixing it in—sometimes an extra squeeze of lemon juice or a touch more mustard takes the flavor from good to outstanding.
Serving Suggestions for Any Occasion
This salad is as versatile as it is delicious. For a filling lunch, serve it between two slices of toasted whole-grain bread or stuffed into pita pockets.
For a lighter option, wrap it in crunchy romaine lettuce leaves or spoon it onto cucumber slices for bite-sized snacks.
It also works well as a party dip alongside crackers, tortilla chips, or vegetable sticks.
If you prefer a meal-prep bowl, layer it over a bed of mixed greens with sliced avocado and cherry tomatoes.
With so many serving possibilities, this salad easily adapts to different occasions and appetites.
Storage Tips for Freshness
To keep the salad fresh and flavorful, store it in an airtight container in the refrigerator.
It will last up to 5 days, making it perfect for preparing ahead for lunches or snacks.
Always use a clean spoon when serving to prevent contamination and extend its shelf life.
If the salad seems a little dry after sitting in the fridge, simply stir in a spoonful of yogurt or a drizzle of lemon juice to bring back the creaminess.
Avoid freezing, as the texture of chickpeas and yogurt does not hold up well after thawing.
Frequently Asked Questions
1. Can I make this salad vegan?
Yes! Simply replace the Greek yogurt with a plant-based yogurt or vegan mayonnaise.
The rest of the ingredients are naturally vegan, so it’s an easy swap that still gives you creaminess and tang.
2. Do I have to remove chickpea skins?
Not at all. Removing them makes the texture smoother, but the salad will still taste delicious with the skins on.
It’s purely a matter of personal preference and time.
3. What other vegetables can I add?
You can add diced bell peppers, shredded carrots, cucumber, or even a handful of arugula for extra freshness.
The recipe is very adaptable, so feel free to mix in what you have on hand.
4. Can I use canned chickpeas or should I cook them from scratch?
Canned chickpeas are perfect for convenience and speed.
If you prefer cooking from scratch, make sure the chickpeas are well-cooked and soft enough to mash easily. Both options work well in this recipe.
5. How can I make the salad more filling?
Serve it with whole-grain bread, add avocado slices for healthy fats, or pair it with boiled eggs on the side.
You can also mix in cooked quinoa or brown rice for a more substantial meal.
