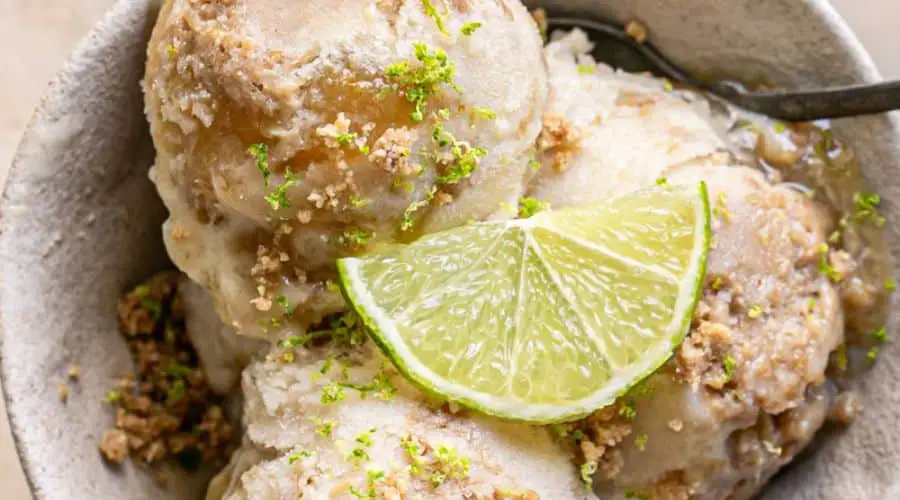
If you’re looking for the perfect summer treat that combines refreshing citrus with a creamy, indulgent texture, then this Key Lime Ice Cream recipe is a must-try!
With the tang of fresh lime juice and zest balanced by the smoothness of sweetened condensed milk and cream, this dessert delivers an unforgettable burst of flavor.
Homemade ice cream is not only a delightful way to beat the heat, but it also offers a chance to customize the ingredients for the best taste possible.
Whether you’re hosting a backyard barbecue, planning a family movie night, or simply craving a sweet escape from the ordinary, this Key Lime Ice Cream will be a hit.
It’s easy to make and incredibly satisfying, offering a flavor profile that perfectly blends tart and sweet with a velvety finish.

What Makes This Key Lime Ice Cream Special?
What sets this Key Lime Ice Cream apart from other frozen treats is its unique balance of flavors and its rich, creamy texture.
Unlike traditional lime sorbets or ice creams that often rely on artificial flavorings, this recipe uses fresh key limes—or regular limes if key limes are hard to find—which ensures an authentic, vibrant citrus flavor.
The zest of the lime adds an extra depth, giving it that unmistakable tang that will awaken your taste buds.
Another element that makes this ice cream so special is its smooth, velvety texture.
While many ice creams can be icy or hard, this recipe uses a combination of heavy cream, whole milk, and sweetened condensed milk, creating a rich base that melts in your mouth.
The sweetened condensed milk not only brings the perfect sweetness but also helps to make the ice cream more luscious and creamy, while the lime juice provides that refreshing zing.
What truly elevates this dessert is its versatility.
You can make it as sweet or as tangy as you like, and the addition of crushed graham crackers will take it one step further, creating a flavor reminiscent of key lime pie.
This recipe brings the best of both worlds: the joy of homemade ice cream and the refreshing, zesty taste of classic key lime pie, all in one delicious frozen scoop.
Ingredients You Will Need
To make this homemade Key Lime Ice Cream, you’ll need a handful of simple, yet essential ingredients that come together to create the perfect balance of creamy sweetness and tangy citrus.
Here’s a list of what you’ll need:
- Key Lime Juice (or regular lime juice) – The star ingredient that gives this ice cream its signature zesty flavor. Freshly squeezed key limes are ideal for their unique, aromatic tartness, but if they’re not available, regular limes will work just fine.
- Lime Zest – The zest adds an extra layer of lime flavor and fragrance, amplifying the citrusy notes in the ice cream. It’s the perfect complement to the lime juice and brings a deeper, more aromatic lime punch.
- Heavy Cream – This ingredient is what makes the ice cream rich and creamy. It’s responsible for the smooth, velvety texture that makes every bite melt in your mouth.
- Whole Milk – Combined with the heavy cream, whole milk creates a balanced base that’s not too rich, but still indulgent. It also helps with the texture, giving the ice cream a soft and scoopable consistency.
- Sweetened Condensed Milk – This adds sweetness and helps achieve the creamy, smooth texture that gives homemade ice cream its decadent feel. The condensed milk also helps prevent the ice cream from becoming too hard once frozen.
- Optional: Salt – A small pinch of salt can bring out the flavors of the lime and enhance the sweetness of the condensed milk. It’s an optional touch that can make the flavors pop.
- Optional: Graham Cracker Crumbs – For a “pie crust” twist, adding crushed graham crackers can provide a crunchy, buttery element that enhances the key lime pie experience. You can stir them into the ice cream or sprinkle them on top before serving.
These few ingredients combine to create the perfect balance of sweet and tangy, with a texture that’s irresistibly smooth.
Equipment You Will Need
Making Key Lime Ice Cream at home is easier than you might think, but there are a few essential tools that will help ensure the process goes smoothly:
- Ice Cream Maker – While not strictly necessary, an ice cream maker is the key to achieving that creamy, smooth texture in your ice cream. It churns the mixture while freezing it, preventing large ice crystals from forming and giving your ice cream that perfect consistency. If you don’t have an ice cream maker, you can still make the recipe by following a no-churn method, but an ice cream maker will yield the best results.
- Mixing Bowls – You’ll need at least one large mixing bowl to whisk together all of your ingredients, as well as smaller bowls if you’re zesting the limes or preparing any mix-ins, like graham cracker crumbs.
- Whisk and Spatula – A whisk will help blend the ingredients into a smooth mixture, while a spatula will be useful for scraping down the sides of the bowl and transferring the mixture into the ice cream maker or storage container.
- Measuring Cups and Spoons – Precision is key in creating a balanced flavor, so make sure you have accurate measuring tools to get the right quantities of ingredients.
- Airtight Container – Once your ice cream is finished churning, you’ll need an airtight container to store it in while it freezes to its final consistency. This will keep the ice cream from becoming icy and prevent it from absorbing any unwanted freezer odors.
With these basic tools and ingredients, you’ll be all set to create a delicious batch of homemade Key Lime Ice Cream that’s sure to impress!
Step-by-Step Instructions

Making Key Lime Ice Cream at home is easy and fun! Follow these simple steps to create a creamy, refreshing treat that’s perfect for any occasion.
Preparing the Base
Start by whisking together the heavy cream, whole milk, and sweetened condensed milk in a large mixing bowl.
These ingredients will form the creamy base of your ice cream.
Whisk them together until well combined, ensuring the mixture is smooth and free of lumps.
Next, add the lime juice and lime zest to the base, stirring thoroughly.
The lime juice is what gives this ice cream its refreshing tartness, while the zest adds depth and aromatic citrus notes.
Mix until everything is evenly incorporated.
If you’d like, you can add a pinch of salt at this stage to enhance the flavors and balance the sweetness.
Stir everything together until the mixture is smooth and well-combined.
Chilling the Mixture
After preparing the base, cover the bowl with plastic wrap or a lid, and place it in the refrigerator for at least 2 hours to chill.
This step is crucial for ensuring the mixture is cold enough for the ice cream maker to churn effectively, creating that smooth texture we all love.
Churning the Ice Cream
Once the mixture has chilled, pour it into your ice cream maker.
Follow the manufacturer’s instructions for your specific model.
Typically, this will take about 20-25 minutes.
You’ll know it’s ready when the ice cream has thickened and reached a soft-serve consistency.
If you don’t have an ice cream maker, no worries!
Simply pour the mixture into an airtight container and freeze it, stirring every 30 minutes for about 2-3 hours to break up any ice crystals (this is known as the no-churn method).
This will give the ice cream a creamier consistency, though it won’t be quite as smooth as the churned version.
Freezing and Serving
Once your ice cream has reached the right consistency, transfer it into an airtight container.
Smooth the top with a spatula, cover with a lid, and freeze for an additional 4-6 hours, or until firm.
When you’re ready to serve, let the ice cream soften for a few minutes before scooping.
This will make it easier to scoop and give you that perfect texture.
Tips for Perfect Key Lime Ice Cream
While making this Key Lime Ice Cream is pretty straightforward, there are a few tips and tricks to ensure it turns out perfectly every time.
How to Make the Ice Cream Extra Creamy
To achieve the creamiest, smoothest texture, make sure to use full-fat dairy (both heavy cream and whole milk).
The higher fat content helps create a rich, silky base.
Additionally, chilling the base for at least 2 hours ensures it churns better and results in a smoother ice cream.
If you want even more creaminess, you could consider using an ice cream stabilizer or corn syrup in small amounts to help prevent ice crystals from forming, though this step is optional.
Flavor Variations
While this Key Lime Ice Cream is delicious on its own, you can always take it up a notch with a few flavor variations:
- Graham Cracker Crumbs: Add crushed graham crackers to give the ice cream a key lime pie flavor. You can mix them directly into the ice cream after churning, or sprinkle them on top when serving.
- Fruit Add-ins: You can experiment by mixing in fresh fruit, such as berries or mango, to complement the tartness of the lime.
- Coconut: For a tropical twist, add shredded coconut to the base for a creamy, island-inspired flavor.
How to Store Homemade Ice Cream
For the best results, store your ice cream in an airtight container to keep it fresh and prevent it from absorbing any unwanted freezer odors.
Homemade ice cream generally lasts for about 2 weeks in the freezer.
If it freezes too hard, let it sit at room temperature for a few minutes to soften before serving.
With these tips, you’ll be well on your way to making perfect Key Lime Ice Cream every time!
Whether you stick with the classic recipe or try a few variations, this treat is sure to be a crowd-pleaser.
Conclusion
This Key Lime Ice Cream recipe is a delightful and refreshing treat that’s perfect for any occasion, especially during the warm summer months.
With just a few simple ingredients, you can create a homemade dessert that beautifully balances the tartness of lime with the smooth creaminess of ice cream.
Whether you’re craving a cool dessert to beat the heat or looking to impress your guests with something special, this Key Lime Ice Cream is sure to satisfy.
Plus, with the flexibility to adjust the sweetness or even add fun mix-ins, it’s a dessert you can easily make your own.
So grab your ingredients, chill that mixture, and enjoy the refreshing taste of homemade Key Lime Ice Cream—you won’t regret it!
Frequently Asked Questions
1. Can I use regular limes instead of key limes?
Yes, if key limes are unavailable, you can use regular limes as a substitute.
While key limes have a more intense and aromatic flavor, regular limes will still give you a tangy, delicious ice cream.
2. Do I need an ice cream maker to make this recipe?
No, you don’t necessarily need an ice cream maker. If you don’t have one, you can use the no-churn method.
After mixing the ingredients, simply transfer the mixture into an airtight container and freeze it, stirring every 30 minutes for 2-3 hours to break up ice crystals.
3. Can I make this ice cream dairy-free?
Yes, you can make a dairy-free version of this Key Lime Ice Cream by substituting the heavy cream and milk with coconut cream or almond milk.
For sweetness, use a dairy-free condensed milk alternative, such as one made from coconut milk.
4. How do I store leftover Key Lime Ice Cream?
To store your ice cream, transfer it into an airtight container and freeze it.
Homemade ice cream typically lasts about 2 weeks in the freezer.
If it freezes too hard, simply let it sit at room temperature for a few minutes to soften before serving.
5. Can I add mix-ins to this Key Lime Ice Cream?
Absolutely! You can mix in ingredients like crushed graham crackers, berries, or shredded coconut for additional flavor and texture.
If you’re adding mix-ins, do so after the ice cream has churned and just before transferring it into the container for freezing.

Key Lime Ice Cream
Equipment
- Ice Cream Maker: 1 (optional but recommended for smooth texture)
- Mixing Bowl – 1 large
- Whisk (1)
- Spatula (1)
- Measuring cups (1 set)
- Measuring spoons (1 set)
- Airtight Container – 1 (for freezing the ice cream)
Ingredients
- 1 cup 240 mL Heavy Cream
- 1 cup 240 mL Whole Milk
- 1 can 14 oz / 396 g Sweetened Condensed Milk
- 1/2 cup 120 mL Fresh Lime Juice (about 4-5 limes)
- 1 tablespoon 6 g Lime Zest (from 2-3 limes)
- 1/4 teaspoon 1 g Salt (optional, for flavor enhancement)
- 1/4 cup 30 g Crushed Graham Crackers (optional, for added texture)
Instructions
Prepare the Base:
- In a large mixing bowl, whisk together the heavy cream, whole milk, and sweetened condensed milk until well combined.
Add Lime:
- Stir in the fresh lime juice and lime zest until everything is thoroughly incorporated. If using, add the salt at this stage for enhanced flavor.
Chill the Mixture:
- Cover the bowl with plastic wrap and refrigerate for at least 2 hours, allowing the mixture to chill completely.
Churn the Ice Cream:
- Once chilled, pour the mixture into your ice cream maker and churn according to the manufacturer’s instructions (usually 20-25 minutes). If you’re using the no-churn method, simply transfer the mixture to an airtight container and freeze, stirring every 30 minutes for 2-3 hours.
Freeze the Ice Cream:
- After churning, transfer the ice cream to an airtight container and freeze for at least 4-6 hours until firm.
Serve:
- Allow the ice cream to soften for a few minutes before scooping and serving. If desired, top with crushed graham crackers for added texture.
Notes
- Creaminess: The heavy cream and whole milk create a rich, smooth base. Using full-fat dairy is key to achieving that luxurious, creamy texture.
- Lime Juice: Freshly squeezed lime juice gives the best flavor. If you don’t have key limes, regular limes work well too!
- Optional Add-ins: Try adding crushed graham crackers to mimic the crust of a key lime pie or mix in fruit like berries for a fun twist.
- Storage: Store the ice cream in an airtight container in the freezer for up to 2 weeks. Allow it to sit at room temperature for a few minutes before scooping if it becomes too hard.


