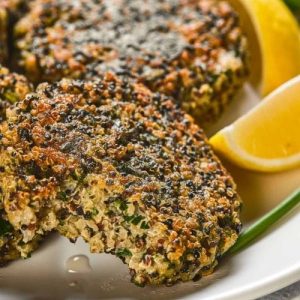
These golden kale and quinoa cakes are a deliciously satisfying vegetarian option, packed with plant-based protein, fiber, and essential vitamins.
Crisp on the outside and tender inside, they combine wholesome grains, nutrient-rich kale, and fragrant herbs for a flavor-packed bite.
Quick to prepare, freezer-friendly, and versatile, they make a perfect addition to weekly meal prep or a wholesome lunch or dinner.
30-Minute Kale Quinoa Cakes
Equipment
- 1 large sauté pan
- 1 Medium Mixing Bowl
- 1 spatula
- Measuring Cups and Spoons
- Knife and cutting board
Ingredients
- 1 tablespoon olive oil plus ¼ cup for frying
- 1 medium yellow onion finely diced
- 3 cloves garlic minced
- ½ –1 teaspoon salt adjust to taste
- Black pepper to taste
- 1 large bunch kale finely chopped
- 3 cups cooked quinoa from ~1 cup dry
- 3 large eggs
- 1 cup breadcrumbs panko or regular
- 2 tablespoons fresh flat-leaf parsley minced
Instructions
- Prepare the Vegetables: Begin by washing the kale thoroughly and removing any tough stems. Finely chop the leafy greens into small, bite-sized pieces so they cook evenly. Peel and dice the yellow onion into small cubes, and mince the garlic cloves finely. Preparing your vegetables first ensures smooth, efficient cooking without delays later.
- Sauté Aromatics: Heat 1 tablespoon of olive oil in a large sauté pan over medium heat. Once the oil shimmers, add the diced onion and minced garlic. Sprinkle in a pinch of salt and freshly ground black pepper to season. Cook the aromatics gently, stirring occasionally, until the onion becomes soft and translucent and the garlic releases its fragrant aroma—about 3–4 minutes. This step builds the base flavor for your cakes.
- Cook the Kale: Add the finely chopped kale to the pan with the onions and garlic. Toss everything together and continue cooking for 3–5 minutes until the kale wilts and reduces in volume. Stir frequently to prevent sticking or burning. Once cooked, remove the pan from the heat and let the mixture cool slightly. Cooling prevents the eggs in the mixture from cooking prematurely.
- Mix the Base: In a medium-sized mixing bowl, combine the cooked quinoa, wilted kale mixture, minced parsley, eggs, and breadcrumbs. Use a spatula or your hands to mix everything thoroughly. The texture should be cohesive but not too wet—some mashed quinoa and soft chunks of kale help the cakes hold together while keeping a pleasant bite. Adjust with additional breadcrumbs if needed to achieve a firm yet pliable mixture.
- Form the Patties: Divide the mixture into 8 equal portions using a spoon or your hands. Shape each portion into a compact, slightly flattened disc about 1 inch thick. Press gently to ensure the cakes hold together, but avoid over-compressing, as this can make them dense. If making smaller appetizer-sized cakes, divide the mixture accordingly.
- Heat the Pan for Frying: Add the remaining ¼ cup of olive oil to a large sauté pan and heat over medium heat until shimmering but not smoking. Properly preheating the oil ensures the cakes cook evenly and develop a crisp, golden crust.
- Fry the Cakes: Gently place half of the cakes into the hot pan, leaving enough space between each to avoid overcrowding. Use a spatula to press them lightly, helping the sides crisp up. Cook for 3–5 minutes on the first side, checking occasionally, until the bottoms are golden brown and firm enough to flip without breaking.
- Flip and Finish Cooking: Carefully flip each cake to cook the other side. Press gently with the spatula to maintain the shape. Cook for another 3–5 minutes until the cakes are golden and crisp on both sides. Remove the cooked cakes from the pan and place them on a wire rack or paper towels to drain any excess oil.
- Repeat with Remaining Cakes: Return the pan to medium heat if needed and repeat the frying process with the remaining portion of cakes. Ensure there’s sufficient oil in the pan and avoid overcrowding. Cooking in batches helps maintain a consistent texture and ensures each cake becomes perfectly golden and crispy.
- Serve or Store: Serve the kale and quinoa cakes warm, either as a main dish, side, or appetizer. For meal prep, allow the cakes to cool completely, then wrap individually or place in an airtight container. These cakes freeze beautifully for up to 6 months and can be reheated in a toaster oven or skillet for a crispy finish.
Notes
- For the best texture, ensure a balance between whole and slightly mashed quinoa. This creates a soft interior with a crisp exterior when fried.
- Adjust salt carefully depending on whether your quinoa was pre-seasoned. Taste the mixture before shaping the cakes.
- If the mixture feels too wet, gradually add more breadcrumbs until it holds together without being dry.
- Let each cake cook undisturbed for several minutes before flipping. This prevents them from falling apart and helps them develop a golden crust.
- Avoid overcrowding the pan while frying. Adequate space ensures even browning and crisp edges.
Chef’s Secrets: Insider Tips For Perfection
Achieving golden, crispy kale and quinoa cakes is all about attention to detail.
Using a combination of cooked quinoa and tender vegetables provides natural moisture while maintaining structure.
Pressing the cakes gently and leaving them to cook undisturbed allows a beautifully crisp crust to form without burning.
Fresh herbs like parsley brighten the flavor, but feel free to experiment with dill, cilantro, or chives for variety.
Pre-cooling the sautéed vegetables ensures the eggs bind properly, making the cakes easy to shape.
Serving Suggestions: Creative Meal Ideas
These kale and quinoa cakes are versatile and can be enjoyed in many ways.
Serve them warm with a dollop of Greek yogurt or tzatziki for a refreshing contrast.
They also pair wonderfully with a simple side salad, roasted vegetables, or a hearty grain bowl.
For sandwiches or wraps, use them as a flavorful, protein-rich filling.
Mini versions make great appetizers or party finger foods, perfect with dipping sauces such as spicy mayo, tahini, or avocado crema.
Storage Tips: Keep Cakes Fresh Longer
Kale and quinoa cakes store well and are ideal for meal prep.
Let the cakes cool completely before storing in an airtight container in the refrigerator for up to 4 days.
For longer storage, freeze individual cakes in a single layer on a baking sheet, then transfer to a freezer-safe container for up to 6 months.
Reheat in a toaster oven or skillet to maintain crispness, rather than microwaving, which may make them soft.
Frequently Asked Questions
1. Can I make these cakes vegan?
Yes! Replace the eggs with flax or chia eggs (1 tablespoon ground seeds + 3 tablespoons water per egg) and ensure your breadcrumbs are vegan-friendly.
The cakes may be slightly more delicate, so handle gently while cooking.
2. What other greens can I use instead of kale?
Spinach, Swiss chard, mustard greens, or collard greens all work well. Just ensure they are finely chopped and wilted before mixing with quinoa.
3. Can I use different grains instead of quinoa?
Absolutely. Cooked millet, barley, farro, or buckwheat can substitute for quinoa.
Keep the same ratio of 3 cups cooked grains for 1 bunch of kale. Adjust breadcrumbs slightly if needed to maintain the right texture.
4. How can I make the cakes crispier?
Make sure the pan is hot before adding the cakes and avoid overcrowding.
Cook undisturbed until golden before flipping, and use a light layer of oil to promote a crispy crust.
5. Can these cakes be frozen?
Yes, they freeze beautifully. Cool completely, wrap individually or layer with parchment paper in a freezer-safe container, and store for up to 6 months.
Reheat in a toaster oven or skillet to restore crispness.
