These Frozen Yogurt Granola Cups are a delicious and wholesome treat that’s perfect for a quick snack or easy dessert.
Packed with protein from Greek yogurt, fiber from oats, and healthy fats from almond butter, they satisfy cravings without guilt.
Quick to assemble and freezer-friendly, they’re ideal for meal prep, family treats, or anytime you need a nourishing, grab-and-go snack.
15-Minute Easy Frozen Yogurt Granola Cups
Equipment
- 1 large mixing bowl
- 1 Spoon or spatula
- 1 muffin pan (12-cup)
- 8–10 muffin liners
- Measuring Cups and Spoons
Ingredients
- 3/4 cup rolled oats
- 1/2 tsp ground cinnamon
- 1/4 cup almond butter
- 3 –4 tbsp honey adjust to taste
- 1 tsp vanilla extract
- 1 1/2 cups Greek yogurt plain or flavored
- Fresh berries for topping as desired
Instructions
- Prepare Your Workspace: Before you begin, clear a clean, flat surface in your kitchen for assembling your granola cups. Gather all ingredients, measuring tools, mixing bowls, and a 12-cup muffin pan. Lining the pan with muffin liners ahead of time ensures that your cups will release easily and hold their shape once frozen. Prepping your space first makes the process smooth and enjoyable.
- Combine the Dry Ingredients: In a large mixing bowl, add rolled oats and ground cinnamon. Use a spoon or spatula to gently stir these dry ingredients together until the oats are evenly coated with cinnamon. This simple step enhances the flavor of the granola base, ensuring a subtle warmth in every bite.
- Incorporate the Nut Butter and Sweetener: Add almond butter and honey to the dry oat mixture. Start with the lower amount of honey (3 tablespoons) and gradually increase if you prefer a sweeter base. Use a spatula or clean hands to mix thoroughly. The goal is a sticky, cohesive dough. If the mixture feels too dry or crumbly, add an extra teaspoon of almond butter or honey at a time until it holds together easily.
- Add Vanilla Extract: Pour in vanilla extract to the granola mixture. This adds a lovely aromatic note that complements the oats and almond butter. Fold the vanilla into the mixture evenly, ensuring that every bit of dough has a hint of vanilla flavor. This step may seem small, but it makes a noticeable difference in the final taste.
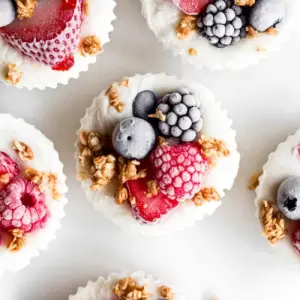
- Press the Granola Base into Muffin Cups: Take a spoonful of the granola mixture and place it into the bottom of each muffin liner. Using your fingers or the back of the spoon, press the granola down firmly to create a compact, even layer. This base will support the yogurt topping and help maintain the structure of your granola cup once frozen. Repeat for all 8–10 cups.
- Add the Yogurt Layer: Spoon Greek yogurt on top of the granola base in each muffin cup. Gently spread it to cover the granola evenly without mixing layers together. If using plain yogurt, you can mix in a little extra honey or vanilla extract to taste before adding. The yogurt provides protein and a creamy contrast to the crunchy granola, forming the heart of the frozen cup.
- Top with Berries and Extra Granola: Choose your favorite fresh berries such as blueberries, raspberries, or sliced strawberries. Sprinkle them generously on top of the yogurt. If you have leftover granola dough, crumble it lightly over the berries for an added crunchy layer. This creates visual appeal and adds extra texture for each bite.
- Freeze Until Firm: Place the muffin pan carefully in the freezer. Allow the granola cups to set for at least 4 hours, or overnight for best results. Freezing ensures the yogurt firms up and the granola stays intact, making them easy to pop out and serve.
- Serve and Enjoy: Once fully frozen, remove the muffin pan from the freezer. Allow the cups to sit for 5–10 minutes at room temperature to slightly soften before serving. Gently peel off the muffin liners and serve your frozen yogurt granola cups immediately. They make a refreshing, protein-rich snack or dessert for any time of day.
- Storage and Reuse Tips: Store any extra cups in an airtight container in the freezer for up to 2 weeks. You can also wrap them individually in parchment paper for grab-and-go convenience. When ready to eat, just thaw slightly at room temperature for a creamy, ready-to-eat snack.
Notes
- Yogurt Choice: You can use plain, vanilla, or flavored Greek yogurt depending on your sweetness preference. If using plain yogurt, add a teaspoon of honey or maple syrup for extra flavor.
- Granola Base Texture: The granola mixture should be sticky enough to hold together but not too wet. Adjust almond butter or honey as needed to achieve the perfect consistency.
- Freezing Time: Freezing for at least 4 hours ensures the cups are firm enough to hold their shape. For best results, freeze overnight.
- Serving Tip: Allow frozen cups to thaw slightly for 5–10 minutes at room temperature before serving. This softens the yogurt for a creamier texture.
- Customizations: Feel free to add nuts, seeds, or cacao nibs to the granola base for extra crunch and flavor variety.
Chef’s Secrets: Expert Tips For Perfection
The key to perfect Frozen Yogurt Granola Cups lies in balancing texture and flavor. Pressing the granola base firmly ensures that it doesn’t crumble when you serve it.
Layering yogurt carefully on top keeps each cup visually appealing and structurally sound.
Using a combination of honey and almond butter provides both natural sweetness and healthy fats, enhancing taste while keeping it nutritious.
For a gourmet twist, mix a few finely chopped nuts or coconut flakes into the granola base for added depth.
Choosing high-quality Greek yogurt not only boosts protein but gives the cups a rich, creamy mouthfeel that complements the crunch of the granola perfectly.
Serving Suggestions: Creative Ways To Enjoy
These frozen cups are versatile and can be served in multiple ways.
They make a refreshing mid-afternoon snack, a light dessert after dinner, or a fun breakfast option when paired with extra fresh fruit.
Drizzle with a little honey, maple syrup, or dark chocolate for added indulgence, or sprinkle with granola, cacao nibs, or chia seeds for extra texture and nutrition.
Pair them with a cup of herbal tea or cold coffee for a balanced, energizing treat.
You can also serve them in a small bowl with extra berries and a spoon for an elegant presentation at brunch or parties.
Storage Tips: Keep Cups Fresh Longer
Store your Frozen Yogurt Granola Cups in an airtight container in the freezer for up to two weeks.
To prevent sticking, place parchment paper between layers when stacking multiple cups.
Individually wrapping them in plastic wrap or reusable silicone liners makes them perfect for grab-and-go snacks.
When ready to eat, remove only the number of cups you plan to serve and allow them to thaw for a few minutes at room temperature.
Avoid repeated freezing and thawing to maintain yogurt creaminess and granola crunch.
Frequently Asked Questions
1. Can I use non-dairy yogurt instead?
Yes! Plant-based yogurts such as almond, coconut, or soy work well.
Choose thick, creamy varieties to maintain structure, and adjust sweetness if necessary since some non-dairy yogurts are less sweet.
2. How long do they need to freeze?
Allow at least 4 hours for the cups to firm up completely. Freezing overnight is ideal for maximum stability and ease of serving.
3. Can I make them ahead for meal prep?
Absolutely. These cups are freezer-friendly and perfect for meal prep. Prepare in batches and store them for up to two weeks.
They’re excellent for quick snacks or desserts throughout the week.
4. Can I substitute almond butter with another nut butter?
Yes. Peanut butter, cashew butter, or sunflower seed butter are great alternatives.
Keep in mind that flavor and consistency may slightly vary depending on the nut butter used.
5. How do I prevent the granola base from being too hard after freezing?
Ensure the granola base is not pressed too thin and has enough almond butter and honey to remain slightly chewy.
Allow cups to thaw 5–10 minutes at room temperature before serving for optimal texture.
