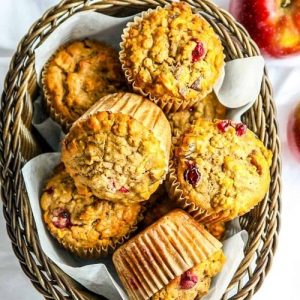
These Cranberry Oatmeal Muffins are a wholesome, naturally sweet breakfast or snack option packed with fiber-rich oats, nutrient-dense cranberries, and heart-healthy walnuts.
Low in refined sugar and featuring plant-based fats from olive oil, they provide steady energy and gentle sweetness.
Quick to make and perfect for meal prep, they balance taste, nutrition, and convenience effortlessly.
30-Minute Cranberry Oatmeal Muffins
Equipment
- 1 twelve-cup muffin pan
- Paper liners or cooking spray (as needed)
- 1 large mixing bowl
- 1 Small Mixing Bowl
- Measuring Cups and Spoons
- Whisk or fork
- Spatula or wooden spoon
- Cooling Rack
Ingredients
- 1 ½ cups gluten-free all-purpose flour with xanthan gum
- 1 cup quick-cooking gluten-free oats
- 1 tablespoon gluten-free baking powder
- 1 teaspoon ground cinnamon
- ¼ teaspoon ground nutmeg
- ¼ teaspoon salt
- 1 cup almond milk
- 1 large egg
- ¼ cup olive oil
- ¼ cup maple syrup
- 1 teaspoon vanilla extract
- 1 large apple peeled and diced
- 6 dates pitted and chopped
- ½ cup cranberries
- ½ cup toasted walnuts chopped
Instructions
- Preheat and Prepare Pan: Begin by preheating your oven to 375°F (190°C) to ensure it reaches the correct baking temperature by the time your batter is ready. While the oven warms, prepare a twelve-cup muffin pan by lining each cup with paper liners. If you prefer, lightly coat the cups with cooking spray instead. This prevents sticking and makes cleanup much easier. Lining the pan also ensures your muffins retain their shape and do not lose their delicate texture.
- Mix Dry Ingredients: In a large mixing bowl, combine all your dry ingredients: 1 ½ cups gluten-free all-purpose flour (with xanthan gum), 1 cup gluten-free quick-cooking oats, 1 tablespoon baking powder, 1 teaspoon ground cinnamon, ¼ teaspoon nutmeg, and ¼ teaspoon salt. Whisk these ingredients together gently until they are evenly distributed.This ensures that the rising agents, spices, and flour are thoroughly blended, which will help your muffins bake evenly and develop a consistent texture.
- Combine Wet Ingredients: In a separate, smaller bowl, prepare the wet mixture. Whisk together 1 cup almond milk, 1 large egg, ¼ cup olive oil, ¼ cup maple syrup, and 1 teaspoon vanilla extract until fully combined. The mixture should be smooth and uniform, with the egg completely incorporated. Mixing the wet ingredients separately from the dry ensures the muffins will be tender and prevents overworking the batter, which could make them dense.
- Incorporate Wet and Dry Mixtures: Create a well in the center of your dry ingredients and pour in the wet mixture. Using a spatula or wooden spoon, gently fold the wet and dry ingredients together. Stir only until the flour is moistened. Be careful not to overmix; a few small lumps are perfectly fine. Overmixing can develop gluten (even in gluten-free blends) and result in tougher muffins, so patience here is key.
- Add Fruits and Nuts: Once the batter is just combined, fold in 1 large diced apple, 6 chopped dates, ½ cup cranberries, and ½ cup toasted walnuts. Gently distribute these add-ins throughout the batter, ensuring each muffin will have a balanced mix of sweet, tart, and crunchy elements. Take care to fold lightly so that the batter remains airy.
- Portion Batter into Pan: Using an ice cream scoop or large spoon, evenly portion the batter into the prepared muffin pan cups. Fill each cup about three-quarters full to allow space for the muffins to rise without spilling over. Even portioning ensures consistent baking and a uniform look, so take your time to distribute the batter carefully.
- Bake the Muffins: Place the muffin pan in the center of your preheated oven and bake for 20 minutes. For even baking, rotate the pan halfway through the baking time, as many ovens have hotter spots toward the back. The muffins are done when a toothpick inserted into the center comes out clean or with just a few crumbs clinging to it. The tops should be lightly golden and springy to the touch.
- Cool in Pan: After baking, remove the muffins from the oven and allow them to cool in the pan for five minutes. This short cooling period helps the muffins set slightly, making them easier to remove from the pan without breaking. Be gentle when handling the paper liners or lifting the muffins.
- Transfer to Cooling Rack: Carefully transfer the muffins from the pan to a wire cooling rack to cool completely. Cooling on a rack prevents the bottoms from becoming soggy and preserves the muffins’ soft, fluffy texture. Let them cool fully before storing or serving to ensure the flavors have time to meld and the texture remains perfect.
- Storage and Meal Prep: Once completely cooled, store the muffins in an airtight container at room temperature for up to two days. For longer storage, you can freeze them: place the muffins on a tray until firm, then transfer to a freezer-safe container or wrap individually. Frozen muffins can be thawed at room temperature or gently warmed in the microwave for a quick breakfast or snack.
Notes
- Naturally sweetened and gluten-free, perfect for breakfast or snacks.
- Packed with fiber from oats and fruits, and healthy fats from walnuts and olive oil.
- Always use the Muffin Method: mix wet and dry ingredients separately for a tender texture.
- Avoid overmixing; a few small lumps in the batter are normal.
- Use an ice cream scoop for evenly sized muffins.
- Allow muffins to cool completely on a wire rack before storing or serving.
Chef’s Secrets: Expert Baking Insights
To achieve perfectly tender muffins, the key is gentle folding and proper ingredient temperature.
Room-temperature eggs and milk help the batter blend smoothly, while chopping fruits evenly ensures every bite has a balanced flavor.
For a subtle lift in gluten-free baking, a splash of lemon juice or apple cider vinegar added to the milk can improve rise and texture.
Toasting the walnuts intensifies their flavor and adds a satisfying crunch.
Finally, rotate your pan halfway through baking to avoid uneven browning caused by hot spots in the oven.
Serving Suggestions: Perfect Pairings Ideas
These muffins pair wonderfully with a variety of accompaniments.
Spread a thin layer of nut butter or cream cheese for extra richness, or enjoy them alongside a warm cup of tea or coffee for a cozy morning treat.
For a wholesome breakfast, serve with a side of yogurt or fresh fruit.
They are also portable and great for lunchboxes, making them an easy grab-and-go snack for school, work, or travel.
Storage Tips: Keep Muffins Fresh Longer
Store cooled muffins in an airtight container at room temperature for up to two days.
For longer preservation, freeze them individually or on a tray until firm, then transfer to a freezer-safe container for up to a month.
When ready to eat, thaw at room temperature or warm gently in the microwave.
Avoid storing muffins while still warm, as condensation can make them soggy.
Paper liners help maintain shape and prevent sticking, making storage simpler.
Frequently Asked Questions
1. Can I make these muffins dairy-free?
Yes! Using almond milk or another plant-based milk keeps them completely dairy-free without affecting texture or flavor.
2. Can I substitute the maple syrup?
You can use honey, agave syrup, or coconut nectar. Adjust sweetness to taste, keeping in mind liquid ratios may slightly affect moisture.
3. Can I replace walnuts with another nut?
Absolutely. Pecans, almonds, or hazelnuts work well. For nut-free versions, sunflower seeds or pumpkin seeds are great alternatives.
4. How do I prevent muffins from sinking?
Ensure the baking powder is fresh and avoid overmixing. Filling the muffin cups just three-quarters full allows them to rise properly without collapsing.
5. Can I prepare the batter ahead of time?
It’s best to bake the muffins immediately after mixing. Storing batter in advance can result in denser muffins due to the reaction of the baking powder starting too soon.
