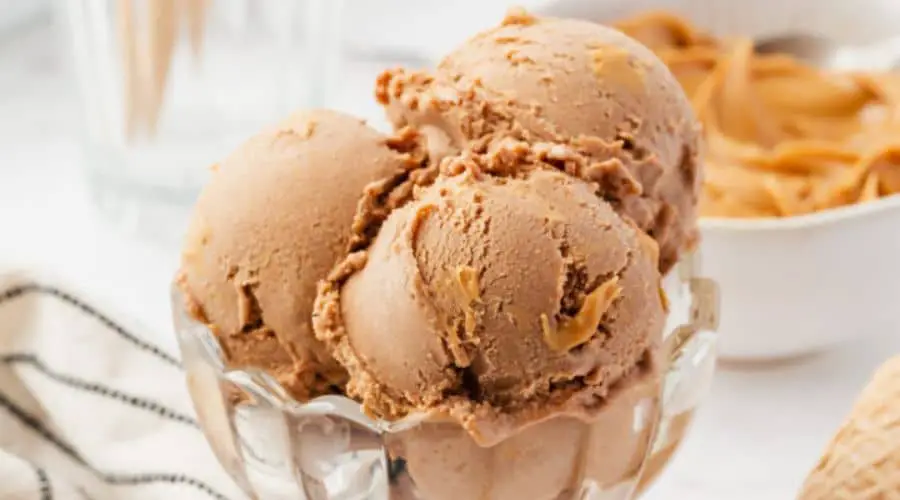
There’s something magical about the combination of chocolate and peanut butter — two flavors that perfectly complement each other, creating a rich, indulgent treat that everyone loves.
And when these two ingredients come together in the form of homemade ice cream, the result is nothing short of spectacular.
This Chocolate Peanut Butter Ice Cream recipe is the ultimate dessert for any occasion, offering a creamy, dreamy texture with that perfect balance of sweetness and savory peanut butter goodness.
Whether you’re cooling off on a warm summer day or just satisfying a late-night craving, this ice cream brings the best of both worlds in every scoop.
The best part? It’s made with simple ingredients and requires minimal effort, so you can enjoy homemade ice cream without any fuss.
Get ready to dive into a dessert that’s rich, creamy, and downright irresistible.

Ingredients You’ll Need
To make this Chocolate Peanut Butter Ice Cream, you’ll need a few key ingredients that are easy to find and will result in a rich and velvety homemade ice cream.
Here’s everything you’ll need to get started:
For the Peanut Butter Base:
- Peanut Butter: Choose creamy peanut butter for a smooth, rich flavor. If you prefer a crunchy texture, you can use chunky peanut butter for a little extra crunch.
- Heavy Cream: This provides the luscious, creamy texture that makes homemade ice cream so indulgent.
- Whole Milk: The combination of whole milk with heavy cream helps create a perfect, balanced base for your ice cream.
- Granulated Sugar: Sweeten the peanut butter base just enough to balance out the flavors.
- Vanilla Extract: A hint of vanilla enhances the overall flavor, bringing out the natural sweetness of the peanut butter.
For the Chocolate Base:
- Dark or Semi-Sweet Chocolate: Choose high-quality chocolate for the best flavor. Dark chocolate will add a rich depth to the ice cream, but semi-sweet works wonderfully for a sweeter balance.
- Heavy Cream: As with the peanut butter base, heavy cream will ensure your chocolate base is silky smooth and creamy.
- Whole Milk: This adds to the creaminess and helps balance the chocolate’s richness.
- Sugar: Sweeten the chocolate base just enough to bring out its flavor without overpowering it.
- Vanilla Extract: A small splash of vanilla enhances the chocolate, adding complexity to the overall flavor.
Optional Add-Ins:
- Crushed Peanuts: Add some extra texture by folding in crushed peanuts for a delightful crunch.
- Chocolate Chips or Chunks: For more chocolatey goodness, stir in some chocolate chips or chunks for a bit of bite in every scoop.
- Swirls of Caramel or Fudge: If you want to elevate this dessert even more, try adding swirls of caramel or fudge for an extra layer of decadence.
These simple ingredients come together to create an unforgettable treat that is rich, creamy, and packed with flavor.
Once you have everything, you’re ready to make your very own Chocolate Peanut Butter Ice Cream at home!
Equipment Needed
Before you dive into making your Chocolate Peanut Butter Ice Cream, gather the essential tools you’ll need to ensure a smooth and successful process.
Here’s a list of everything required to make this rich, creamy dessert:
Ice Cream Maker
An ice cream maker is the key to achieving that perfect, smooth texture for your ice cream.
It helps churn the mixture while freezing it, creating small ice crystals that result in a silky, scoopable ice cream.
If you don’t have one, don’t worry — there are no-churn alternatives, but an ice cream maker definitely makes the process easier and faster.
Mixing Bowls
You’ll need at least two mixing bowls: one for the peanut butter base and another for the chocolate base.
These bowls should be large enough to allow you to whisk the ingredients thoroughly without splashing.
Whisk and Spatula
A whisk is necessary to mix the ingredients for both bases, ensuring the sugar dissolves completely and that everything combines smoothly.
A spatula will help you scrape down the sides of the bowl and stir in any optional add-ins like chocolate chips or crushed peanuts.
Saucepan
Use a saucepan to melt the chocolate for the chocolate base.
You’ll gently heat the chocolate with some of the cream to ensure it melts evenly without burning.
Airtight Container
Once the ice cream has been churned, you’ll need an airtight container to store it in the freezer.
A well-sealed container will help maintain the ice cream’s texture and prevent freezer burn.
Step-by-Step Instructions

Now that you have everything you need, let’s walk through the process of making your Chocolate Peanut Butter Ice Cream.
It’s simpler than you might think, and the results are so worth it!
Step 1: Prepare the Peanut Butter Base
Start by making the peanut butter base, which will form the creamy foundation of half your ice cream.
In a mixing bowl, combine the peanut butter, heavy cream, whole milk, granulated sugar, and vanilla extract.
Whisk the mixture until it’s smooth and fully incorporated.
The result should be a creamy, peanut-buttery liquid that will freeze beautifully.
Step 2: Make the Chocolate Ice Cream Base
In a saucepan, combine the dark or semi-sweet chocolate and a portion of the heavy cream.
Heat gently over medium-low heat, stirring constantly to melt the chocolate evenly.
Once the chocolate is melted and smooth, remove the saucepan from the heat and add the remaining heavy cream, whole milk, sugar, and vanilla extract.
Whisk until everything is well combined, and you have a rich, velvety chocolate mixture.
Step 3: Churn the Ice Cream Mixture
Now comes the fun part — churning! Pour both the peanut butter and chocolate ice cream bases into your ice cream maker according to the manufacturer’s instructions.
As the mixture churns, it will thicken and become smooth and creamy.
Depending on your ice cream maker, this usually takes about 20 to 30 minutes.
Step 4: Swirl the Flavors Together
Once the two bases are churned and ready, it’s time to swirl them together.
Transfer half of the chocolate mixture into your airtight container, followed by half of the peanut butter mixture.
Use a spoon or spatula to gently swirl the two mixtures together, creating a marbled effect.
Be careful not to over-mix; the goal is to have distinct ribbons of chocolate and peanut butter throughout.
Step 5: Freeze the Ice Cream
Cover the container with a lid and place it in the freezer for at least 4 hours, or preferably overnight, to fully set.
The ice cream will harden as it freezes, achieving the perfect scoopable texture.
Tips for Success
Making homemade ice cream can be a fun and rewarding experience, but it’s important to keep a few tips in mind to ensure the best results.
Here are some helpful tips for success:
Choose Quality Ingredients
The flavor of your ice cream depends on the ingredients you use, so opt for high-quality chocolate and creamy peanut butter.
A rich dark chocolate or semi-sweet chocolate will provide a deep flavor, while using natural peanut butter (without added sugars or oils) will give the peanut butter base a more authentic, robust taste.
Get the Right Consistency
When making the ice cream bases, be sure to whisk the mixtures thoroughly until they’re smooth.
If your peanut butter mixture feels too thick, add a little more milk or cream to achieve the desired consistency.
For the chocolate base, make sure the chocolate is fully melted to prevent any lumps from forming in the mixture.
Don’t Over-Churn the Ice Cream
Over-churning can lead to a grainy texture, so be sure to follow the recommended churning time for your ice cream maker.
Most machines will take around 20-30 minutes to reach the right consistency.
Keep an eye on the mixture and stop the churning process once it’s thickened and creamy.
Let It Set for Optimal Texture
While it’s tempting to dive in right after churning, the ice cream needs time to firm up in the freezer.
Let it freeze for at least 4 hours, or preferably overnight, to ensure it reaches that perfect scoopable texture.
This waiting period is crucial for achieving the right consistency.
Experiment with Add-Ins
Feel free to get creative with your ice cream by adding extra ingredients during the churning process.
For a crunchy texture, fold in crushed peanuts, or mix in chocolate chips for an extra chocolatey bite.
You can even swirl in fudge or caramel for added richness!
Serving Suggestions
Once your Chocolate Peanut Butter Ice Cream is ready, it’s time to enjoy it!
Here are some delicious ways to serve it:
Classic Ice Cream Scoop
Sometimes, the best way to enjoy ice cream is simply in a bowl or on a cone.
Scoop generous portions into your favorite bowl, and savor each creamy bite.
If you’re feeling extra indulgent, drizzle some hot fudge or caramel sauce on top!
Sundae Style
Elevate your serving by turning your ice cream into a sundae.
Start with a scoop of chocolate peanut butter ice cream, then layer with whipped cream, chocolate syrup, crushed peanuts, and maybe even a cherry on top.
A sundae is a fun and customizable way to enjoy your homemade ice cream.
Ice Cream Sandwiches
For a creative twist, make ice cream sandwiches!
Take two cookies (chocolate chip, oatmeal, or even brownies) and sandwich a scoop of chocolate peanut butter ice cream between them.
Freeze for a bit to let them set, and you’ve got a delicious, handheld treat.
In a Milkshake
Blend a scoop of the ice cream with milk to make a decadent milkshake.
For an extra chocolate-peanut butter experience, blend in some extra peanut butter or chocolate syrup, and top with whipped cream and a sprinkle of crushed peanuts.
Layered Desserts
If you’re hosting a party or looking for a fancy dessert, layer your ice cream in parfait glasses with brownies or crumbled cookies.
Add layers of chocolate and peanut butter ice cream, drizzle with caramel or fudge, and top with whipped cream for an impressive, yet simple treat.
Creative Toppings
To add a fun twist, top your ice cream with a variety of garnishes.
Here are some ideas to complement the chocolate and peanut butter flavors:
- Crushed peanuts for extra crunch.
- Mini chocolate chips for an extra chocolatey bite.
- Chopped Reese’s cups or other chocolate-peanut butter candy.
- Drizzle of caramel sauce to add sweetness.
- Chopped pretzels for a salty contrast to the sweetness.
With these tips and serving ideas, your Chocolate Peanut Butter Ice Cream will not only taste incredible but also look impressive when served.
Whether you stick with a classic scoop or get creative with sundaes and shakes, there’s no wrong way to enjoy this delicious dessert!
Conclusion
There’s no denying that Chocolate Peanut Butter Ice Cream is the ultimate dessert indulgence.
The rich, creamy combination of smooth peanut butter and decadent chocolate will leave your taste buds dancing with joy.
Whether you’re cooling off on a hot summer day or simply treating yourself to something sweet, this homemade ice cream recipe is a crowd-pleaser every time.
Making your own ice cream is easier than you think, and once you try this recipe, you’ll never want to go back to store-bought again.
With just a few simple ingredients and a little patience, you can create a dessert that’s perfect for any occasion — or just because you deserve something special.
Don’t forget to get creative! Add your favorite mix-ins, experiment with toppings, and make this recipe your own.
Enjoy every creamy bite of your homemade Chocolate Peanut Butter Ice Cream, and share it with friends and family for a truly delightful treat.
Frequently Asked Questions
1. Can I make Chocolate Peanut Butter Ice Cream without an ice cream maker?
Yes, you can! While an ice cream maker helps achieve a smooth, creamy texture, you can still make this recipe without one.
Simply pour the mixture into a shallow container, cover it tightly, and freeze.
Every 30 minutes, stir the mixture with a fork to break up any ice crystals.
Continue until the ice cream firms up and reaches your desired consistency.
2. Can I use almond butter or cashew butter instead of peanut butter?
Absolutely! If you’re not a fan of peanut butter or have dietary restrictions, almond butter or cashew butter can be great alternatives.
The texture and flavor will differ slightly, but the result will still be a deliciously creamy ice cream.
3. How can I make this recipe dairy-free or vegan?
To make this recipe dairy-free or vegan, substitute the heavy cream and whole milk with plant-based alternatives like coconut milk, almond milk, or oat milk.
For the chocolate, be sure to choose dairy-free chocolate. You can also use a dairy-free or vegan-friendly sweetener if desired.
4. Can I add other mix-ins to the ice cream?
Of course! You can get creative with your ice cream by adding different mix-ins during the churning process.
Consider adding crushed Oreos, chocolate chunks, marshmallows, or even a swirl of salted caramel for an extra burst of flavor.
5. How should I store the ice cream?
Store your homemade ice cream in an airtight container in the freezer.
To keep it as fresh as possible and avoid freezer burn, place a piece of plastic wrap directly on the surface of the ice cream before sealing the container.
This will help maintain the creamy texture and prevent ice crystals from forming.

Chocolate Peanut Butter Ice Cream
Equipment
- Ice Cream Maker – 1 (For churning the ice cream)
- Mixing Bowls – 2 (Large enough to mix each ice cream base)
- Whisk – 1 (To combine the ingredients)
- Saucepan – 1 (For melting the chocolate)
- Spatula – 1 (For swirling and scraping)
- Airtight Container – 1 (To store the ice cream)
Ingredients
For the Peanut Butter Base:
- 1/2 cup 120g Peanut Butter (creamy)
- 1 cup 240ml Heavy Cream
- 1 cup 240ml Whole Milk
- 3/4 cup 150g Granulated Sugar
- 1 tsp 5ml Vanilla Extract
For the Chocolate Base:
- 4 oz 115g Dark or Semi-Sweet Chocolate (chopped)
- 1 cup 240ml Heavy Cream
- 1 cup 240ml Whole Milk
- 3/4 cup 150g Granulated Sugar
- 1 tsp 5ml Vanilla Extract
Optional Add-Ins:
- 1/2 cup 75g Crushed Peanuts (for extra crunch)
- 1/2 cup 85g Chocolate Chips or Chunks (for a more chocolaty experience)
- Swirl of Caramel or Fudge optional, for added decadence
Instructions
Prepare the Peanut Butter Base:
- In a mixing bowl, combine peanut butter, heavy cream, whole milk, sugar, and vanilla extract. Whisk until the mixture is smooth and creamy.
Make the Chocolate Base:
- In a saucepan, melt the chopped chocolate with 1/2 cup of the heavy cream over medium-low heat, stirring constantly. Once melted, add the remaining heavy cream, milk, sugar, and vanilla extract. Whisk until smooth and fully combined.
Churn the Ice Cream:
- Pour both the peanut butter and chocolate bases into an ice cream maker. Follow the manufacturer’s instructions, typically churning for about 20-30 minutes, until the mixture thickens to a soft-serve consistency.
- Swirl the Flavors Together: In an airtight container, layer half of the chocolate mixture and half of the peanut butter mixture. Use a spatula to gently swirl the two flavors together, creating a marbled effect.
Freeze the Ice Cream:
- Cover the container and freeze for at least 4 hours, or overnight, until the ice cream is firm and scoopable.
Serve and Enjoy:
- Once fully frozen, scoop and serve the ice cream as is, or top with additional crushed peanuts, chocolate syrup, or caramel for extra flavor.
Notes
- Texture Tip: For the best texture, allow the ice cream to sit at room temperature for a few minutes before scooping.
- Churning Time: Be sure not to over-churn, as this can result in a grainy texture. Stop once it reaches a soft-serve consistency.
- Storage: Store in an airtight container in the freezer. For best texture, finish within a week or two.
- Make-Ahead: This recipe can be made ahead of time and stored in the freezer for up to a month.


