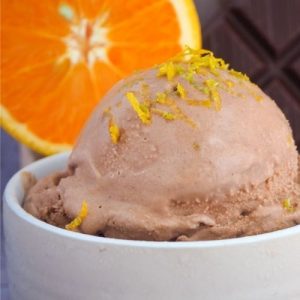
Indulge in the luxurious fusion of rich chocolate and zesty fresh oranges with this homemade ice cream.
Naturally high in healthy fats from full cream and cream, and lightly sweetened, it delivers a creamy, satisfying treat with a hint of citrus brightness.
Perfect for a quick dessert or a make-ahead frozen delight, this recipe balances indulgence with wholesome ingredients for everyday enjoyment.
Creamy Chocolate Orange Ice Cream
Equipment
- 1 Ice Cream Maker
- 1 Stick or immersion blender
- 1 Small pot
- 1 Heatproof jug
- 1 small bowl
- 1 Zester or grater
Ingredients
- 1 cup 250 ml full cream milk
- 2 tsp 5 g tapioca starch
- 2 cups 500 ml thickened cream
- ½ cup 110 g white sugar
- ¼ cup 25 g natural cocoa powder
- Zest of 3–5 medium oranges
- 1 tsp 7.5 g glucose syrup
- A few drops food-safe orange oil NOT essence
Instructions
- Prepare the Tapioca Slurry: Begin by measuring out 1 cup (250 ml) of full cream milk. Reserve two tablespoons of this milk in a small bowl. Sprinkle in the 2 teaspoons (5 g) of tapioca starch and mix thoroughly with a small whisk or spoon until it forms a smooth, lump-free slurry. This will act as your natural thickener and ensures your ice cream has a creamy, smooth texture without any gritty pockets. Set this aside while you prepare the main mix.
- Zest the Oranges: Using a fine grater or zester, carefully zest 3–5 medium-sized oranges. Aim for thin, delicate strips without the bitter white pith. For a smoother texture in the ice cream, you can finely chop the zest even further into tiny pieces. The fresh zest will infuse your ice cream with a bright, fragrant citrus flavor that pairs perfectly with the richness of the cocoa.
- Combine Cream, Milk, and Sweeteners: Pour the remaining milk into a small pot and add 2 cups (500 ml) of thickened cream, ½ cup (110 g) of white sugar, and 1 teaspoon (7.5 g) of glucose syrup. Stir gently to combine all ingredients. Glucose syrup helps prevent the ice crystals from forming, keeping your ice cream luxuriously smooth and scoopable straight from the freezer.
- Incorporate Cocoa Powder: Sift ¼ cup (25 g) of natural cocoa powder directly into the pot. Place the pot over low heat and slowly warm the mixture while stirring continuously. If the cocoa powder resists dissolving, remove the pot from the heat briefly and use a stick or immersion blender to fully incorporate it. This step ensures a deep, even chocolate flavor throughout the ice cream without clumps or streaks.
- Infuse Orange Zest: Once the cocoa is fully blended and the mixture is warm, add the finely chopped orange zest. Stir gently while keeping the heat low. Taste the mixture for a balanced orange flavor. If the citrus notes are not pronounced enough, you can add additional zest from 1–2 more oranges or a few drops of food-safe orange oil. The key is to achieve a bright, aromatic citrus presence that complements the chocolate without overpowering it.
- Add the Tapioca Slurry: Re-stir the tapioca starch and milk slurry to ensure it’s smooth and lump-free, then slowly pour it into the pot. Stir constantly as you add it, blending it fully into the warm cream and chocolate mixture. Once incorporated, remove the pot from heat. Allow the mixture to cool for 10–15 minutes to prevent condensation when chilling later.
- Strain and Chill the Mixture: Pour the cooled mixture through a fine-mesh sieve into a heatproof jug. This removes any zest clumps or undissolved cocoa bits for a perfectly smooth base. Cover the jug with a lid or cling film and place it in the refrigerator. Chill for at least four hours, or preferably overnight. Chilling allows the flavors to meld beautifully and helps the mixture achieve the ideal temperature for churning.
- Prepare the Ice Cream Maker: While the mixture chills, prep your ice cream maker. If using a self-freezing model, switch it on about 10 minutes before churning. For non-freezing machines, place the freezer bowl in the freezer until thoroughly cold. This ensures the ice cream sets quickly and develops the signature creamy texture rather than forming icy crystals.
- Churn the Ice Cream: Once the ice cream base is fully chilled, give it a gentle stir to reincorporate any settled cream or cocoa. Pour the mixture into your ice cream machine. Churn according to the manufacturer’s instructions. The ice cream will thicken and reach a soft-serve consistency in about 20–30 minutes, depending on your machine. At this stage, it should be smooth, creamy, and slightly scoopable.
- Add Final Orange Zest Touch: Transfer the soft ice cream to your pre-chilled storage container. Immediately sprinkle a small amount of freshly grated orange zest over the top and fold it in lightly. This final touch reinforces the citrus aroma and adds a visually appealing pop of color against the rich chocolate.
- Freeze Until Firm: Cover the container with a lid or plastic wrap and freeze for at least four hours, or until firm enough to scoop cleanly. The ice cream will continue to develop its flavors and texture during this period, resulting in a rich, velvety dessert that holds its shape.
- Serve and Enjoy: To serve, remove the ice cream from the freezer a few minutes before scooping to allow it to soften slightly. Scoop into bowls or cones and enjoy the luscious combination of creamy chocolate and bright orange. For an extra indulgent experience, drizzle with chocolate sauce or orange syrup. This ice cream also pairs wonderfully with fresh fruit or a thin biscuit for added texture.
Notes
- Use fresh oranges for zest to maximize natural flavor; store-bought zest or pre-packaged zest often lacks brightness.
- Tapioca starch ensures a smooth, creamy texture while preventing ice crystals. Do not skip it.
- Glucose syrup helps maintain a soft texture in the freezer, but if unavailable, light corn syrup is a good substitute.
- Chocolate powder should be sifted before mixing to prevent clumps and ensure a uniform chocolate flavor.
- Chilling the mixture before churning is crucial. It allows flavors to meld and produces smoother ice cream.
- For stronger citrus flavor, add a few drops of food-safe orange oil after heating. This keeps the aroma fresh.
- This ice cream can be made over two days: prepare and chill the base one day, churn and freeze the next.
Chef’s Secrets For Perfect Ice Cream
Achieving the perfect chocolate orange ice cream is all about temperature control and ingredient quality.
Always heat your cream and milk mixture gently over low heat to avoid scalding or curdling.
Sifting cocoa powder ensures it blends evenly without lumps.
Don’t underestimate the power of fresh orange zest—the fine pieces release essential oils that elevate the flavor.
Lastly, chilling the base thoroughly before churning produces a smooth, velvety texture and allows the flavors to fully develop.
Small details, like a final sprinkle of fresh zest before freezing, add a professional touch.
Serving Suggestions To Impress Guests
This ice cream shines on its own, but there are many ways to elevate it.
Serve in bowls with a drizzle of dark chocolate sauce or a touch of orange syrup for added decadence.
For a refreshing twist, pair it with fresh berries or thin chocolate shards.
It also works beautifully alongside sponge cakes or in a chocolate orange sundae.
For a sophisticated adult dessert, add a splash of orange liqueur or Grand Marnier just before serving.
Presentation with a sprinkle of zest or a small mint leaf makes it visually irresistible.
Storage Tips For Long-Term Enjoyment
Store your ice cream in an airtight container to prevent freezer burn and preserve flavor.
Place a piece of parchment or wax paper directly on the surface before sealing to reduce ice crystal formation.
Ideally, consume within 2–3 weeks for optimal freshness, though it can last up to a month in the freezer if stored carefully.
Avoid repeated thawing and refreezing; always scoop only what you plan to eat.
For softer ice cream, leave it at room temperature for 5–10 minutes before scooping.
Frequently Asked Questions
1. Can I make this ice cream without an ice cream machine?
Yes! Pour the chilled mixture into a freezer-safe container and stir every 30–40 minutes as it freezes to break up ice crystals.
Repeat 4–5 times until creamy. The texture will be slightly softer than churned ice cream but still delicious.
2. Can I use orange essence instead of fresh zest?
Fresh zest is highly recommended for natural citrus oils and flavor depth. If using essence, add only a few drops to avoid an artificial taste.
Food-safe orange oil is a better alternative if zest is unavailable.
3. Can I substitute the cream with a lower-fat option?
You can replace thickened cream with a combination of milk and a little mascarpone or coconut cream, but the ice cream will be less rich and may freeze slightly harder.
The full cream version gives the best smooth, creamy texture.
4. How do I make the ice cream extra chocolatey?
Increase the cocoa powder slightly (up to ⅓ cup) or add small chunks of dark chocolate during the last few minutes of churning.
Be careful not to alter the liquid balance too much to prevent affecting texture.
5. Can I prepare this in advance for a party?
Absolutely! The base can be made a day or two in advance and kept chilled in the fridge.
Churned ice cream can be frozen for up to a month, making it perfect for entertaining.
Add zest or toppings just before serving to maintain freshness and aroma.
