Transform simple frozen peas into a vibrant, flavorful side in just minutes with this garlic buttered peas recipe.
Packed with fiber and plant-based protein, these tender peas are lightly coated in heart-healthy butter and aromatic garlic for a satisfying taste without heavy calories.
Quick, easy, and versatile, this dish works perfectly for weeknight dinners, meal prep, or pairing with any main course for a nutritious boost.
Buttered Peas
Equipment
- 1 Large saucepan
- 1 wooden spoon or heatproof spatula
- 1 measuring cup
- 1 Knife and cutting board
Ingredients
- 3 tbsp 50 g unsalted butter or preferred cooking fat
- 2 garlic cloves finely minced
- 1 lb 500 g frozen peas
- 1/2 tsp kosher or cooking salt
- 1/2 tsp freshly ground black pepper
- 1 tbsp water
Instructions
- Prepare Your Ingredients: Before turning on the stove, gather all your ingredients and equipment. Measure out 3 tablespoons (50 g) of unsalted butter, finely mince 2 garlic cloves, and have 1 pound (500 g) of frozen peas ready. Keep 1 tablespoon of water nearby, and make sure your salt and pepper are within reach. Prepping everything in advance ensures a smooth, stress-free cooking process.
- Heat the Butter: Place a large saucepan over medium heat. Add the butter and allow it to melt gently. Watch carefully as it turns from solid to a golden liquid, but avoid letting it brown at this stage. Melted butter provides a rich, velvety base that will coat the peas beautifully.
- Sauté the Garlic: Once the butter is fully melted, add the minced garlic to the pan. Stir immediately to combine. Cook the garlic for about 30 seconds, just until it becomes fragrant and lightly golden. Avoid overcooking, as burnt garlic can turn bitter and overpower the delicate flavor of the peas. The aroma of garlic sizzling in butter is the first sign that your dish is coming alive.
- Add the Frozen Peas: Directly add the frozen peas to the saucepan, no need to thaw them first. Gently stir to coat each pea in the buttery garlic mixture. The cold peas will lower the temperature slightly, so be patient and allow the pan to return to medium-high heat. This step locks in the bright green color and prevents the peas from becoming mushy.
- Season the Peas: Sprinkle 1/2 teaspoon of salt and 1/2 teaspoon of black pepper over the peas. Add 1 tablespoon of water to create a little steam, which helps the peas cook evenly and keeps them tender. Stir carefully to ensure every pea is lightly seasoned and coated in the flavorful butter.
- Cook and Stir: Turn the heat to medium-high and cook the peas for about 5 minutes. Stir occasionally to prevent sticking and ensure even cooking. You want the peas to become hot and tender while retaining a slight bite. The water will evaporate during this process, leaving the peas glossy and coated in garlic butter.
- Taste and Adjust: After cooking, taste a few peas and adjust seasoning if necessary. You can add a pinch more salt or pepper according to your preference. This final check ensures that each bite bursts with perfectly balanced flavor.
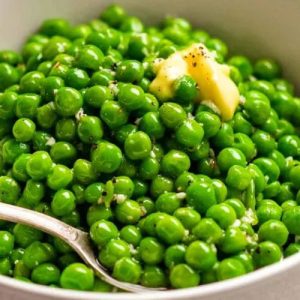
- Serve the Garlic Buttered Peas: Carefully transfer the cooked peas into a serving bowl. The bright green, glossy peas should glisten under the light, coated with aromatic garlic butter. Serve immediately as a side to complement any main course—meat, fish, or plant-based dishes.
- Optional Garnishes (Optional Enhancement): For added flavor, consider stirring in freshly chopped herbs like mint, parsley, or chives. A light sprinkle of grated Parmesan or a hint of lemon zest can elevate the dish further. These optional touches make the peas even more appealing for special occasions or a weeknight dinner upgrade.
- Storage Tips for Leftovers: If you have leftovers, allow them to cool completely before transferring them to an airtight container. Store in the fridge for up to 4 days or freeze for up to 3 months. Reheat gently over low heat, adding a splash of water or butter to refresh the texture.
Notes
- Peas: Baby peas are naturally sweeter and tender, but regular frozen peas work just as well. Avoid thawing before cooking to preserve their bright color and firm texture.
- Butter Alternatives: You can use olive oil, ghee, or plant-based margarine if you prefer a dairy-free option. Each fat brings a slightly different flavor profile.
- Garlic Flavor: Mince garlic finely to release its aroma quickly. Cooking it briefly prevents bitterness while maximizing fragrance.
- Customization: Add fresh herbs, spices, or a sprinkle of cheese at the end for an extra layer of flavor. Mint, parsley, lemon zest, cumin, or coriander all pair beautifully.
- Quick Tip: Stir occasionally while cooking to avoid sticking, and watch the water evaporate completely to ensure glossy, non-watery peas.
Chef’s Secrets: Elevate Everyday Garlic Peas
The key to restaurant-quality garlic buttered peas lies in attention to temperature and timing.
Always sauté garlic over medium heat to release its aroma without burning it.
Adding frozen peas directly to the pan maintains their vibrant green color and prevents mushiness.
A splash of water helps create steam, allowing the peas to cook evenly and absorb buttery flavors.
For a richer taste, try finishing with a small knob of cold butter stirred in at the end.
Experimenting with fresh herbs or spices at the final stage can transform this simple side into a gourmet experience.
Serving Suggestions: Versatile Pairing Ideas
Garlic buttered peas are incredibly versatile and pair beautifully with a wide range of dishes.
Serve alongside roasted chicken, grilled salmon, or seared steaks for a wholesome weeknight dinner.
They also complement vegetarian mains such as mushroom risotto, pasta dishes, or lentil-based meals.
For a vibrant, casual presentation, sprinkle fresh herbs, grated Parmesan, or a hint of lemon zest over the peas before serving.
These finishing touches elevate the dish visually and enhance the flavor without extra effort.
Storage Tips: Keep Peas Fresh Longer
To store leftover garlic buttered peas, allow them to cool completely before placing them in an airtight container.
Refrigerate for up to four days, reheating gently over low heat with a splash of water or butter to restore their tenderness.
For longer storage, peas freeze well for up to three months. Thaw in the refrigerator and reheat gently to prevent mushiness.
Avoid microwaving directly from frozen, as uneven heating can cause the peas to become soggy or lose their vibrant color.
Frequently Asked Questions
1. Can I use thawed peas instead of frozen?
Yes, but frozen peas work best for maintaining color and texture.
Thawed peas can overcook quickly and become soft, so reduce cooking time slightly.
2. Can I make this recipe dairy-free?
Absolutely! Substitute butter with olive oil, ghee, or vegan margarine.
Each option gives a slightly different flavor, but all maintain a rich, glossy coating.
3. How can I boost flavor without extra fat?
Use fresh herbs like mint, parsley, or chives, a squeeze of lemon juice, or a pinch of spices like cumin or smoked paprika to enhance flavor without adding more butter.
4. Can this recipe be doubled for a larger crowd?
Yes, simply double all ingredients and cook in a large enough pan to avoid overcrowding.
Stir occasionally to ensure even cooking and prevent steaming instead of sautéing.
5. Will this recipe work with fresh peas?
Yes, fresh peas are excellent. Cook slightly longer than frozen to ensure tenderness, and add a small splash of water if needed to prevent sticking.
Fresh peas are naturally sweeter, which makes this dish even more vibrant.
