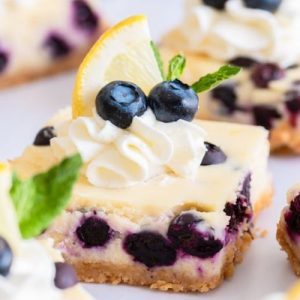
These Blueberry Lemon Cheesecake Bars combine zesty lemon, sweet fresh blueberries, and a creamy cheesecake filling atop a buttery Oreo crust for a dessert that’s both indulgent and satisfying.
Packed with protein from cream cheese and good fats from butter, they’re a balanced treat.
Quick to prepare and perfect for meal prep or family gatherings, they offer a delightful way to enjoy a fruity, nutrient-boosted dessert any day.
Blueberry Lemon Cheesecake Bars
Equipment
- 8×8 inch baking pan
- Foil or parchment paper for lining
- Large mixing bowl
- Hand mixer or stand mixer with paddle attachment
- Measuring Cups and Spoons
- Spatula
Ingredients
- 18 Golden Oreo cookies finely crushed
- 3 tablespoons unsalted butter melted
- 8 ounces cream cheese softened
- 1/3 cup sour cream
- 1/3 cup granulated sugar
- 1/2 teaspoon vanilla extract
- 1 large egg
- 2 tablespoons all-purpose flour
- 1 tablespoon fresh lemon juice
- Zest of 1 lemon
- 1 cup fresh blueberries
Instructions
- Prepare the Pan: Start by preheating your oven to 325°F (163°C) to ensure it reaches the perfect baking temperature while you assemble the ingredients. Line an 8×8 inch baking pan with either foil or parchment paper, leaving an extra 1–2 inches hanging over the sides to make lifting the bars out easier later. Lightly grease the lining with a small amount of butter or nonstick spray to prevent sticking.
- Make the Oreo Crust: In a medium mixing bowl, combine 18 finely crushed Golden Oreo cookies with 3 tablespoons of melted unsalted butter. Use a fork or spoon to mix thoroughly until the crumbs are evenly coated and feel slightly moist. Press this mixture firmly into the bottom of your prepared pan using the back of a spoon or your fingers to create an even, compact layer. A uniform crust ensures the bars hold together beautifully after baking.
- Soften and Beat the Cream Cheese: Place 8 ounces of cream cheese in a large mixing bowl. Using a hand mixer or a stand mixer with a paddle attachment, beat the cream cheese on medium speed for 2–3 minutes until it is smooth and creamy, with no lumps. Properly softened cream cheese is crucial for a silky, lump-free cheesecake filling. Scrape the sides of the bowl occasionally to ensure all pieces are fully incorporated.
- Incorporate Sour Cream and Sugar: Add 1/3 cup of sour cream and 1/3 cup granulated sugar to the cream cheese. Beat on medium speed until the mixture is smooth and slightly glossy. The sour cream not only adds a subtle tang but also helps create a creamy, rich texture that sets beautifully in the oven.
- Add Flavorings: Mix in 1/2 teaspoon of vanilla extract, 1 tablespoon of fresh lemon juice, and the zest of 1 lemon. Continue mixing on medium speed until the flavors are evenly distributed throughout the filling. The lemon juice provides a bright, refreshing tang, while the zest gives a fragrant citrus aroma that complements the sweetness of the cheesecake.
- Incorporate the Egg and Flour: Crack 1 large egg into the bowl, then add 2 tablespoons of all-purpose flour. Beat on medium speed just until the mixture is fully combined. The egg helps bind the cheesecake filling, giving it structure, while the flour stabilizes the texture without affecting the creaminess. Avoid overmixing at this stage to keep the filling light and airy.
- Fold in the Blueberries: Gently fold in 3/4 of the cup of fresh blueberries using a spatula. Use a light hand to avoid breaking the berries and releasing too much juice into the mixture. Once folded, pour the filling evenly over the prepared Oreo crust in the pan. Spread gently with a spatula to ensure it reaches all corners.
- Top with Remaining Blueberries: Sprinkle the remaining 1/4 cup of blueberries evenly over the top of the cheesecake filling. These berries will provide a visually appealing finish and a burst of fresh flavor in every bite.
- Bake the Cheesecake Bars: Place the pan in the preheated oven and bake for 28–30 minutes. The center should still be very slightly jiggly when gently shaken, while the edges turn a light golden brown. This delicate jiggle ensures the cheesecake remains creamy rather than dry or crumbly. Avoid overbaking, as this will cause cracks and a firmer, less luxurious texture.
- Cool and Chill: Remove the pan from the oven and allow it to cool completely at room temperature for 30–45 minutes. Once cooled, cover the pan tightly with plastic wrap or foil and refrigerate for at least 4 hours or overnight. Chilling fully is essential, as it allows the cheesecake bars to firm up, making them easier to cut and enhancing the flavor.
- Cut and Serve: Lift the chilled cheesecake out of the pan using the overhanging foil or parchment. Place on a cutting board and slice into 9 evenly sized bars using a sharp knife. For clean cuts, wipe the knife with a warm, damp cloth between slices. Serve chilled, and enjoy the creamy, tangy, and fruity combination in every bite!
Notes
- Room Temperature Ingredients: Ensure your cream cheese and sour cream are at room temperature before mixing. This helps the filling blend smoothly without lumps and creates a creamier texture.
- Fine Oreo Crumbs: For the perfect crust, pulse your Golden Oreos into fine crumbs using a food processor. Coarse crumbs may not bind well with butter, resulting in a crumbly base.
- Fresh Citrus Flavor: Always use freshly squeezed lemon juice and zest. The bright, natural flavor enhances the sweetness of the cheesecake and provides a refreshing tang.
- Gentle Folding: When adding blueberries, fold carefully to avoid breaking them. This keeps the berries intact, offering bursts of flavor and a visually appealing presentation.
- Chill Before Cutting: Patience is key—refrigerate the bars for at least 4 hours or overnight. Proper chilling allows the cheesecake to set fully, ensuring clean slices and optimal texture.
Chef’s Secrets for Perfect Bars
The secret to truly luxurious cheesecake bars lies in attention to detail at every step.
Start with room-temperature dairy; this guarantees a smooth, creamy filling.
Don’t overmix after adding the egg, as this can introduce air and cause cracks.
Use a light hand when folding in blueberries—they add moisture and flavor without breaking apart.
Finally, chill the bars thoroughly. A well-set cheesecake not only slices beautifully but also allows the flavors to deepen, producing a rich, tangy, and slightly sweet dessert that is irresistible.
Serving Suggestions for Maximum Enjoyment
These Blueberry Lemon Cheesecake Bars shine when served slightly chilled, offering a creamy, tangy bite balanced by the sweet, crunchy Oreo crust.
Pair them with a dollop of lightly whipped cream, a sprinkle of lemon zest, or extra fresh blueberries for added elegance.
They also work wonderfully alongside a cup of hot coffee or a refreshing iced tea.
Perfect for brunch, dessert platters, or even casual snack moments, these bars are as versatile as they are delicious.
Storage Tips for Freshness
To maintain their creamy texture and fruity freshness, store the bars in an airtight container in the refrigerator for up to 4–5 days.
For longer storage, they freeze beautifully for up to 2 months.
Wrap individual bars in plastic wrap and then place them in a freezer-safe container to prevent freezer burn.
Thaw in the fridge overnight before serving, and for an extra touch, lightly brush the blueberries with a few drops of lemon juice to revive their vibrant color.
Frequently Asked Questions
1. Can I use frozen blueberries?
Yes, but make sure to thaw and drain them first to avoid excess moisture, which can make the cheesecake watery. Fresh berries are ideal for the best texture and flavor.
2. Can I make these gluten-free?
Absolutely! Swap the Oreo crust for gluten-free cookies or almond flour mixed with butter.
The bars will maintain their rich, creamy texture without compromising taste.
3. Why is my cheesecake cracking?
Cracks usually form from overmixing or overbaking.
Beat the filling only until smooth, and bake just until the center is slightly jiggly.
Proper chilling also prevents cracks from forming.
4. Can I halve or double the recipe?
Yes! The recipe scales easily. Use a smaller pan (6×6 inches) for half the batch or a larger pan (9×13 inches) for double.
Adjust baking time slightly, checking the center for a gentle jiggle.
5. Can I prepare these ahead of time?
Definitely! They are perfect for make-ahead desserts. Bake, cool, and refrigerate overnight for the best results.
This allows the flavors to meld, and the cheesecake sets perfectly for easy slicing and serving.
