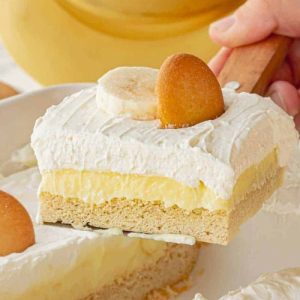
These Banana Cream Pie Bars are a decadent yet easy-to-make dessert, featuring a soft, chewy crust, creamy banana pudding, and a light whipped topping.
Naturally rich in protein from cream cheese and milk, and providing fiber from bananas, they’re a wholesome treat that’s low in saturated fat.
Perfect for quick dessert prep, family gatherings, or satisfying a sweet craving anytime.
Banana Cream Pie Bars
Equipment
- 9×13-inch baking pan – 1
- Electric mixer – 1
- Paddle or whisk attachment – 1
- Mixing Bowls (2-3)
- Spatula (1)
- Measuring cups and spoons (1 set)
Ingredients
For the crust:
- ½ cup unsalted butter room temperature
- ½ cup brown sugar
- 1 large egg
- 1 teaspoon vanilla extract
- ½ teaspoon salt
- ½ teaspoon baking soda
- 1¾ cups all-purpose flour
For the banana pudding filling:
- 1 5.1 oz box instant banana pudding mix
- 2½ cups cold whole milk
For the whipped cream topping:
- 4 oz cream cheese room temperature
- ½ teaspoon vanilla extract
- ½ cup powdered sugar
- 2 cups cold heavy whipping cream
Optional toppings:
- Fresh banana slices
- Crumbled vanilla wafer cookies graham crackers, or chocolate chips
Instructions
- Prepare the Oven and Pan: Preheat your oven to 375°F (190°C) to ensure it reaches the correct temperature while you prepare the crust. Lightly grease a 9×13-inch baking pan with butter or non-stick spray, making sure to coat the bottom and sides evenly. This will prevent the crust from sticking and allow the bars to release easily after baking. Set the pan aside while you mix the dough.
- Cream the Butter and Sugar: In a medium mixing bowl, combine ½ cup of softened unsalted butter and ½ cup of brown sugar. Using an electric mixer with a paddle or whisk attachment, beat on medium-high speed for 2–3 minutes until the mixture becomes light, fluffy, and pale in color. Scrape down the sides of the bowl with a spatula to ensure everything is evenly combined. This process aerates the butter, giving the crust a soft, tender texture.
- Incorporate the Egg and Vanilla: Add one large egg and 1 teaspoon of vanilla extract to the creamed butter and sugar. Mix on medium speed until the egg is fully incorporated and the mixture is smooth. Be sure to scrape the bowl again if necessary. The egg helps bind the ingredients together, while the vanilla adds a subtle, aromatic flavor to the crust.
- Combine Dry Ingredients: In a small bowl, whisk together 1¾ cups all-purpose flour, ½ teaspoon salt, and ½ teaspoon baking soda. Gradually add these dry ingredients to the wet mixture. Mix on low speed until a soft, slightly sticky dough forms. Avoid overmixing to ensure the crust remains tender and chewy after baking.
- Shape and Bake the Crust: Transfer the dough into the prepared 9×13-inch baking pan. Using your hands or a spatula, gently press the dough evenly across the bottom of the pan. Bake at 375°F (190°C) for 10–12 minutes (or 12–14 minutes if using a thicker ceramic pan). The crust will look soft and slightly underbaked; this is intentional as it will firm up once chilled. Remove from the oven and allow it to cool completely before adding the filling.
- Prepare the Banana Pudding Filling: While the crust is cooling, prepare the banana pudding. In a medium bowl, whisk together 1 (5.1 oz) box of instant banana pudding mix with 2½ cups of cold milk. Beat for 2 minutes until the pudding thickens slightly and becomes smooth. The mixture should be pourable but set enough to spread easily. Once the crust is completely cooled, evenly spread the pudding over it. Chill in the refrigerator for 20–30 minutes to allow it to firm slightly.
- Make the Whipped Cream Topping: In a large mixing bowl, combine 4 oz of room-temperature cream cheese, ½ teaspoon vanilla extract, and ½ cup powdered sugar. Using a whisk or paddle attachment, beat on high speed for 2–3 minutes until smooth, creamy, and lump-free. Next, gradually add 2 cups of cold heavy whipping cream in ½-cup increments. After each addition, mix thoroughly until fully incorporated. Once all the cream is added, whip on high speed for 1–2 minutes until the mixture becomes light, fluffy, and spreadable. This careful method ensures a stable, airy topping that won’t collapse over the pudding layer.
- Assemble the Bars: Once the banana pudding layer is set, gently spread the whipped cream mixture over the top. Use a spatula to create an even layer, taking care not to disturb the pudding underneath. This creates a smooth, creamy top that complements the soft crust and banana layer perfectly.
- Add Optional Toppings: For added texture and flavor, you can sprinkle sliced fresh bananas over the top. You may also crumble vanilla wafer cookies, graham crackers, or chocolate chips for a decorative and crunchy finish. Press lightly so the toppings adhere to the whipped cream but do not sink.
- Chill Before Serving: Refrigerate the assembled bars for at least 30 minutes before slicing. This allows the layers to set properly and makes cutting easier. Use a sharp knife, wiping it clean between slices for neat edges. Serve chilled, and store any leftovers in an airtight container in the refrigerator for up to 3 days.
Notes
- Use room-temperature butter and cream cheese to ensure smooth mixing and a creamy texture.
- For best results, choose firm bananas that are ripe but not overly soft to prevent sogginess.
- Instant banana pudding mix must be combined with cold milk; warm or plant-based milk will prevent proper setting.
- Press the crust gently but evenly into the pan to achieve a soft, chewy base.
- Chill the bars for at least 30 minutes before slicing to maintain clean layers and easy handling.
- Optional toppings like wafer cookies or graham crackers add a pleasing crunch, but fresh banana slices should be added just before serving to prevent browning.
Chef’s Secrets: Tips For Perfect Layers
Achieving the ideal Banana Cream Pie Bar starts with balancing textures.
The crust should feel slightly underbaked when removed from the oven; it will firm up in the refrigerator while keeping a soft chew.
Whipping the cream cheese separately before folding in heavy cream ensures a light, airy topping that spreads without sinking into the pudding layer.
For even layers, let the pudding sit briefly in the fridge until slightly set—this prevents it from mixing with the whipped cream and maintains a distinct, beautiful separation.
Using a sharp, clean knife between slices also keeps the layers intact and visually appealing.
Serving Suggestions: Creative Presentation Ideas
These bars are perfect as a stand-alone dessert, but they also pair beautifully with fresh berries, a drizzle of chocolate sauce, or a sprinkle of toasted coconut for extra flavor.
Serve chilled straight from the refrigerator for the best texture, or allow them to sit at room temperature for 5–10 minutes if you prefer a softer bite.
For parties or potlucks, cut into smaller squares or mini rectangles for easy serving, and consider layering them in clear dessert cups for an elegant presentation.
Storage Tips: Keeping Bars Fresh Longer
Store these bars in an airtight container in the refrigerator for up to 3 days.
This keeps the pudding layer firm and the whipped topping creamy.
Avoid freezing, as the whipped cream can lose its texture and become watery when thawed.
If you need to prep ahead, you can bake the crust and make the pudding up to a day in advance; simply assemble and top with whipped cream just before serving to maintain freshness and visual appeal.
Frequently Asked Questions
1. Can I use plant-based milk for the pudding?
No, plant-based alternatives like almond, soy, or oat milk won’t allow the instant banana pudding to set properly.
Whole milk or 2% milk is required for the correct consistency.
2. How can I prevent bananas from browning?
Sprinkle a tiny amount of lemon juice over banana slices before adding them on top.
Alternatively, add fresh slices right before serving to maintain color and freshness.
3. Can I make the bars ahead of time?
Yes! The crust and pudding can be prepared a day in advance.
Refrigerate the pudding layer separately and add the whipped cream topping just before serving for best results.
4. How do I cut clean slices?
Use a sharp knife and wipe it clean between cuts.
Chilling the bars for at least 30 minutes ensures firmer layers and prevents the pudding and whipped cream from smearing.
5. Can I substitute the whipped cream topping?
You can try a stabilized whipped cream or a lighter whipped topping alternative, but for the classic texture and taste, cream cheese-based whipped cream is ideal.
Avoid overly sweetened pre-made whipped toppings, as they can alter the balance of flavor.
