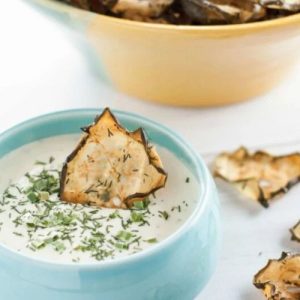
Crispy, flavorful, and delightfully light, these Garlic Dill Baked Cucumber Chips are a perfect healthy snack.
Naturally low in calories and carbs, they’re rich in fiber and plant-based nutrients, making them ideal for guilt-free munching.
Quick to prepare and easy to bake, these chips are a satisfying option for everyday snacking, meal prep, or pairing with dips.
Baked Cucumber Chips
Equipment
- 2 large baking sheets
- Parchment paper (2 sheets)
- Large mixing bowl (1)
- Small mixing bowl (1)
- Paper towels
- Measuring spoons
- Oven
Ingredients
- 2 large cucumbers 8–10 inches long
- 1 tbsp dried dill
- 1 tsp onion powder
- 1 tsp garlic powder
- 1 tbsp apple cider vinegar
- Sea salt to taste
Instructions
- Slice the Cucumbers Thinly: Start by washing your cucumbers thoroughly under cold running water to remove any dirt or residues. Using a sharp knife or mandoline, slice each cucumber into ultra-thin rounds, approximately 1/8 inch thick. The thinner the slices, the crispier your chips will be. Try to keep all slices uniform so they bake evenly and develop a consistent texture.
- Dry the Cucumber Slices: Lay the cucumber slices in a single layer on a few layers of paper towels. Place another set of paper towels on top and gently press down to absorb excess moisture. If your cucumbers are particularly juicy, repeat this process two or three times. Removing excess water is key to achieving a crispy texture rather than soggy chips.
- Prepare the Garlic Dill Mixture: In a small mixing bowl, combine the dried dill, garlic powder, onion powder, and apple cider vinegar. Stir well to create a thick, aromatic herb mixture. The vinegar will help the seasonings stick to the cucumber slices while also adding a subtle tang that enhances flavor.
- Toss Cucumbers with Seasoning: Transfer the dried cucumber slices to a large mixing bowl. Pour the prepared herb-vinegar mixture over the cucumbers. Using a spatula or your hands, gently toss each slice until it is evenly coated with the mixture. Ensure every slice has a light, even layer of the garlic-dill seasoning so that every chip is flavorful.
- Prepare Baking Sheets: Line two large baking sheets with parchment paper to prevent sticking and make cleanup easier. Arrange the cucumber slices in a single layer on the parchment, ensuring no slices overlap. Overlapping slices will result in uneven baking and soggy spots. Sprinkle a light pinch of sea salt over each tray for added taste.
- Bake at Low Temperature: Preheat your oven to 200°F (95°C). Place the prepared trays in the oven and bake for 3 hours. This slow baking process will gradually remove moisture from the cucumber slices, transforming them into crispy, golden chips. About halfway through, carefully rotate the trays from top to bottom to ensure even cooking and consistent crispiness.
- Cool for Maximum Crispiness: Once baking is complete, turn off the oven and leave the trays inside to cool completely. This additional step helps the chips firm up even more, creating a satisfying crunch. Removing them immediately may result in slightly softer chips.
- Serve or Store: After cooling, transfer the chips to a serving dish or airtight container. Enjoy them immediately as a healthy, crunchy snack, or store in a sealed container for up to 3 days. These chips are perfect on their own, paired with dips, or added to salads for extra texture and flavor.
Notes
- For the crispiest chips, removing as much moisture as possible from the cucumber slices is essential. Using paper towels to press out excess water ensures they bake evenly and become perfectly crunchy.
- Uniform slices are key. A mandoline slicer can help maintain consistent thickness, which prevents some chips from overcooking while others remain soft.
- Feel free to experiment with seasoning. While garlic dill is classic, you can try paprika, chili powder, or even a sprinkle of nutritional yeast for a cheesy flavor.
- Baking at a low temperature allows the water to evaporate slowly, creating crisp chips without burning. Patience is essential—resist the urge to increase the oven heat.
Chef’s Secrets: Tips For Perfect Chips
The secret to irresistibly crisp cucumber chips lies in a combination of thin slicing, proper drying, and slow baking.
Start with firm cucumbers for maximum crunch and avoid varieties that are overly watery.
When tossing with the garlic-dill mixture, ensure each slice is coated but not drenched—too much liquid can slow the drying process.
Rotating baking trays halfway through is also crucial to achieve even color and crispiness.
Finally, letting the chips cool completely in the oven allows residual moisture to evaporate, giving that satisfying crunch with every bite.
Serving Suggestions: Creative Ways To Enjoy
These baked cucumber chips are incredibly versatile. Serve them as a crunchy snack alongside hummus, guacamole, or tzatziki for a refreshing appetizer.
They also make a fun, low-calorie addition to sandwiches or salads, adding texture and flavor without extra calories.
For a party platter, mix these chips with other veggie chips and roasted nuts for a colorful, guilt-free snack spread.
They’re also excellent for meal prep, providing a ready-to-eat snack whenever hunger strikes.
Storage Tips: Keep Chips Crispy Longer
To maintain crispiness, store fully cooled chips in an airtight container at room temperature.
Avoid storing in the refrigerator, as humidity can make them soft.
If you’re preparing multiple batches, consider layering them with parchment paper to prevent sticking.
Consume within 2–3 days for the best texture, though properly dried chips may stay crunchy slightly longer.
For extra-long storage, you can try a dehydrator for maximum shelf life without losing crunch.
Frequently Asked Questions
1. Can I use other cucumber varieties?
Yes! Firm cucumbers like English or Kirby cucumbers work best due to their low water content.
Avoid very large or overly watery cucumbers, as they may not crisp up as well.
2. Do I need to peel cucumbers first?
Peeling is optional. The skin adds extra fiber and nutrients, but if you prefer a smoother chip, peeling is fine. Just ensure the slices are evenly cut.
3. Can I make this recipe faster?
While baking at a higher temperature may reduce cooking time, it can compromise crispiness.
Slow baking at 200°F ensures uniform, crunchy chips.
4. How do I prevent chips from sticking together?
Spacing slices in a single layer on parchment paper and lightly tossing them with seasoning prevents sticking.
Cool completely before storing, and use parchment paper between layers if stacking in a container.
5. Can I experiment with flavors?
Absolutely! Try lemon zest for brightness, smoked paprika for depth, or nutritional yeast for a cheesy twist.
Garlic and dill are classic, but the recipe is very adaptable for your taste preferences.
