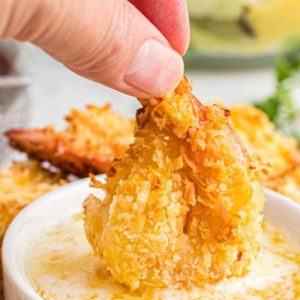
These baked coconut shrimp bring a perfect balance of crispiness and lightness without the need for deep frying.
Coated in panko breadcrumbs and unsweetened coconut, they deliver a crunchy bite while keeping the recipe lower in saturated fat compared to fried versions.
High in protein and a good source of healthy fats, this dish is both satisfying and nutritious—ideal for quick weeknight meals, meal prep, or a crowd-pleasing appetizer.
Baked Coconut Shrimp
Equipment
- 3 shallow bowls (for coating)
- 1 whisk (for egg mixture)
- 1 baking sheet or cookie sheet (lightly greased or lined)
- Cooking spray or brush for greasing
- Oven (preheated to 425°F / 220°C)
Ingredients
- ½ cup all-purpose flour
- 1 teaspoon salt
- 1 large egg
- 2 tablespoons milk
- 1 cup panko breadcrumbs
- 1 cup unsweetened shredded coconut
- 1 pound large shrimp peeled and deveined
- ⅓ cup melted butter
Instructions
- Preheat and Prepare the Baking Sheet: Begin by preheating your oven to 425°F (220°C) so it’s hot and ready when the shrimp go in. Line a baking sheet with parchment paper or lightly grease it with cooking spray to prevent sticking. A light coating ensures the shrimp bake evenly and turn out golden without burning. Setting this up in advance helps keep the cooking process smooth and efficient.
- Set Up Three Dredging Stations: Prepare three shallow bowls or plates for the coating process. First bowl (flour mix): Combine the all-purpose flour and salt. This will create a dry base layer that helps the egg mixture cling to the shrimp. Second bowl (egg wash): Crack the egg into the bowl, add the milk, and whisk until smooth and slightly frothy. This will act as the glue for the coconut coating. Third bowl (crispy coating): Stir together the panko breadcrumbs and unsweetened shredded coconut until evenly combined. This is where the crunch and flavor come from. Having these stations lined up in order—flour, egg wash, then coating—makes the process neat and organized.
- Dry and Prepare the Shrimp: Pat the shrimp dry with a paper towel to remove any excess moisture. Dry shrimp hold the coating better and bake up crispier. Make sure the shrimp are peeled and deveined, but keep the tails on if you’d like a nicer presentation and easier dipping.
- Coat the Shrimp in Flour Mixture: Take one shrimp at a time and dredge it in the flour and salt mixture, making sure every side is lightly coated. Shake off any excess flour so the coating doesn’t become too thick. This first layer helps the egg wash stick evenly.
- Dip the Shrimp into Egg Wash: Next, dip the floured shrimp into the egg and milk mixture. Turn it over to ensure it’s completely coated. Lift the shrimp out, letting any excess egg wash drip off. A thin, even layer works best for helping the coconut-panko mixture adhere without clumping.
- Press Shrimp into Coconut Coating: Place the shrimp into the bowl with the panko and shredded coconut mixture. Use a spoon to gently press the coating onto the shrimp, making sure every side is covered. This step is important because pressing helps the crunchy coating stick firmly and prevents it from falling off during baking. Continue this process with all the shrimp, arranging them on the prepared baking sheet as you go.
- Drizzle with Melted Butter: Once all the shrimp are coated and lined up on the baking sheet, drizzle the melted butter evenly over the tops. The butter helps the coconut and breadcrumbs turn beautifully golden and crispy in the oven while keeping the shrimp tender and juicy inside.
- Bake Until Crispy and Pink: Place the baking sheet into the preheated oven and bake for 10–15 minutes, depending on the size of your shrimp. Keep an eye on them—shrimp cook quickly! You’ll know they’re done when the coating is golden brown, the shrimp have curled slightly, and the flesh has turned opaque and pink. Avoid overbaking, as shrimp can become tough and rubbery if left in the oven too long.
- Serve Hot with Your Favorite Dip: Remove the shrimp from the oven and let them cool for 1–2 minutes on the baking sheet. This short resting period allows the coating to firm up slightly, making them easier to handle. Serve immediately while they’re hot and crispy with your choice of dipping sauces—sweet chili sauce, tartar sauce, cocktail sauce, or even a citrusy marmalade dip pair wonderfully with the coconut crust.
Notes
- Always pat shrimp dry before coating—this ensures the flour sticks properly and the crust turns crisp.
- Panko breadcrumbs create a crunchier finish than regular breadcrumbs, so don’t skip them.
- Unsweetened shredded coconut keeps the flavor balanced and prevents the shrimp from becoming overly sweet.
- Adding melted butter before baking enhances crispness without the need for frying.
- These shrimp can also be cooked in an air fryer or skillet for variations in texture and flavor.
- Serve immediately after baking for the crispiest results—shrimp tend to soften if they sit too long.
Chef’s Secrets for Perfect Shrimp
The secret to truly irresistible coconut shrimp lies in the layering of textures.
Start with a light dusting of flour—it acts as an anchor for the egg wash, preventing the coating from sliding off.
The egg mixture adds moisture and helps the panko and coconut cling firmly, while pressing the coating onto each shrimp ensures maximum crunch.
To avoid soggy results, never overcrowd the baking sheet; leaving space around each shrimp allows hot air to circulate for even browning.
Finally, use unsweetened coconut for the best flavor balance—sweetened coconut can caramelize too quickly and overpower the delicate shrimp.
Serving Suggestions and Pairing Ideas
These coconut shrimp are wonderfully versatile and can shine as both an appetizer and a main course.
Serve them with a variety of dipping sauces to suit different tastes—sweet chili sauce offers a classic sweet-heat combination, while tartar sauce brings creamy tang.
For a tropical twist, try pairing them with a mango salsa or pineapple chutney.
If serving as a meal, add a side of jasmine rice, a crisp cucumber salad, or roasted vegetables for a balanced plate.
For parties, arrange the shrimp on a platter with colorful dipping sauces in small bowls for an inviting, crowd-pleasing spread.
Storage Tips and Reheating Methods
Coconut shrimp are best enjoyed fresh, but leftovers can be stored for later.
Allow them to cool completely before transferring to an airtight container.
They’ll keep in the refrigerator for up to 2–3 days. To reheat, skip the microwave—this will make them soggy.
Instead, place the shrimp on a baking sheet and warm them in a preheated oven at 350°F (175°C) for about 8–10 minutes until crisp again.
For longer storage, freeze the shrimp on a tray in a single layer before transferring them to a freezer bag.
They can be baked directly from frozen, adding a few extra minutes of cook time.
Frequently Asked Questions
1. Can I use regular breadcrumbs instead of panko?
Yes, but panko is highly recommended because it creates a lighter, crunchier crust.
Regular breadcrumbs will work in a pinch, but the texture will be denser.
2. Do I need to use unsweetened coconut?
Unsweetened coconut is best for this recipe since it prevents the shrimp from becoming overly sweet.
If you only have sweetened coconut, reduce the amount slightly and watch closely while baking to prevent burning.
3. How do I know when shrimp are fully cooked?
Shrimp cook quickly and are done when they turn opaque, pink, and curl into a “C” shape.
Overcooked shrimp become rubbery, so check them around the 10-minute mark.
4. Can I make these shrimp ahead of time?
You can coat the shrimp a few hours in advance and store them, covered, in the refrigerator until baking.
This makes them convenient for parties. However, bake just before serving for the crispiest results.
5. What dipping sauces go best with coconut shrimp?
Classic choices include sweet chili sauce, tartar sauce, and cocktail sauce.
For something unique, try orange marmalade mixed with soy sauce, or a spicy sriracha-mayo blend for extra kick.
