Every product is independently reviewed and selected by our editors. If you buy something through our links, we may earn an affiliate commission at no extra cost to you.
There’s something magical about the combination of sweet, pillowy marshmallows and rich, creamy ice cream.
This homemade marshmallow ice cream is a dream come true for dessert lovers—light, airy, and bursting with a delicate vanilla-marshmallow flavor.
Whether you’re making it for a summer gathering, a cozy movie night, or just because you deserve a treat, this ice cream will quickly become a favorite.
The best part? You don’t need to be an expert to whip up this indulgent dessert!
With a handful of ingredients and an easy step-by-step method, you’ll have a luscious batch of marshmallow ice cream ready to enjoy.
Keep reading to discover why this recipe is a must-try and how to make it yourself.

Why You’ll Love This Marshmallow Ice Cream
1. Ultra-Creamy and Smooth Texture
Marshmallows don’t just add flavor—they contribute to an incredibly smooth and fluffy texture.
Their unique composition helps prevent ice crystals from forming, giving you a rich, velvety ice cream every time.
2. A Fun Twist on Classic Ice Cream
While vanilla and chocolate are timeless favorites, this marshmallow-infused version brings something new to the table.
It’s sweet, slightly toasted in flavor, and perfect for those who love a soft, melt-in-your-mouth experience.
3. No Ice Cream Maker? No Problem!
This recipe works beautifully with both churn and no-churn methods.
Whether you own an ice cream maker or not, you can still enjoy homemade marshmallow ice cream with ease.
4. Perfect for Customization
Love s’mores? Add graham cracker crumbles and chocolate chunks.
Want something fruity? Swirl in strawberry or raspberry sauce. This recipe serves as a delicious base for endless variations.
5. Crowd-Pleasing & Kid-Approved
This ice cream is a guaranteed hit with kids and adults alike.
Its nostalgic marshmallow flavor brings back childhood memories of roasting marshmallows over a fire, but in a refreshingly cool and creamy form.
Ready to dive in? Let’s get started with the ingredients you’ll need! 🍦
Ingredients You’ll Need
Before you begin, gather these simple ingredients to create a rich and fluffy marshmallow ice cream.
Main Ingredients
- 2 cups heavy whipping cream – The key to a creamy, luxurious texture.
- 1 cup whole milk – Balances the richness while keeping the ice cream smooth.
- ¾ cup granulated sugar – Enhances the sweetness and helps create a silky consistency.
- 2 cups mini marshmallows (or 1 cup marshmallow fluff) – The star ingredient that adds a light, airy texture and distinct marshmallow flavor.
- 1 teaspoon vanilla extract – Brings a warm, classic depth to the flavor.
Optional Add-Ins & Variations
- ½ cup chocolate chips or fudge swirls – For a s’mores-inspired twist.
- ½ cup crushed graham crackers – Adds a delicious crunch.
- Toasted marshmallows – Mix them in for a caramelized flavor boost.
- Fruit puree (strawberry, raspberry, or mango) – For a refreshing fruity variation.
Step-by-Step Guide to Making Marshmallow Ice Cream

This recipe is simple to make, whether you have an ice cream maker or not.
Follow these easy steps for a perfect batch every time.
Step 1: Prepare the Marshmallow Base
- In a medium saucepan over low heat, add the mini marshmallows and milk.
- Stir constantly until the marshmallows are completely melted and the mixture is smooth.
- Remove from heat and let it cool to room temperature. This step ensures the mixture blends well into the ice cream base.
Step 2: Make the Ice Cream Mixture
- In a separate mixing bowl, whisk together heavy whipping cream, sugar, and vanilla extract until the sugar is dissolved.
- Gently fold in the cooled marshmallow mixture, stirring until fully combined.
Step 3: Churn or No-Churn Method
Churn Method (Using an Ice Cream Maker):
- Pour the mixture into your ice cream maker.
- Churn according to the manufacturer’s instructions (usually 20-25 minutes) until thick and creamy.
- Transfer to an airtight container and freeze for at least 4 hours to firm up.
No-Churn Method (Without an Ice Cream Maker):
- Using a hand mixer or stand mixer, whip 1 cup of heavy cream until stiff peaks form.
- Gently fold the whipped cream into the marshmallow mixture, ensuring it stays light and airy.
- Pour the mixture into a loaf pan or airtight container, cover, and freeze for 4-6 hours, stirring every 30 minutes for the first 2 hours to reduce ice crystals.
Step 4: Freeze and Serve
- Once the ice cream is firm, scoop and enjoy!
- Garnish with extra toasted marshmallows, a drizzle of chocolate sauce, or crushed graham crackers for added texture and flavor.
Pro Tips for the Creamiest Marshmallow Ice Cream
- Use Fresh, High-Quality Ingredients – The better the cream and vanilla, the richer the final product.
- Don’t Skip Cooling the Marshmallow Mixture – Adding hot marshmallow to cold cream can lead to curdling. Let it cool completely.
- Toast the Marshmallows for Extra Flavor – If you love a slightly smoky, caramelized taste, toast the marshmallows before melting them into the mixture.
- Stir During Freezing (No-Churn Method) – If making no-churn ice cream, stirring every 30 minutes for the first 2 hours helps create a smoother texture.
- Store Properly – Keep ice cream in an airtight container with a layer of plastic wrap pressed onto the surface to prevent ice crystals from forming.
Now that your marshmallow ice cream is ready, let’s explore the best ways to serve and enjoy it! 🍨
Delicious Ways to Serve Your Marshmallow Ice Cream
Marshmallow ice cream is delightful on its own, but why stop there?
Here are some creative and mouthwatering ways to serve it:
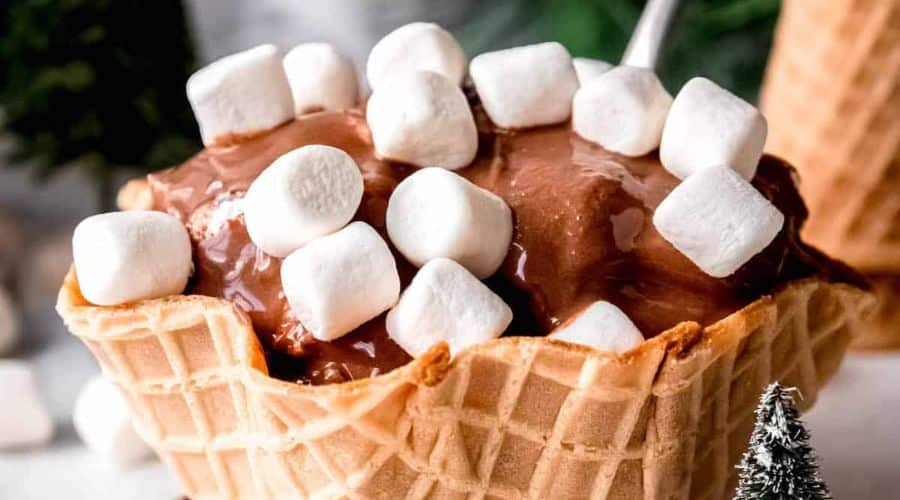
1. Classic Style
Scoop into a bowl or waffle cone and enjoy its pure, creamy goodness.
Add a drizzle of caramel or chocolate sauce for extra indulgence.
2. S’mores-Inspired Sundae
Take your ice cream to the next level by layering it with crushed graham crackers, chocolate chunks, and toasted marshmallows.
A drizzle of warm chocolate syrup makes it even better!
3. Ice Cream Sandwiches
Place a scoop between two soft chocolate chip cookies or graham crackers for a delicious handheld treat.
Roll the edges in mini chocolate chips or sprinkles for a fun touch.
4. Milkshake Magic
Blend a few scoops of marshmallow ice cream with milk and top with whipped cream and a cherry for a creamy, dreamy milkshake.
Add a bit of cocoa powder for a marshmallow hot chocolate twist!
5. Topped Over Brownies or Pie
Serve a scoop alongside a warm brownie, apple pie, or s’mores pie for a delicious contrast of hot and cold textures.
The ice cream melts slightly, creating a rich, gooey topping.
Final Thoughts
Marshmallow ice cream is a must-try for anyone who loves sweet, creamy treats with a hint of nostalgia.
Whether enjoyed on its own, in a sundae, or as part of a s’mores-inspired dessert, it’s sure to bring joy with every bite.
This easy recipe is perfect for both beginners and seasoned home chefs.
With a few simple ingredients and steps, you can create a smooth, fluffy, and irresistibly delicious homemade ice cream.
Frequently Asked Questions (FAQ)
1. Can I use marshmallow fluff instead of mini marshmallows?
Yes! Marshmallow fluff works just as well.
Substitute 1 cup of marshmallow fluff for every 2 cups of mini marshmallows, and follow the same melting steps.
2. How long does homemade marshmallow ice cream last?
When stored properly in an airtight container, it can last up to 2 weeks in the freezer.
To maintain freshness, press a piece of plastic wrap directly onto the surface before sealing the container.
3. Can I toast the marshmallows before adding them to the mixture?
Absolutely! Toasting the marshmallows adds a delicious caramelized depth to the flavor.
Simply spread them on a baking sheet and broil for 1-2 minutes until golden brown before melting them into the milk.
4. Can I make this ice cream without dairy?
Yes! Use full-fat coconut milk or almond milk instead of dairy milk and replace heavy cream with a dairy-free whipping alternative.
The texture may be slightly different but still delicious.
5. My ice cream turned out too hard—how do I fix it?
Homemade ice cream can firm up more than store-bought versions.
Let it sit at room temperature for 5-10 minutes before scooping, or add 1 tablespoon of corn syrup to the mixture before freezing to keep it softer.

Marshmallow Ice Cream
Equipment
- 1 Medium Saucepan – To melt the marshmallows
- 1 Whisk – For mixing the ice cream base
- 1 Mixing Bowl – To combine the ingredients
- 1 Ice Cream Maker (optional) – For a churned version
- 1 Hand Mixer or Stand Mixer (for no-churn method) – To whip the cream
- 1 Airtight Container – For freezing and storage
- 1 Rubber Spatula – To fold ingredients smoothly
Ingredients
Main Ingredients:
- 2 cups heavy whipping cream
- 1 cup whole milk
- ¾ cup granulated sugar
- 2 cups mini marshmallows or 1 cup marshmallow fluff
- 1 teaspoon vanilla extract
Optional Add-Ins:
- ½ cup chocolate chips or fudge swirls
- ½ cup crushed graham crackers
- ½ cup toasted marshmallows
- ¼ cup fruit puree strawberry, raspberry, or mango
Instructions
Step 1: Prepare the Marshmallow Base
- In a medium saucepan, add mini marshmallows and milk.
- Heat over low heat, stirring constantly until the marshmallows fully melt into the milk.
- Remove from heat and let the mixture cool to room temperature.
Step 2: Make the Ice Cream Mixture
- In a mixing bowl, whisk together heavy cream, sugar, and vanilla extract until sugar dissolves.
- Slowly pour in the cooled marshmallow mixture, whisking until fully combined.
Step 3: Churn or No-Churn Method
- Churn Method (Using an Ice Cream Maker):
- Pour the mixture into an ice cream maker and churn according to the manufacturer’s instructions (usually 20-25 minutes).
- Transfer to an airtight container and freeze for at least 4 hours until firm.
- No-Churn Method (Without an Ice Cream Maker):
- In a separate bowl, use a hand mixer or stand mixer to whip 1 cup of heavy cream until stiff peaks form.
- Gently fold the whipped cream into the marshmallow mixture to keep it light and airy.
- Pour into a loaf pan or airtight container, cover, and freeze for 4-6 hours, stirring every 30 minutes for the first 2 hours.
Step 4: Freeze and Serve
- Once frozen, let the ice cream sit at room temperature for 5 minutes before scooping.
- Serve as is or with chocolate drizzle, graham crackers, or toasted marshmallows for extra flavor!
Notes
- For a toasted marshmallow flavor, broil marshmallows on a baking sheet for 1-2 minutes before adding them to the mixture.
- To prevent ice crystals, press plastic wrap directly onto the ice cream’s surface before freezing.
- If ice cream becomes too hard, let it sit out for 5-10 minutes before scooping.
- Store in an airtight container for up to 2 weeks.
