All products are selected by our editorial team for quality. If you buy through our links, we may earn a small commission at no extra cost to you.
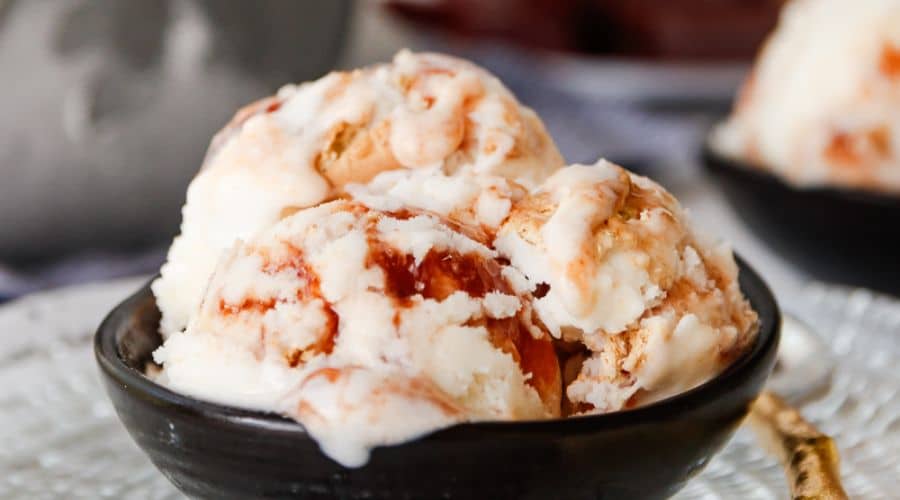
Nothing beats the taste of fresh, homemade guava ice cream—a creamy, tropical delight that’s bursting with fruity flavor.
If you love exotic fruits and refreshing desserts, this recipe is a must-try! Guavas have a unique aroma and natural sweetness that make them perfect for ice cream.
This recipe is simple, requires just a few ingredients, and can be made with or without an ice cream maker.
Whether you’re looking for a cool summer treat or a unique dessert to impress guests, this guava ice cream is sure to be a hit.

Why You’ll Love This Guava Ice Cream
1. Bursting with Tropical Flavor
Guava has a naturally sweet and floral taste, making this ice cream a refreshing twist on classic flavors like vanilla or chocolate.
It’s like taking a bite of summer in every scoop!
2. Smooth and Creamy Texture
Thanks to a rich base of heavy cream and milk, this ice cream is irresistibly smooth.
You’ll get a velvety texture that melts in your mouth, making it a true indulgence.
3. Easy to Make at Home
No need for fancy equipment! While an ice cream maker helps achieve a professional texture, the no-churn method works just as well.
With a few simple steps, you can enjoy homemade guava ice cream anytime.
4. Naturally Sweet and Refreshing
Since guavas are naturally sweet, this recipe requires less added sugar.
Plus, the fruit’s slight tartness balances the sweetness, creating a perfectly refreshing dessert.
5. A Unique and Exotic Dessert
Tired of the same old ice cream flavors? Guava ice cream offers something different.
It’s a great way to introduce friends and family to tropical flavors they might not have tried before.
Ingredients You’ll Need
To make this creamy and flavorful guava ice cream, you’ll need a handful of simple ingredients.
Using ripe guavas will give you the best taste and aroma, ensuring a perfect balance of sweetness and tartness.
Main Ingredients:
- 4–5 ripe guavas – Fresh guavas work best, but frozen can be used if necessary.
- 1 cup heavy cream – Provides a rich, creamy texture.
- 1 cup whole milk – Helps balance the consistency.
- ½ cup sugar (or honey) – Adjust based on the sweetness of your guavas.
- 1 teaspoon vanilla extract – Enhances the fruity flavors.
- 1 tablespoon lemon juice – Adds a slight tang and prevents the guavas from browning.
Optional Ingredients for Extra Creaminess:
- ½ cup sweetened condensed milk – For a richer, denser texture.
- A pinch of salt – Enhances the overall flavor.
Now that you have everything ready, let’s get started!
Step-by-Step Instructions to Make Guava Ice Cream

Step 1: Prepare the Guava Puree
- Select and Wash the Guavas – Choose ripe guavas that are slightly soft to the touch. Wash them thoroughly to remove any dirt.
- Cut and Remove Seeds – Slice the guavas in half and scoop out the seeds using a spoon. This ensures a smooth puree.
- Blend into a Puree – Add the guava flesh to a blender along with lemon juice and blend until smooth. If you prefer a silky texture, strain the puree through a fine mesh sieve to remove any remaining bits.
Step 2: Make the Ice Cream Base
- Heat the Milk and Sugar – In a saucepan over low heat, combine whole milk and sugar. Stir until the sugar dissolves completely (do not boil).
- Mix in Heavy Cream and Vanilla – Remove from heat and add the heavy cream, vanilla extract, and guava puree. Stir well until everything is combined.
- Taste and Adjust – If needed, add more sugar or a pinch of salt to enhance the flavors.
Step 3: Churn or No-Churn Method
Churn Method (Using an Ice Cream Maker)
- Pour the mixture into an ice cream maker and churn according to the manufacturer’s instructions.
- Once thick and creamy, transfer to a lidded container and freeze for at least 4 hours.
No-Churn Method (Without an Ice Cream Maker)
- Pour the mixture into a shallow dish and place it in the freezer.
- Every 30 minutes, stir vigorously with a fork or whisk to break up ice crystals. Repeat this process for 3–4 hours until creamy.
After freezing, your homemade guava ice cream is ready to enjoy! Scoop it into bowls or cones and savor the tropical goodness.
Tips for the Best Guava Ice Cream
1. Choose Ripe and Fragrant Guavas
For the best flavor, use ripe guavas that are soft to the touch and have a strong, sweet aroma.
Overripe guavas work well too, as they are naturally sweeter and more flavorful.
2. Strain the Guava Puree for a Smoother Texture
Guava seeds can be hard and grainy, so for an ultra-smooth ice cream, strain the blended guava puree through a fine-mesh sieve.
This step ensures a silky consistency without any grittiness.
3. Adjust Sweetness Based on Your Guavas
Guavas vary in sweetness, so taste your puree before adding sugar.
If your guavas are very sweet, reduce the sugar slightly to avoid an overpowering taste.
Conversely, if they’re slightly tart, a little extra sugar or honey can balance the flavor.
4. Enhance the Flavor with Citrus or Spices
A touch of lemon or lime juice brightens the guava flavor, making it more vibrant.
For a warm depth of flavor, consider adding a pinch of cinnamon or nutmeg to complement the tropical notes.
5. Use an Ice Cream Maker for the Best Texture
An ice cream maker helps incorporate air, resulting in a light and creamy texture.
However, if you’re using the no-churn method, be sure to stir frequently while freezing to break up ice crystals.
6. Store It Properly for Freshness
Homemade guava ice cream stays fresh for up to two weeks in an airtight container.
To prevent freezer burn, press a piece of parchment paper directly onto the surface before sealing the lid.
Serving Suggestions
1. Classic Scoop in a Bowl or Cone
Enjoy this creamy guava ice cream on its own in a bowl or a crisp waffle cone.
The natural fruitiness makes it a delightful treat without needing extra toppings.
2. Pair It with Fresh Fruits
Enhance the tropical experience by serving guava ice cream with sliced mangoes, pineapples, or bananas. The combination of flavors creates a refreshing and exotic dessert.
3. Drizzle with Toppings
Take your ice cream to the next level with these delicious toppings:
- Honey or caramel sauce for extra sweetness.
- Toasted coconut flakes for a crunchy contrast.
- Chopped nuts (almonds, cashews, or pistachios) for added texture.
4. Make a Guava Ice Cream Milkshake
Blend a scoop of guava ice cream with a splash of milk for a creamy, tropical milkshake.
You can even add a banana for an extra fruity twist.
5. Serve with Warm Desserts
Pair guava ice cream with warm pastries, crepes, or sponge cakes for a delicious contrast of hot and cold textures.
It also goes beautifully with tres leches cake or a warm churro.
Conclusion & Final Thoughts
Homemade guava ice cream is a creamy, refreshing treat that captures the essence of tropical flavors.
Whether you use an ice cream maker or opt for the no-churn method, this dessert is easy to make and absolutely delicious.
The natural sweetness and slight tartness of guava create a perfect balance, making it a standout choice for fruit lovers.
Now that you have the perfect guava ice cream recipe, it’s time to try it for yourself! Serve it on a hot summer day, pair it with your favorite desserts, or enjoy it as a midnight snack.
However you choose to indulge, this tropical delight is bound to impress.
Frequently Asked Questions (FAQs)
1. Can I use frozen guavas instead of fresh ones?
Yes! If fresh guavas aren’t available, frozen guavas work well. Just let them thaw slightly before blending.
The flavor remains just as delicious, though fresh guavas tend to have a stronger aroma.
2. How long does homemade guava ice cream last?
When stored properly in an airtight container, guava ice cream stays fresh for up to two weeks.
To prevent ice crystals, place a layer of parchment paper or plastic wrap directly on the surface before sealing the lid.
3. Can I make this ice cream dairy-free?
Absolutely! Substitute coconut milk and coconut cream for the whole milk and heavy cream.
The result is a rich, tropical, dairy-free guava ice cream that’s just as creamy and flavorful.
4. Why is my guava ice cream icy instead of creamy?
This usually happens if there’s too much water content in the mixture. To avoid iciness:
- Use ripe guavas with less water.
- Add sweetened condensed milk or cornstarch to help prevent ice crystals.
- If using the no-churn method, stir every 30 minutes while freezing.
5. Can I mix guava with other fruits for a unique flavor?
Yes! Guava pairs beautifully with mango, passion fruit, pineapple, and even strawberries.
You can blend them together for a tropical fruit fusion or swirl in a fruit puree for a marbled effect.

Guava Ice Cream
Equipment
- 1 Blender – For making smooth guava puree
- 1 Fine-Mesh Sieve – Optional, for straining guava puree
- 1 Medium Saucepan – To heat the milk and dissolve sugar
- 1 Mixing Bowl – To combine the ingredients
- 1 Ice Cream Maker (optional, for churning)
- 1 Freezer-safe container (for storing the ice cream)
- 1 Whisk or Spoon – To mix the ingredients
Ingredients
- 4 –5 about 2 cups ripe guavas, peeled and deseeded
- 1 cup heavy cream
- 1 cup whole milk
- ½ cup sugar adjust based on guava sweetness
- 1 teaspoon vanilla extract
- 1 tablespoon lemon juice
- ½ cup sweetened condensed milk optional, for extra creaminess
- A pinch of salt to enhance flavors
Instructions
Step 1: Prepare the Guava Puree
- Wash the guavas thoroughly and peel them.
- Cut them in half, scoop out the seeds, and discard them.
- Blend the guava flesh with lemon juice until smooth.
- If you prefer a silky texture, strain the puree through a fine-mesh sieve.
Step 2: Make the Ice Cream Base
- In a medium saucepan over low heat, combine whole milk and sugar, stirring until the sugar dissolves (do not boil).
- Remove from heat and mix in heavy cream, vanilla extract, guava puree, and a pinch of salt. Stir well.
- If using condensed milk, add it now for extra creaminess.
Step 3: Churn or No-Churn Method
- Churn Method (Using an Ice Cream Maker)
- Pour the mixture into an ice cream maker and churn according to the manufacturer’s instructions (usually 20–30 minutes).
- Transfer to a freezer-safe container, cover, and freeze for at least 4 hours before serving.
- No-Churn Method (Without an Ice Cream Maker)
- Pour the mixture into a shallow container and freeze.
- Every 30 minutes, stir vigorously with a fork or whisk to break up ice crystals.
- Repeat this process for 3–4 hours, or until smooth and creamy.
Step 4: Serve and Enjoy!
- Let the ice cream sit at room temperature for 5 minutes before scooping.
- Serve in bowls or cones and enjoy the tropical flavors!
Notes
- For a Dairy-Free Version: Substitute coconut milk and coconut cream for milk and heavy cream.
- Enhance Flavor: A small pinch of cinnamon or nutmeg adds warmth to the tropical taste.
- Guava Substitutes: If guavas are unavailable, try using mango, passion fruit, or strawberries for a different tropical twist.
- Storage Tips: Store in an airtight container for up to 2 weeks. Prevent ice crystals by pressing parchment paper onto the surface before sealing.


