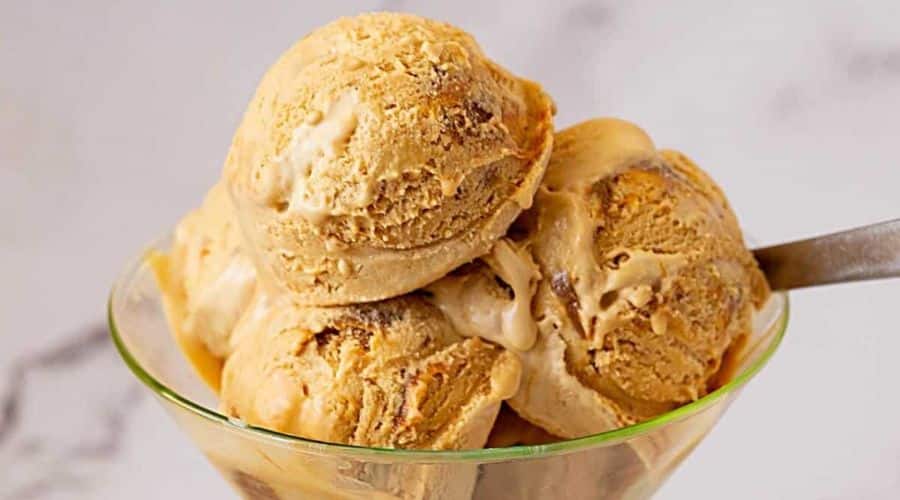
If you’ve never tasted dulce de leche ice cream, prepare to fall in love with this luscious, creamy treat.
Inspired by the sweet, caramelized milk spread that’s beloved across Latin America and beyond, this ice cream is a true indulgence.
The rich, golden flavor of dulce de leche blends seamlessly into the smooth, velvety texture of homemade ice cream, making it a perfect dessert for any occasion.
Whether you’re looking for a unique addition to your dessert repertoire or simply craving something sweet and creamy, this dulce de leche ice cream recipe is bound to impress.
Not only does it boast a comforting, familiar flavor, but it’s also incredibly easy to make at home with just a few simple ingredients.
The best part? You can enjoy the magic of homemade ice cream without needing to rely on store-bought options. Get ready to dive into the sweet world of dulce de leche in its most delightful form!

Ingredients You’ll Need for Dulce de Leche Ice Cream
Creating this indulgent dulce de leche ice cream requires only a handful of ingredients, most of which you likely already have in your kitchen.
Here’s everything you’ll need to make this creamy, sweet dessert from scratch:
Essential Ingredients for the Base
- Dulce de Leche: The star of this recipe! You can find store-bought dulce de leche, or if you’re feeling adventurous, make your own by simmering sweetened condensed milk until it turns into a thick, golden caramel spread. This ingredient provides the signature sweetness and flavor that defines the ice cream.
- Heavy Cream: Heavy cream is what gives the ice cream its richness and creamy texture. The higher fat content helps create a smooth, silky base that ensures each scoop is decadently satisfying.
- Whole Milk: Whole milk adds balance and lightness to the ice cream base, preventing it from being too heavy while still giving it a luscious texture.
- Sugar: A little sugar goes a long way in enhancing the flavor and sweetness of the ice cream. Since dulce de leche is already quite sweet, we use a modest amount to complement it perfectly.
- Egg Yolks: Egg yolks are essential for a custard-style ice cream base. They help thicken the mixture and create that signature creamy texture. If you’re aiming for a more traditional, smooth ice cream, don’t skip this ingredient!
Optional Toppings or Add-ins
- Chopped Nuts (Optional): For a bit of texture and crunch, you can add some chopped nuts like almonds or pecans. They’ll add a delicious contrast to the creamy base.
- Chocolate Chips or Swirl (Optional): If you’re a fan of chocolate and dulce de leche together, consider folding in some mini chocolate chips or even swirling in extra chocolate sauce for a decadent flavor combination.
- A Pinch of Salt (Optional): A tiny pinch of sea salt can elevate the flavors of the dulce de leche, bringing out the sweetness while balancing the richness of the ice cream.
How to Make Dulce de Leche Ice Cream from Scratch

Making dulce de leche ice cream from scratch is easier than you might think, especially if you have an ice cream maker.
Follow these simple steps for a delicious, homemade treat!
Step 1: Prepare the Custard Base
Start by making the custard base for your ice cream. In a medium saucepan, combine the whole milk and heavy cream.
Heat the mixture over medium heat, stirring occasionally, until it’s warm but not boiling. You want it to be hot enough to dissolve the sugar, but not so hot that it scalds.
In a separate bowl, whisk the egg yolks and sugar together until the mixture becomes pale and slightly thickened. This will help create a rich, smooth texture in the ice cream.
Gradually pour about a third of the warm milk and cream mixture into the egg yolks while whisking continuously. This process, called tempering, prevents the eggs from scrambling.
Once the eggs have been tempered, slowly pour the egg mixture back into the saucepan with the remaining milk and cream.
Cook the custard over medium-low heat, stirring constantly, until it thickens enough to coat the back of a spoon.
This should take about 8-10 minutes. Be patient, as rushing this step can result in an undercooked custard.
Step 2: Add Dulce de Leche
Now that your custard is ready, it’s time to add the dulce de leche. Remove the saucepan from the heat and whisk in the dulce de leche until fully incorporated.
The dulce de leche will melt into the custard, turning it into a rich, caramel-flavored base. If you’d like a smoother consistency, you can strain the mixture to remove any bits of cooked egg or impurities, though this is optional.
Let the custard cool to room temperature, then cover it and refrigerate it for at least 4 hours, or overnight, to chill thoroughly. This ensures the ice cream base is cold and ready for churning.
Step 3: Churn the Ice Cream
Once the custard has chilled, it’s time to churn the ice cream. Pour the cold mixture into your ice cream maker and churn according to the manufacturer’s instructions.
This usually takes about 20-25 minutes, depending on your machine. As the ice cream churns, it will thicken and take on a soft, scoopable texture.
Step 4: Freeze the Ice Cream
After churning, the ice cream will have a soft-serve consistency. For a firmer texture, transfer the ice cream to an airtight container and freeze it for at least 4 hours, or until it hardens to your desired consistency.
Tips for the Perfect Dulce de Leche Ice Cream
Making homemade ice cream can sometimes be tricky, but with these tips, you’ll get a perfect batch every time!
Achieving a Creamy Texture
To achieve that perfectly smooth and creamy ice cream, ensure that your custard doesn’t overcook during the stovetop step. If it becomes too thick or curdles, it could lead to a grainy texture once frozen. Keep the heat low and stir gently but consistently to avoid this.
Another trick for a smoother ice cream is to cool the custard completely before churning. Chilling it thoroughly before you start the churning process helps prevent ice crystals from forming, leading to a smoother final product.
Prevent Ice Crystals from Forming
Homemade ice cream can sometimes develop ice crystals if not churned properly. To avoid this, make sure your ice cream maker’s bowl is completely frozen if it’s a freezer bowl type. This ensures that the mixture freezes evenly and forms a smooth texture.
Additionally, be sure to churn the ice cream for the recommended time. Churning incorporates air into the mixture, giving it that airy, fluffy texture. If you stop too soon, the ice cream may end up too dense.
Make Sure to Use Full-Fat Ingredients
For the creamiest results, always use full-fat dairy products. This includes whole milk and heavy cream. Low-fat alternatives can alter the texture and mouthfeel, leaving your ice cream less rich and smooth.
Storing Your Ice Cream
Homemade ice cream is best enjoyed within a week or two of making it. To store, transfer the ice cream to an airtight container, and smooth the top to remove air pockets. If you want to prevent the ice cream from developing a hard, icy crust, press a layer of plastic wrap directly onto the surface before sealing the container.
Ways to Serve and Enjoy Dulce de Leche Ice Cream
Dulce de leche ice cream is a treat on its own, but you can elevate the experience with a few creative serving ideas.
Here’s how to enjoy it to the fullest:
Scoop it into Cones or Bowls
The simplest and most satisfying way to enjoy your homemade dulce de leche ice cream is by scooping it into a crispy cone or a chilled bowl. The caramelized sweetness of the ice cream pairs perfectly with the crunch of the cone, while a bowl lets you savor every bite with minimal distractions.
Drizzle Extra Dulce de Leche on Top
If you want to amplify the flavor, drizzle a little extra dulce de leche on top of your scoops. This adds an extra layer of sweetness and richness that will please any caramel lover. For a more decadent touch, warm the dulce de leche slightly and pour it in a glossy ribbon over the ice cream.
Add Chopped Nuts for Texture
If you’re craving some crunch, add chopped nuts like toasted almonds, pecans, or walnuts on top of your ice cream. The nutty flavor and texture balance out the creaminess of the ice cream, making every bite a bit more exciting.
Pair with Other Desserts
Dulce de leche ice cream can also be paired with other desserts to create a more indulgent experience. Try it alongside warm brownies, a slice of apple pie, or even draped over a piece of rich chocolate cake.
The ice cream can act as the perfect complement to any baked good, enhancing its flavor and providing a cool contrast.
Make a Sundae
Turn your ice cream into a full sundae experience by adding chocolate or caramel sauce, whipped cream, or a sprinkle of chocolate chips. You could even add a cherry on top for the ultimate indulgent dessert.
There are endless ways to create a personalized sundae with dulce de leche ice cream as the base.
Conclusion
Making dulce de leche ice cream at home is a fun and rewarding process, and the result is an irresistibly creamy, sweet treat that will leave everyone asking for more.
With just a few ingredients and simple steps, you can create a dessert that is as rich and flavorful as anything you’d find in a specialty ice cream shop.
Whether you serve it in a cone, topped with extra dulce de leche, or as part of a sundae, this ice cream offers endless ways to enjoy its smooth, caramelized goodness.
You’ll never look at store-bought ice cream the same way again, especially after tasting the homemade version of this indulgent treat.
Frequently Asked Questions
1. Can I make Dulce de Leche Ice Cream without an ice cream maker?
Yes! If you don’t have an ice cream maker, you can still make this dulce de leche ice cream. After preparing the custard and adding the dulce de leche, transfer the mixture to a shallow dish and place it in the freezer.
Every 30 minutes, use a fork to scrape and stir the mixture to break up any ice crystals. Do this for about 3-4 hours until it reaches the desired consistency.
2. Can I make my own dulce de leche for this recipe?
Absolutely! To make homemade dulce de leche, simply simmer a can of sweetened condensed milk in a double boiler for 1-2 hours, stirring occasionally, until it thickens and turns golden brown.
Be sure to remove it from the heat once it reaches your desired caramel-like consistency, and let it cool before adding it to your ice cream base.
3. How long does this ice cream last in the freezer?
Homemade ice cream is best enjoyed within 1-2 weeks for the freshest taste and texture. Over time, it can become icy or lose its creamy consistency. Be sure to store it in an airtight container to keep it as fresh as possible.
4. Can I make a dairy-free version of dulce de leche ice cream?
Yes, you can make a dairy-free version by substituting the whole milk and heavy cream with plant-based alternatives such as coconut milk or almond milk. For the dulce de leche, use a dairy-free sweetened condensed milk to keep the flavor intact while making it suitable for those with dairy restrictions.
5. Can I add other mix-ins, like chocolate or fruits, to the ice cream?
Definitely! Feel free to customize your dulce de leche ice cream with mix-ins such as chocolate chips, swirl in a bit of fudge, or even add fresh fruit like berries or banana slices.
If you choose to add chocolate, nuts, or fruit, make sure to fold them in gently after the ice cream has been churned, before you freeze it.

Dulce De Leche Ice Cream
Equipment
- 1 ice cream maker (optional)
- 1 medium saucepan
- (1) Whisk
- 1 mixing bowl
- 1 Fine-Mesh Strainer (optional)
- 1 airtight container (for freezing)
- 1 Measuring Cups & Spoons
Ingredients
- 1 can 14 oz of Dulce de leche
- 1 ½ cups of Heavy cream
- 1 cup of Whole milk
- 4 Egg yolks
- ¾ cup of Sugar
- 1 tsp of Vanilla extract optional
- A pinch of Salt optional
Instructions
Prepare the Custard Base:
- In a medium saucepan, combine the heavy cream and whole milk. Heat over medium, stirring occasionally, until the mixture is warm (not boiling).
Whisk the Egg Yolks and Sugar:
- In a separate mixing bowl, whisk together the egg yolks and sugar until pale and slightly thickened.
Temper the Egg Yolks:
- Gradually add a small amount of the warm cream mixture to the egg yolks, whisking constantly to avoid curdling. Once the yolks are tempered, slowly pour the egg yolk mixture back into the saucepan with the remaining cream mixture.
Cook the Custard:
- Return the saucepan to medium-low heat and cook, stirring constantly, until the custard thickens enough to coat the back of a spoon (about 8-10 minutes).
Add Dulce de Leche:
- Remove the saucepan from the heat and whisk in the dulce de leche until fully combined. Optionally, strain the mixture to ensure smoothness.
Chill the Custard:
- Allow the custard to cool to room temperature, then cover it and refrigerate for at least 4 hours or overnight.
Churn the Ice Cream:
- Once chilled, pour the custard into your ice cream maker and churn according to the manufacturer’s instructions. This typically takes 20-25 minutes.
Freeze the Ice Cream:
- Transfer the ice cream to an airtight container and freeze for at least 4 hours or until firm.
Serve and Enjoy:
- Scoop the ice cream into cones, bowls, or use it as a topping for other desserts. Optionally, drizzle with extra dulce de leche or add toppings like chopped nuts.
Notes
- Dulce de Leche Variations: You can use store-bought dulce de leche for convenience or make your own by simmering sweetened condensed milk for 1-2 hours until thick and caramelized.
- Ice Cream Maker: If you don’t have an ice cream maker, you can still make this ice cream by freezing the custard in a shallow container and stirring every 30 minutes until it reaches the desired consistency.
- Storage: Store the ice cream in an airtight container for up to 1-2 weeks. To prevent ice crystals from forming, smooth the top before sealing the container.
- Customizations: You can add chocolate chips, toasted nuts, or a swirl of extra caramel to enhance the flavor.


