This Sweet Corn Ice Cream with Salted Caramel transforms simple corn into a luxuriously creamy dessert with rich, golden caramel swirls.
Packed with natural sweetness and wholesome ingredients, it delivers a satisfying dose of protein and fiber while keeping saturated fats moderate.
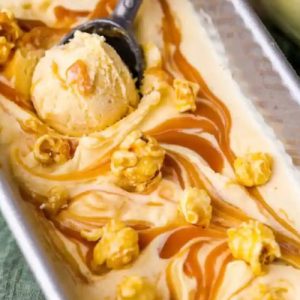
Smooth, naturally sweet, and delightfully crunchy with optional caramel corn, it’s perfect for everyday indulgence, entertaining, or meal-prep-friendly dessert servings.
Sweet Corn Ice Cream
Equipment
- Blender (1)
- Fine-mesh sieve – 1
- Heatproof bowls (2–3)
- Medium Saucepan – 1
- Heavy-bottomed large pot (1)
- Ice cream maker attachment (1, Kitchenaid or equivalent)
Ingredients
Sweet Corn Ice Cream
- 1 ear sweet yellow corn husked
- 1 cup whole milk 240 ml
- 2 cups heavy cream 500 ml, divided
- ¾ cup granulated sugar 165 g
- 1 teaspoon vanilla extract
- ½ teaspoon kosher salt ¼ teaspoon if using table salt
- 4 large egg yolks
- 2 tablespoons popcorn kernels 28 g
- ¼ cup caramel corn optional garnish
Salted Caramel with Bay Leaf
- 1 cup granulated sugar 200 g
- ½ teaspoon lemon juice
- 6 tablespoons unsalted butter 85 g, room temperature, cut into pieces
- ½ cup heavy cream 120 ml, room temperature
- 1 teaspoon kosher salt ½ teaspoon if using table salt
- 2 bay leaves
Instructions
- Preheat and Prepare for Roasting: Begin by preheating your oven to 400°F (200°C). Line a baking sheet with foil or parchment paper to prevent sticking and make cleanup easier. This step ensures your corn husks roast evenly and develop a delicate, nutty flavor that will enhance the ice cream later.
- Separate Corn Components: Carefully shuck the ear of corn, removing all outer husks. Inspect for any damaged or blemished leaves and discard them. Next, gently separate the corn silk, kernels, and cob, keeping each component aside in separate bowls. Each part of the corn will contribute different layers of flavor to the ice cream, so reserving them individually is key.
- Roast the Corn Husks: Place the cleaned corn husks on the prepared baking sheet. Roast in the oven for 13–15 minutes, flipping halfway through to ensure even browning. The husks should become golden and slightly crisp. Roasting brings out a subtle caramelized note that infuses the custard with a richer aroma.
- Pop the Popcorn Kernels: While the husks are roasting, prepare popcorn from the kernels. You can use a microwave-safe popcorn popper or a small pot on the stove with minimal oil. Pop until most kernels are open and golden. Freshly popped popcorn adds a light, toasted corn flavor that deepens the overall taste of the ice cream.
- Blend the Corn Custard Base: In a blender, combine the following: Freshly popped popcorn, Corn kernels, Whole milk, 1 cup of heavy cream, Sugar, Vanilla extract, Salt. Blend the mixture just until smooth, avoiding over-blending, which can turn the custard frothy. This step ensures the corn flavor is fully incorporated into a creamy, smooth base while keeping a natural texture.
- Heat the Corn Mixture: Pour the blended corn mixture into a medium saucepan and set over medium heat. Stir occasionally until the mixture reaches a gentle simmer and the sugar has completely dissolved. Be careful not to let it boil too rapidly, as this can create uneven texture in your custard.
- Temper the Egg Yolks: In a heatproof bowl, whisk the egg yolks continuously. Slowly stream in the warm corn mixture while whisking constantly. This technique, called tempering, prevents the eggs from scrambling and ensures a silky custard. Once fully combined, pour the mixture back into the saucepan.
- Cook the Custard: Return the saucepan to medium-low heat. Whisk continuously as the mixture thickens. Cook until it coats the back of a spoon or reaches 170°F (77°C) on an instant-read thermometer. This step forms a custard that is rich, creamy, and smooth, providing the perfect base for the ice cream.
- Infuse Roasted Corn Elements: Remove the saucepan from heat.Stir in the remaining 1 cup of heavy cream, along with the roasted corn husks, silk, and cob. These ingredients impart a gentle roasted corn aroma and flavor, elevating the custard to a multi-layered, aromatic profile. Cover the mixture and refrigerate overnight, allowing the flavors to meld and the custard to chill thoroughly.
- Prepare the Salted Caramel: In a heavy-bottomed saucepan, combine sugar and lemon juice over medium heat, stirring constantly until fully melted. Once melted, carefully add the butter in pieces, whisking until incorporated. Slowly pour in the heavy cream while stirring. Continue stirring and then boil for 1 minute, or until the caramel reaches 220°F (104°C). Remove from heat, stir in the salt, and add bay leaves for infusion. Cool to room temperature before removing the leaves.
- Strain the Custard: After chilling overnight, strain the custard through a fine mesh sieve into a clean bowl. Discard solids such as husks and silk. This creates a perfectly smooth custard base for your ice cream, free from any gritty textures, ensuring a creamy, luxurious finish.
- Churn the Ice Cream: Pour the strained custard into your ice cream maker. Churn according to the manufacturer’s instructions until it reaches soft-serve consistency (approximately 30 minutes on a low setting for the Kitchenaid attachment). The churning process incorporates air, creating a light and creamy texture.
- Layer with Salted Caramel: Transfer a portion of the churned ice cream into your freezer-safe container. Drizzle cooled salted caramel over the surface, then add another layer of ice cream and repeat to create swirls. Optional: sprinkle with caramel corn for added texture. Cover tightly with a lid or plastic wrap.
- Freeze Until Firm: Freeze the layered ice cream for at least 4 hours, preferably overnight, until firm. This step allows the flavors to fully develop and the texture to stabilize for perfect scooping.
- Serve and Enjoy: When ready to serve, scoop into bowls or cones and drizzle with extra salted caramel. This ice cream delivers a rich, creamy, sweet corn flavor with hints of roasted notes and indulgent caramel, making it a show-stopping dessert for any occasion.
Notes
- For best results, always chill the custard completely before churning; a temperature of around 40°F (4–5°C) ensures smooth, creamy ice cream and prevents icy textures.
- Roasting the corn husks and silk adds depth and a subtle toasted flavor to the ice cream; don’t skip this step.
- Use freshly popped popcorn for the base—it provides a gentle roasted corn aroma that pre-packaged popcorn cannot replicate.
- When making caramel, adding the lid while melting sugar can help prevent crystallization, keeping the sauce silky and smooth.
- Optional garnishes like caramel corn or a light sprinkle of coarse salt enhance both texture and flavor contrast for a more visually appealing dessert.
Chef’s Secrets: Elevating Corn Ice Cream Flavor
To make this ice cream truly exceptional, consider layering flavors and textures.
Roasting the corn husks and silk before infusing them into the custard releases nutty, aromatic notes that enhance the natural sweetness.
Tempering the egg yolks carefully ensures a silky, smooth base without curdling.
For the caramel, incorporating bay leaves during cooling adds a subtle herbal undertone that balances the sweetness beautifully.
Finally, swirling in the salted caramel during layering creates a visually stunning dessert with rich, decadent pockets of flavor in every bite.
Serving Suggestions: Creative Ways to Enjoy
This ice cream is versatile and pairs well with many accompaniments.
Serve in a classic ice cream bowl or cone, drizzle extra salted caramel, and sprinkle with caramel corn for a delightful crunch.
For an elevated presentation, pair it with a slice of warm apple pie, pound cake, or fresh berries.
It also works beautifully as part of a dessert platter or as a refreshing summer treat at gatherings.
Small, elegant scoops topped with a caramel drizzle make it suitable for dinner parties or celebratory occasions.
Storage Tips: Keep Ice Cream Fresh
Store the ice cream in an airtight, freezer-safe container to maintain texture and prevent freezer burn.
Layering parchment paper between the ice cream and the lid can further prevent ice crystals from forming.
For best flavor, consume within 2–3 weeks. The salted caramel can be stored separately in the refrigerator for up to 1 week and reheated gently before drizzling over the ice cream.
Avoid refreezing melted portions to preserve creaminess.
Frequently Asked Questions
1. Can I make this ice cream without an ice cream maker?
Yes! You can pour the chilled custard into a shallow, freezer-safe pan and stir vigorously every 30–40 minutes as it freezes.
This manual method incorporates air, helping maintain a creamy texture, though it may be slightly less smooth than a machine-churned version.
2. Is it possible to use frozen corn instead of fresh?
Absolutely. Use fresh-frozen corn kernels, thawed completely, for convenience.
While fresh corn gives the richest flavor, properly thawed frozen corn still produces a creamy, naturally sweet ice cream.
Roast the husks separately if available for added aroma.
3. Can I prepare the salted caramel ahead of time?
Yes, you can make the salted caramel 1–2 days in advance. Store it in a tightly sealed jar in the refrigerator.
Bring it to room temperature or gently warm before drizzling over ice cream to maintain a smooth, pourable consistency.
4. How do I prevent ice crystals in my ice cream?
Ensure the custard is thoroughly chilled before churning, avoid over-churning, and store in an airtight container.
Adding a swirl of salted caramel also helps improve texture by introducing sugar and fat, which reduce crystallization.
5. Can I make this recipe dairy-free?
Yes, by substituting whole milk with unsweetened plant milk (like oat or almond) and heavy cream with coconut cream, you can achieve a creamy texture.
Note that the flavor will shift slightly, but the corn and caramel combination remains deliciously rich and satisfying.
