Indulge in the creamy, silky richness of homemade French Vanilla Ice Cream, crafted with simple, fresh ingredients for a naturally delicious treat.
This classic dessert is high in protein and healthy fats from whole milk and cream, offering a satisfying indulgence with every scoop.
Quick to prepare and perfect for summer, it’s an easy, crowd-pleasing dessert for any occasion.
French Vanilla Ice Cream
Equipment
- 1 Ice cream maker with frozen bowl (1 unit)
- 1 Medium saucepan (1 unit)
- 1 Mixing bowl (1 unit)
- 1 Whisk (1 unit)
- 1 Fine-mesh strainer (1 unit)
- 1 Ladle (1 unit)
- 1 Airtight container for freezing (1 unit)
Ingredients
- 1 ½ cups whole milk
- 1 ½ cups heavy cream
- 1 vanilla bean split and seeds scraped (or 1 tsp vanilla extract)
- ⅛ teaspoon salt
- 4 large egg yolks
- ⅔ cup granulated sugar
Instructions
- Freeze the ice cream bowl: Start by placing the ice cream maker bowl in your freezer. This should be done at least overnight to ensure it’s completely frozen. A well-chilled bowl is essential for achieving smooth, creamy ice cream with a perfect texture.
- Warm the milk and cream: In a medium saucepan, combine 1 ½ cups whole milk and 1 ½ cups heavy cream.If using a vanilla bean, slice it lengthwise and scrape out the seeds, then add both the seeds and the pod to the milk mixture along with a pinch of salt. Heat over medium heat until the mixture begins to simmer, stirring occasionally to prevent scorching. This process takes about 10 minutes and helps infuse the milk with rich vanilla flavor.
- Whisk the egg yolks and sugar: While the milk mixture is warming, take 4 large egg yolks and ⅔ cup granulated sugar and whisk them together in a mixing bowl. Beat until the mixture becomes pale, thick, and slightly airy. This step ensures a smooth custard base, creating a luscious texture for the ice cream.
- Temper the eggs: To prevent the eggs from curdling, slowly add a few ladles of the hot milk mixture into the egg yolks while continuously whisking. This gradually warms the eggs and prepares them to combine safely with the remaining milk mixture. Once tempered, pour the rest of the milk mixture in and stir until fully incorporated.
- Cook the custard base: Return the tempered mixture to the saucepan and cook over low heat for about 10 minutes. Stir constantly and monitor the temperature; the custard is ready when it thickens slightly and reaches 170–175°F. This step ensures the eggs are fully cooked while maintaining a silky consistency.
- Strain the custard: Pour the cooked custard through a fine-mesh strainer into a clean mixing bowl. This removes any cooked egg bits and the vanilla pod, leaving a perfectly smooth base for your ice cream.
- Cool the mixture: Let the custard sit at room temperature for 30–40 minutes to slightly cool. Cover with plastic wrap and refrigerate for at least 2 hours or until thoroughly chilled. Chilling is key for a creamy, firm ice cream after churning.
- Churn the ice cream: Pour the chilled custard into the frozen ice cream maker bowl and churn according to your manufacturer’s instructions. The churning process mixes while freezing, breaking down ice crystals to achieve a smooth, creamy texture.
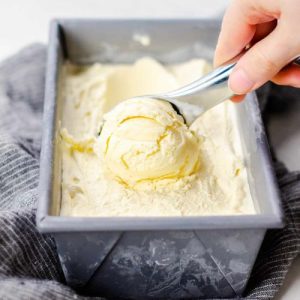
- Freeze before serving: Transfer the freshly churned ice cream into an airtight container. Freeze for several hours or overnight to allow it to firm up fully. Once frozen, scoop and enjoy the rich, silky French Vanilla Ice Cream you’ve made from scratch.
Notes
- Ice cream bowl preparation: Ensure your ice cream maker bowl is fully frozen, preferably overnight, for smooth, creamy results.
- Tempering is essential: Slowly adding hot milk to egg yolks prevents curdling and guarantees a silky custard base.
- Straining matters: Strain the cooked custard through a fine-mesh sieve to remove cooked egg bits and vanilla pods for a flawless texture.
- Use fresh ingredients: Fresh eggs, whole milk, and heavy cream provide the richest flavor and best consistency.
- Vanilla choice impacts flavor: A whole vanilla bean gives a deeper, aromatic flavor, but pure vanilla extract works as a convenient substitute.
- Chilling improves texture: Refrigerate the custard thoroughly before churning to ensure the ice cream sets properly.
- Freezing tips: Store in an airtight container to prevent ice crystals and preserve creamy texture.
Chef’s Secrets for Creamy Custard
The key to French Vanilla Ice Cream lies in its custard base.
Using high-quality whole milk and cream provides natural fats that make the ice cream silky.
Tempering the eggs carefully ensures a smooth texture without any lumps or curdled bits.
Patience is essential: cook the custard over low heat and chill it completely before churning.
Additionally, using a real vanilla bean elevates the flavor, adding tiny flecks of vanilla that create an authentic, gourmet appearance.
For extra richness, a pinch of salt balances the sweetness and enhances the depth of flavor.
Serving Suggestions for Maximum Enjoyment
French Vanilla Ice Cream is incredibly versatile.
Serve it in a classic cone for a nostalgic treat, or pair it with fresh fruit such as berries, mango, or sliced peaches.
It’s also perfect as a topping for warm desserts like apple pie, chocolate brownies, or molten lava cakes.
For a simple indulgence, drizzle with homemade caramel sauce or dark chocolate ganache.
A sprinkle of toasted nuts or a few fresh mint leaves adds texture and visual appeal, turning your homemade ice cream into an elegant dessert for entertaining.
Storage Tips for Long-Lasting Ice Cream
Proper storage ensures your ice cream stays smooth and creamy.
Always transfer the churned ice cream into a clean, airtight container and press a piece of parchment or plastic wrap directly onto the surface to minimize ice crystals.
Store in the back of the freezer rather than the door to maintain a consistent temperature.
Homemade ice cream is best consumed within 1–2 weeks, though it can last up to a month if stored carefully.
Allow it to sit at room temperature for a few minutes before scooping to soften slightly for perfect servings.
Frequently Asked Questions
1. Can I make this recipe without eggs?
Yes, you can make an eggless version using cornstarch or custard powder as a thickening agent.
However, eggs provide richness and creaminess that are difficult to replicate, so the texture may be slightly lighter.
2. Is it safe to eat the ice cream because of raw eggs?
Absolutely. By tempering the eggs and cooking the custard to 170–175°F, the eggs are fully cooked, making it completely safe to eat.
3. Can I use skim or plant-based milk?
Whole milk and heavy cream are essential for the creamy texture and rich flavor.
Skim or plant-based alternatives will change the texture and fat content, resulting in a less smooth ice cream.
4. How long should I churn the ice cream?
Churn according to your ice cream maker’s instructions, usually 20–30 minutes.
Churning helps incorporate air and breaks down ice crystals, resulting in a soft, creamy texture.
5. Can I add mix-ins like chocolate or nuts?
Yes! Add mix-ins during the last few minutes of churning to evenly distribute them without affecting the creamy consistency.
Popular options include chocolate chips, crushed cookies, or roasted nuts.
